A complete guide to installing Flutter in Android Studio on Windows, covering system requirements, environment configuration, plugin setup, and final verification using flutter doctor. This article offers a technical, step-by-step approach to help developers start building cross-platform apps from a single codebase.
Flutter is Google’s open-source framework for building natively compiled applications across mobile, web, and desktop from a single codebase. It enables developers to craft high-quality interfaces for iOS, Android, Windows, macOS, and Linux without rewriting platform-specific logic. For professionals handling scalable projects, this translates into faster development cycles and consistent user experiences. This guide walks you through installing Flutter in Android Studio on a Windows system—focusing on technical precision and real-world readiness.
Minimum System Requirements and Environment Preparation
Before you begin, ensure your development machine meets the following specifications. Proper system compatibility prevents common roadblocks during setup.
- Operating system: Windows 10 version 1803 or later (Windows 11 recommended).
- Processor: 64-bit architecture with Hyper-V support (required for the emulator).
- RAM: at least 8 GB; 16 GB is recommended when running the emulator alongside Android Studio.
- Storage: 4 GB of free space for the Flutter SDK, Android Studio, and additional tooling.
- Windows PowerShell 5.0 or newer (pre‑installed on Windows 10/11).
- Git for Windows 2.x for running Flutter commands and managing dependencies.
Additionally, you’ll need administrative privileges to modify system environment variables. Always run the command prompt or PowerShell as an administrator when executing installation commands.
Flutter boosts productivity by letting you maintain a single codebase for multiple platforms. A well-prepared environment eliminates unnecessary friction later in the development cycle.
Installing the Flutter SDK
The first step is to download and set up the Flutter SDK. Stick to the stable channel for production‑grade reliability and long‑term support.
- Visit the official Flutter SDK releases page and download the latest stable Windows zip file.
- Extract the archive to
C:\flutter. Avoid directories with restrictive permissions (likeProgram Files) to prevent permission issues later. - Add the Flutter binary folder to your system’s Path environment variable. Open System Properties → Advanced → Environment Variables. Under System variables, select Path and click Edit. Add
C:\flutter\binas a new entry.
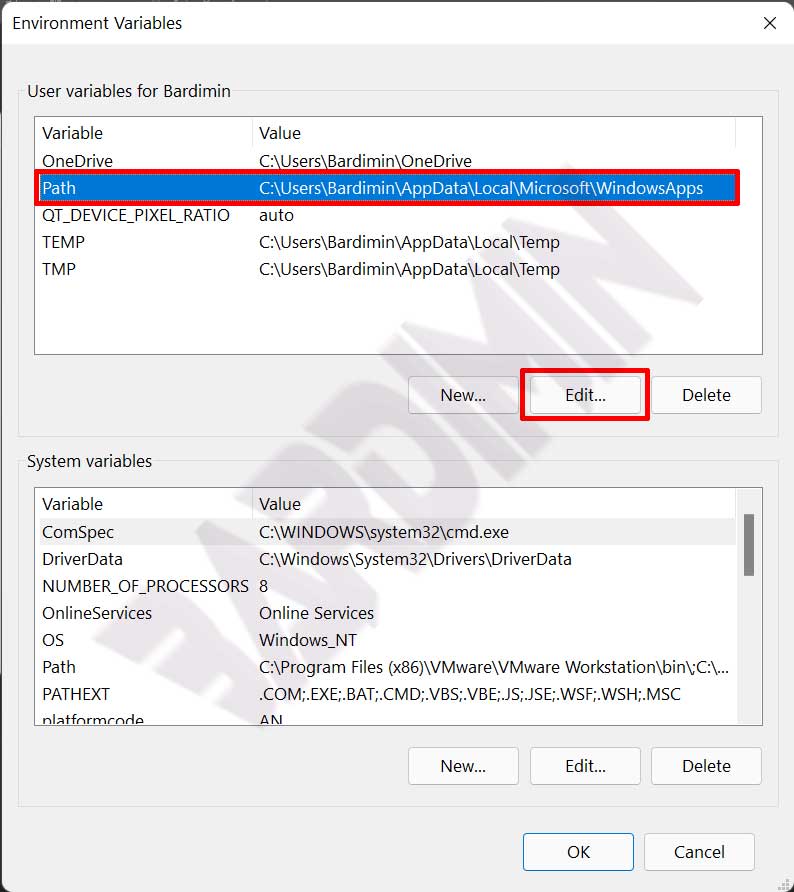
flutter command is globally accessible.After the change, open a new command prompt window and run flutter --version. If you see version details, the SDK is correctly detected. If not, double‑check the Path entry.
Quick verification: run echo %PATH% in the command prompt and confirm that C:\flutter\bin appears in the output.
Installing and Configuring Android Studio
Android Studio serves as the primary IDE for Flutter development. Follow these steps to integrate it smoothly.
- Download and install the latest version of Android Studio. Choose the full installation (includes the Android SDK and emulator).
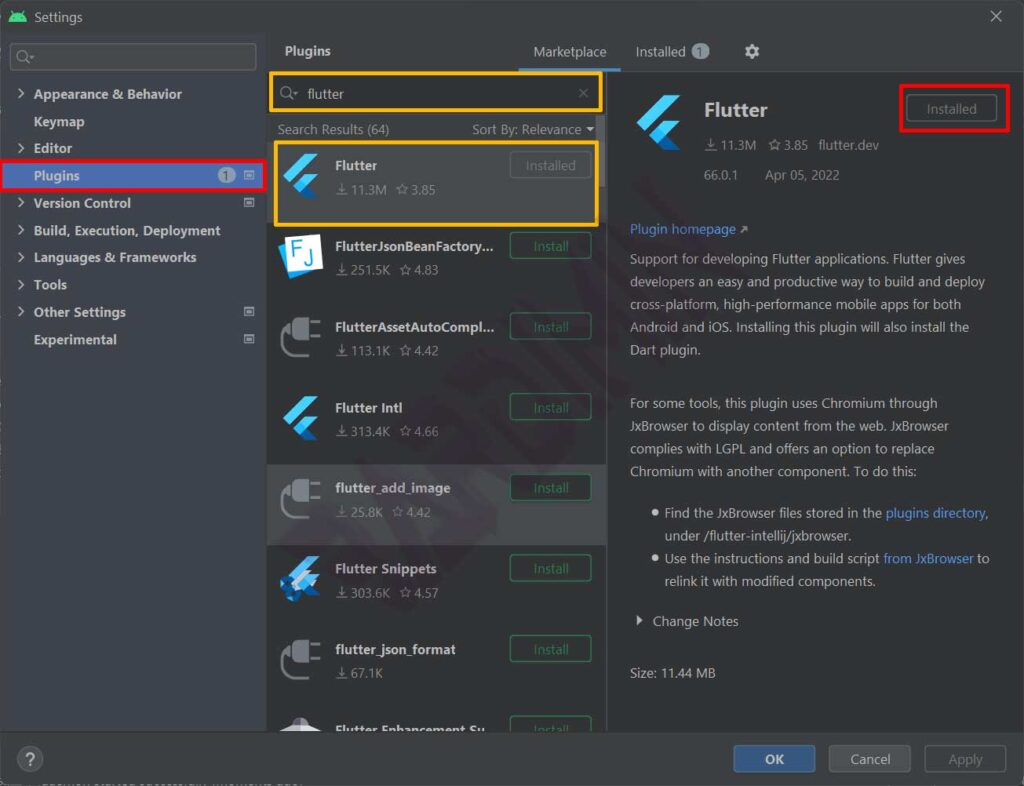
- Launch Android Studio. From the welcome screen, go to Settings (or Configure → Plugins). Search for the Flutter plugin in the Marketplace tab and install it. Android Studio will prompt you to install the Dart plugin as a dependency. After the installation finishes, restart the IDE.
- Open Settings again (File → Settings). Navigate to Languages & Frameworks → Flutter. Set the Flutter SDK path field to
C:\flutter. Android Studio will validate the path automatically. - In Settings, go to Appearance & Behavior → System Settings → Android SDK. Switch to the SDK Tools tab, check Android SDK Command‑line Tools (latest), and click OK to download them.
You’ll also need to accept Android SDK licenses. This can be done later via flutter doctor or manually with sdkmanager --licenses.
Installing Visual Studio Community
Visual Studio is required for Windows desktop development with Flutter. It supplies the C++ toolchain needed by the Flutter engine to compile native Windows applications.
- Download the latest Visual Studio Community installer from Microsoft.
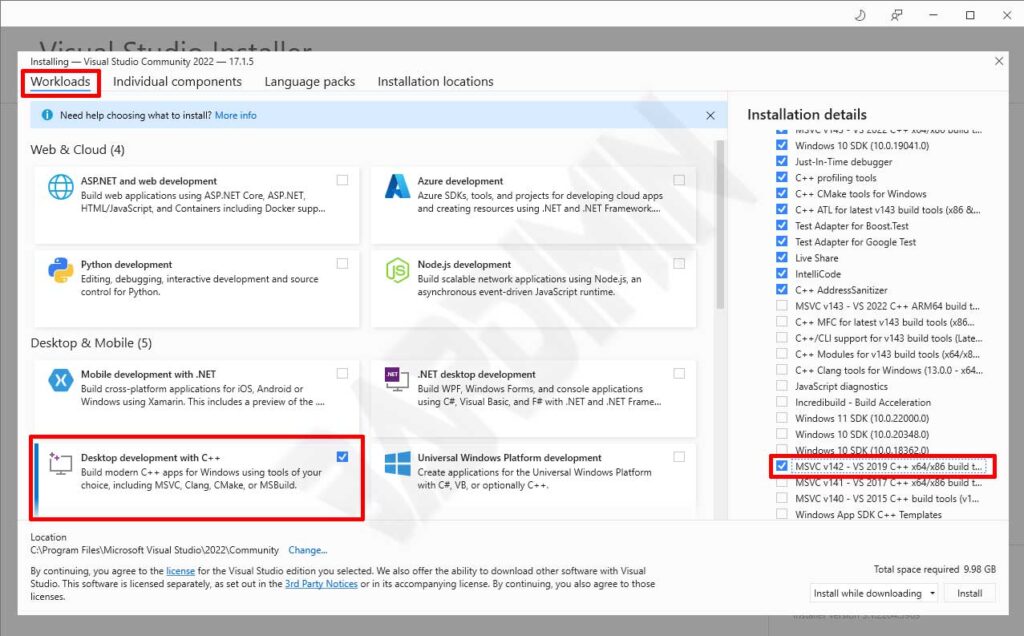
- Run the installer and, on the Workloads tab, select Desktop development with C++. In the right‑hand panel (Installation details), make sure MSVC v143 (or the latest available version) and the Windows 10/11 SDK are included. These components are essential for building Windows apps.
- Proceed with the installation. This step may take some time due to the size of the components.
Accepting Licenses and Verifying with Flutter Doctor
With all components in place, the next step is to accept the Android SDK licenses and run a final verification. Flutter doctor scans your environment and reports any missing pieces.
- Open a command prompt as an administrator.
- Run the following command to accept all Android SDK licenses:
flutter doctor --android-licenses
Press y repeatedly until all licenses are accepted. - After that, execute:
flutter doctor
This command checks the Flutter SDK, Android toolchain, Visual Studio installation, and connected devices.
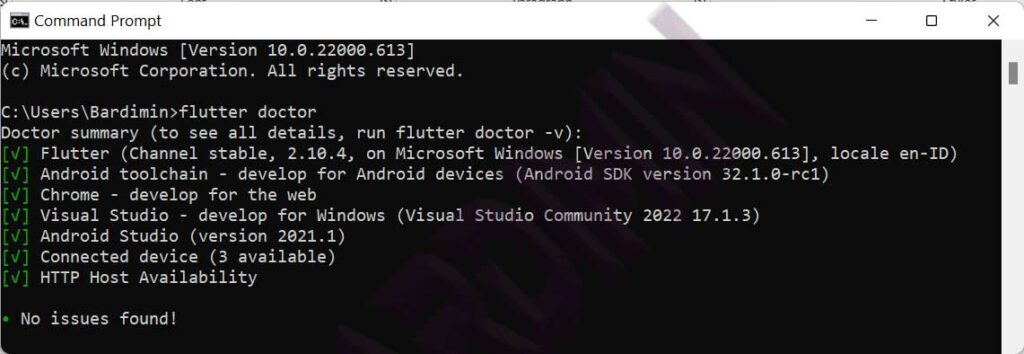
If the output ends with No issues found!, your Flutter installation is complete and functional. You can now create your first project by running flutter create my_app. Should any issues appear, read the error messages carefully—they often point directly to missing dependencies or incorrect paths. For instance, if Android Studio isn’t detected, verify that the SDK path is correctly set; if Visual Studio is missing, reinstall it with the required workload.
For a deeper insight into your environment, run
flutter doctor -v. It displays detailed version information for each component, which is especially useful when troubleshooting or confirming system readiness.
With a fully configured environment, you are ready to start building cross‑platform applications using Flutter. Features like hot reload, a rich plugin ecosystem, and extensive official documentation streamline the journey from prototype to production. Regularly update the Flutter SDK and Android Studio to benefit from the latest performance improvements and security patches.