Changing drive letters in Windows 11 is straightforward and can be done through three different paths: Disk Management, Command Prompt, or PowerShell. Each method has its own strengths, but all are safe when you prepare backups and follow the steps carefully. This guide walks you through the entire process in a relaxed yet detailed manner. It is designed for technicians, gamers, and anyone who wants to tidy up storage without risking data loss.
Windows recognizes every partition and storage device with a drive letter like C:, D:, or E:. This letter acts as an address that lets you and your applications find files. If a drive loses its letter, the data remains intact, but you can no longer see it in File Explorer. That is why knowing how to manage drive letters is essential, especially if you frequently connect multiple storage devices.
The problem is that Windows sometimes shifts drive letters automatically. A flash drive you use for your game library might suddenly get a different letter after a restart. As a result, applications that rely on absolute paths start throwing errors. By understanding how to change drive letter in Windows 11, you can fix such annoyances yourself without stress.
What Are Drive Letters and Why Do They Matter?
Drive letters are alphabetical labels from A to Z assigned to each volume. Historically, A and B were reserved for floppy disks. Today, the system partition that contains Windows almost always takes the letter C. Other volumes like data partitions, external SSDs, or optical drives get the next available letters. This assignment is stored in the registry, so the configuration remains even after you unplug the device.
If you frequently plug and unplug external drives, the letter order can shift. For gamers who store titles on a dedicated drive, this change causes launchers to lose track. On the other hand, technicians who manage multiple computers need consistent letters for smooth cloning and backup processes. That is why knowing how to manage drive letters is a must.
Important Warning: Never tamper with the letter of the system partition (usually C:) because it can prevent Windows from booting. This guide applies only to data drives, external drives, and non-system volumes.
When Should You Change a Drive Letter?
Several situations force you to change a drive letter. First, a letter conflict occurs after you insert a memory card or a new drive. Second, you want to align drive layouts across several PCs so that portable applications run immediately. Third, you have your own preference, for instance wanting your game drive always on G: and your backup drive on B:. Fourth, certain applications only recognize paths with a specific letter. In all these cases, how to change drive letter in Windows 11 will come to the rescue.
This procedure is also common after cloning a hard disk to an SSD or while preparing a dual-boot setup. The main goal remains the same: maintain application access and convenient data management. By knowing the technique, you do not need to reinstall Windows just because of a messy drive letter.
Prepare First, Then Execute
Although changing drive letters does not erase data, the risk is still there. So before you start, protect your important files first. Copy everything from the target drive to another location, whether an external hard disk or the cloud. Once you are safe, create a system restore point through the Control Panel. This point will record the system state before the change, allowing you to roll back if something goes wrong.
Next, close all programs that are currently accessing that drive. Applications like video editors, download managers, or game launchers must be shut down completely. Check the settings of those applications and note down their storage paths. Later, after the letter changes, you only need to redirect the application to the new letter. This small preparation makes the whole process smooth and drama-free.
Method 1: Change Drive Letter via Disk Management (The Easiest Way)
Disk Management is a built-in Windows tool that is very user friendly. You simply right-click the desired volume and pick a replacement letter. This method is perfect for beginners who want safety and convenience. Follow these steps at a relaxed pace.
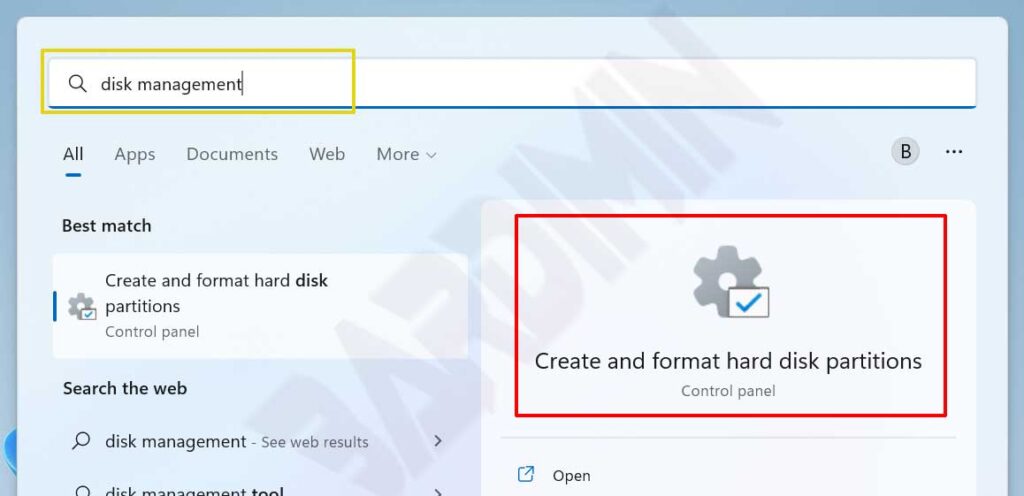
- Press Windows + X and select Disk Management. Alternatively, type “disk management” in the search box and click Create and format hard disk partitions.
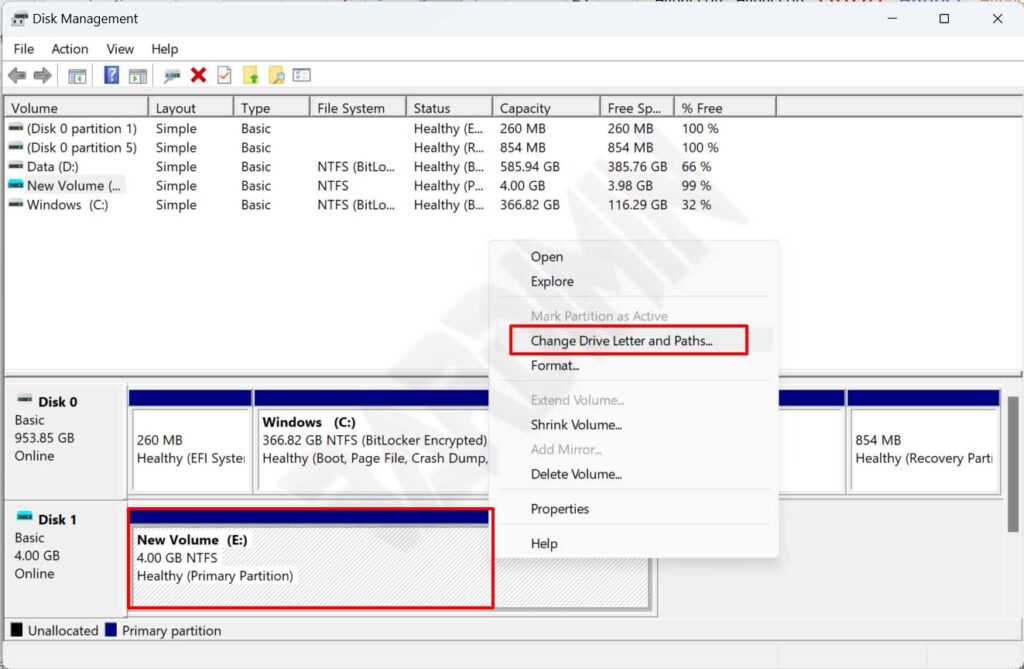
- In the Disk Management window, locate the drive whose letter you want to change. Pay attention to its capacity and label so you do not accidentally pick the system partition.
- Right-click the target partition or volume, then click Change Drive Letter and Paths.
- In the dialog box that appears, click the Change button.
- Enable the option Assign the following drive letter, then select an unused letter from the dropdown list.
- Confirm with OK. Windows will warn you about possible impact on applications. Proceed by clicking Yes.

Once finished, the drive immediately appears with the new letter in File Explorer. All your data remains safe. If an application throws errors, simply update its path settings. This approach is a favorite of many technicians and gamers because it is simple and carries minimal risk.
Method 2: Change Drive Letter Using Command Prompt (Diskpart)
Diskpart is the secret weapon of administrators who love speed and automation. Through the command line, you can change a drive letter in seconds. However, there is no visual confirmation, so make sure you select the right volume.
- Open Command Prompt as administrator. Type diskpart and press Enter.
- Run the command list volume to see the partition list. Note the volume number, letter, label, and size.
- Select the target volume with select volume X (replace X with the correct volume number).
- Remove the old letter using remove letter=Y (Y is the letter you want to replace).
- Assign a new letter with the command assign letter=Z (Z is an available letter).
- Type exit to leave Diskpart, then close Command Prompt.
Accuracy is the name of the game here. The assign command instantly changes the letter without further warning. This method is highly favored by experienced administrators who need how to change drive letter in Windows 11 instantly without opening multiple windows.
Method 3: Change Drive Letter with PowerShell (For Advanced Users)
PowerShell introduces a modern and flexible approach. You can combine multiple operations into a single script or change many drives at once. It is ideal if you enjoy automation or manage a fleet of computers.
- Open PowerShell as administrator.
- Execute the cmdlet Get-Partition to display the partition list. Pay attention to the DriveLetter column and the size.
- Run the command: Set-Partition -DriveLetter X -NewDriveLetter Y (X is the old letter, Y is the new one). Make sure Y is not already in use.
- Verify the change by running Get-Partition again.
The power of PowerShell shines when you need to modify several drives simultaneously. Just write a simple script and run it once. This is an essential tool for professionals who want to perform change drive letter Windows 11 tasks across many machines quickly. For further exploration, visit the official Set-Partition documentation.
After Changing the Letter, What Should You Do?
Once the process is complete, open File Exporer and check whether the drive is using the new letter. If it does not appear yet, try refreshing or unplugging and replugging the external device. For internal partitions, a quick restart is usually enough.
Applications that suddenly throw errors after the change? Relax, that is normal. Go into the application settings and redirect it to the correct folder. For example, in Steam you can add a new library folder through the Steam Library Folders menu. That way, your game collection does not need to be re-downloaded. This step is the true essence of how to assign drive letter Windows 11 without losing data.
If the system refuses the change because the drive is in use, make sure no program is still accessing it. Open Resource Monitor to track which process holds control. If necessary, restart the computer in safe mode so the operation can proceed smoothly.
A rare issue is the drive losing its letter after a restart. The fix is easy: go back to Disk Management and assign the same letter again. If the problem repeats, check Group Policy settings or security software that may be blocking permanent assignments.
Smart Tips to Keep Your Drives Organized
Make it a habit to note down every drive letter change you make. Write the old letter, the new letter, and the volume label. This simple documentation will be very helpful later, especially if you manage many partitions or workstations.
Avoid altering drives that contain software with complex licensing unless you have official guidance. Some professional applications lock their licenses to absolute paths. When in doubt, check the vendor documentation before making changes.
For gamers, adopt a consistent letter scheme. For instance, G: for games, M: for media, and B: for backups. This pattern reduces the risk of conflicts when you plug in multiple devices at once. Also, remember to regularly back up your system image so all configurations stay safe.
Make sure Windows 11 is always up to date. Updates often bring improvements for storage management. You can read official information at Microsoft Support. With a healthy system, how to change drive letter in Windows 11 will run even more smoothly and stress-free.
Conclusion
Managing drive letters in Windows 11 is not a complicated matter after all. You have learned three reliable methods: the simple Disk Management, the rapid Diskpart, and the modern PowerShell. All of them are safe as long as you prepare backups and follow the preparation steps correctly. Now you can reorganize your storage without worrying about data loss or application errors.
Whether you are a technician, a gamer, or an everyday user, mastering this technique will make your digital life neater and more efficient. So do not hesitate to try it yourself and experience the convenience.