This guide resolves the Android debug symbols upload error in Google Play Console, detailing NDK installation, build.gradle configuration, and correct bundle generation procedures.
Android developers frequently encounter issues when uploading apps containing native code. The error App Bundle contains native code, and you’ve not uploaded debug symbols appears when symbol files are missing. This condition blocks app review and release workflows. Resolving it requires precise environment configuration. The following steps provide a systematic approach to fix this issue.
Why Debug Symbols Matter
Debug symbols map compiled binaries back to original source code. Google Play Console uses them for accurate crash analysis. Without these files, error reports show only memory addresses. Development teams struggle to trace root causes. Therefore, uploading debug symbols is a technical requirement. This process also supports Play App Signing features. Moreover, symbol tables enable performance optimization insights.
Key note: Debug symbol files have a 300 MB maximum limit. Ensure your configuration stays within this boundary.
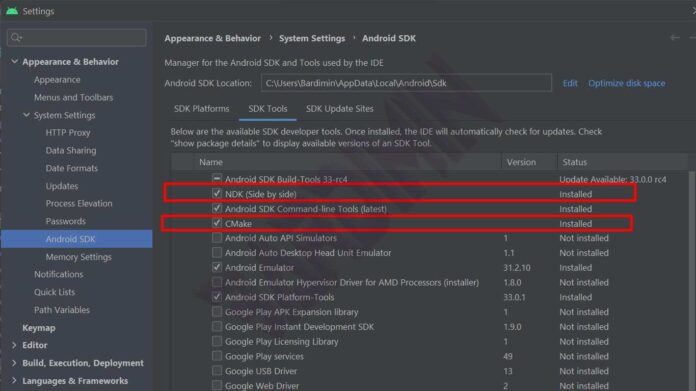
1. Install NDK and CMake in Android Studio
First, prepare your build environment. NDK and CMake are essential components for native development. Follow these installation steps in order.
- Open your project in Android Studio.
- Navigate to Tools > SDK Manager.
- Select the SDK Tools tab.
- Check NDK (Side by side) and CMake options.
- Click OK to begin installation.
- Wait for download and configuration to complete.
- Press Finish once installation succeeds.
Your project will auto-sync build files afterward. Ensure stable internet connectivity during this step. However, if errors occur, verify your proxy or firewall settings.
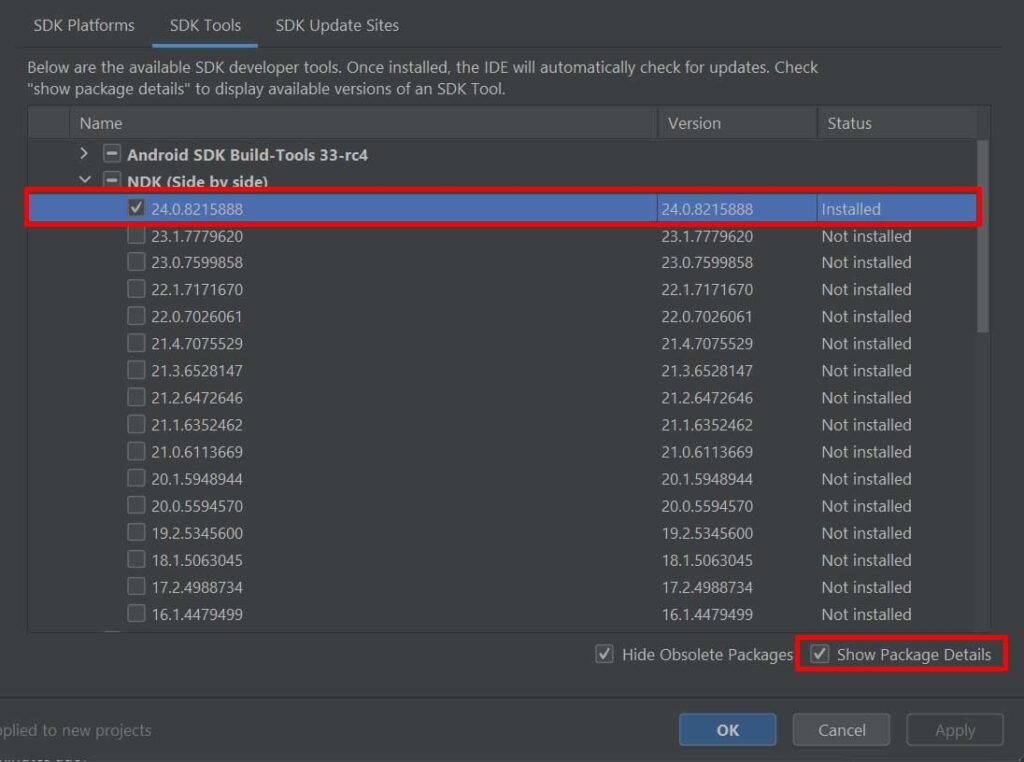
2. Verify Your NDK Version
NDK version consistency is critical for compatibility. Use a version matching your project requirements. Here is how to check installed versions.
- Reopen Tools > SDK Manager > SDK Tools.
- Enable Show Package Details at the window bottom.
- Identify available NDK versions.
- Note the version number for build.gradle configuration.
Mismatched NDK versions can cause build failures. Therefore, always document the version you use. This practice simplifies team collaboration and environment reproduction.
3. Configure debugSymbolLevel in build.gradle
The core step adds debug symbol configuration. Modify your app/build.gradle file with the following code block.
android {
    ..................

    ndkVersion "24.0.8215888" //match your installed version

    buildTypes {
        release {
            ..................
            ndk {
                debugSymbolLevel 'FULL'
                //or 'SYMBOL_TABLE' for smaller size
            }
        }
    }

    ..................
}
Select the symbol level based on your needs. The FULL option generates complete debug information. However, file size increases significantly. Use SYMBOL_TABLE if you face the 300 MB limit. This configuration ensures Google Play Console receives meaningful crash data.
Practical tip: Always test release builds in a staging environment before production upload.
4. Generate Signed Bundle or APK
The final build process produces artifacts ready for upload. Follow this standard Android Studio workflow.
- Click Build > Generate Signed Bundle/APK.
- Choose Android App Bundle or APK format.
- Complete keystore information and credentials.
- Wait for the build process to finish.
Output differences depend on your selected format:
- For APK: debug symbols appear at
app\build\outputs\native-debug-symbols\release\native-debug-symbols.zip. Upload this file separately to Google Play Console. - For Android App Bundle: debug symbols are embedded within
app-release.aab. No separate upload is required.
Google Play Console validates debug symbol files automatically. Ensure no errors occur during upload. If issues arise, recheck your NDK configuration and symbol level. Moreover, verify file size does not exceed specified limits.
Common Troubleshooting Steps
Several issues frequently appear during implementation. Below are solutions for popular problems.
- Build fails after adding NDK config: Ensure the NDK version in build.gradle matches your installed version. Re-sync your project.
- Debug symbol size exceeds 300 MB: Change
debugSymbolLeveltoSYMBOL_TABLE. Delete old build artifacts before rebuilding. - Google Play Console rejects the file: Verify the zip file is not corrupted. Use official Android SDK tools to regenerate it.
Official Google documentation provides additional guidance. Visit developer.android.com for the latest references. Moreover, Stack Overflow community forums often discuss specific cases.
Following this guide streamlines native code app uploads. Properly configured debug symbols enhance crash reporting quality. Development teams can respond to production issues more rapidly. Therefore, integrate these steps into your CI/CD workflow.