Several integrated methods allow you to share files between host and guest Hyper-V systems efficiently, including Enhanced Session Mode, PowerShell Direct, and network shares. This guide walks through each approach step by step so you can choose the most effective technique for your workflow.
Hyper-V delivers robust virtualization capabilities that let you run multiple operating systems on a single physical machine. In day-to-day operations, the need to share files between host and guest Hyper-V environments arises frequently, whether you are pushing configuration scripts, retrieving diagnostic logs, or exchanging project data. Without a reliable file transfer strategy, these tasks quickly become time-consuming and error-prone.
By default, a Hyper-V virtual machine does not expose direct access to the host file system. Microsoft, however, equips the platform with several integration mechanisms that allow secure, high-performance file exchange. The right choice depends on your network setup, security policy, and whether you require manual or automated transfers.
Prerequisites That Apply to All File Sharing Methods
Before adopting any file sharing technique, a few foundational services must be operational. These components handle the communication channel between host and guest. Hyper-V Integration Services must be installed and running inside the guest operating system. On modern Windows versions, this package is already built in. You can verify its status through the virtual machine settings.
Without the Guest Service Interface, integration-based file transfer will fail entirely, regardless of the method you attempt.
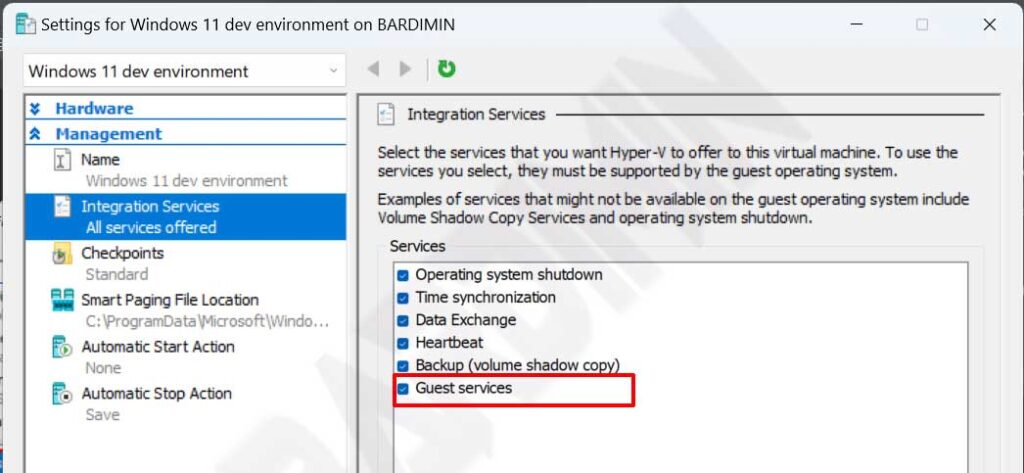
The most critical component for file transfer is the Guest Service Interface. This service provides the conduit that allows the host to copy files directly into or out of a virtual machine. Enable it with the following steps:
- Shut down the target virtual machine.
- Right-click the VM and select Settings.
- In the left pane, navigate to Integration Services.
- Tick the Guest services checkbox and click OK.
Once the interface is active, you can select the method that best matches your requirements. Each approach offers unique strengths depending on bandwidth needs, ease of use, and the level of automation you desire.
Method 1: Sharing Files Through Enhanced Session Mode
Enhanced Session Mode leverages the Remote Desktop Protocol (RDP) to create a richer connection between host and guest. It allows redirection of local resources such as the clipboard and drives, turning file transfer into a straightforward copy-and-paste operation. Its primary advantage is simplicity, it requires no additional network configuration.
Enhanced Session Mode works exactly like a Remote Desktop connection, making drive redirection and clipboard sharing feel completely natural.
For Enhanced Session Mode to work, you must enable policies on both the Hyper-V server side and the user session. Follow these steps carefully:
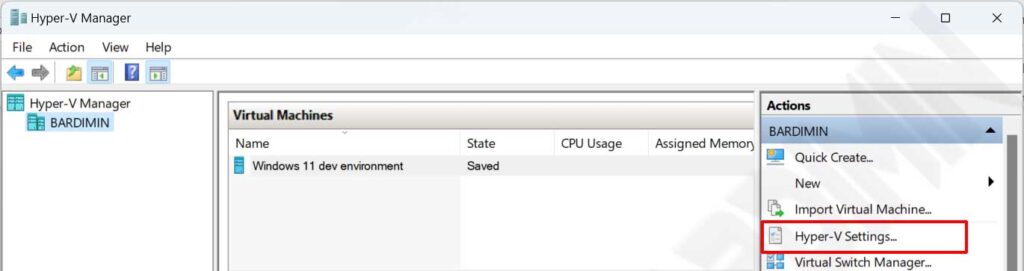
- Open Hyper-V Manager. In the right-hand panel, click Hyper-V Settings.
- Under the Server section, choose Enhanced Session Mode Policy. Tick Allow enhanced session mode.
- Move to the User section and select Allow enhanced session mode.
- Click OK to save the changes.
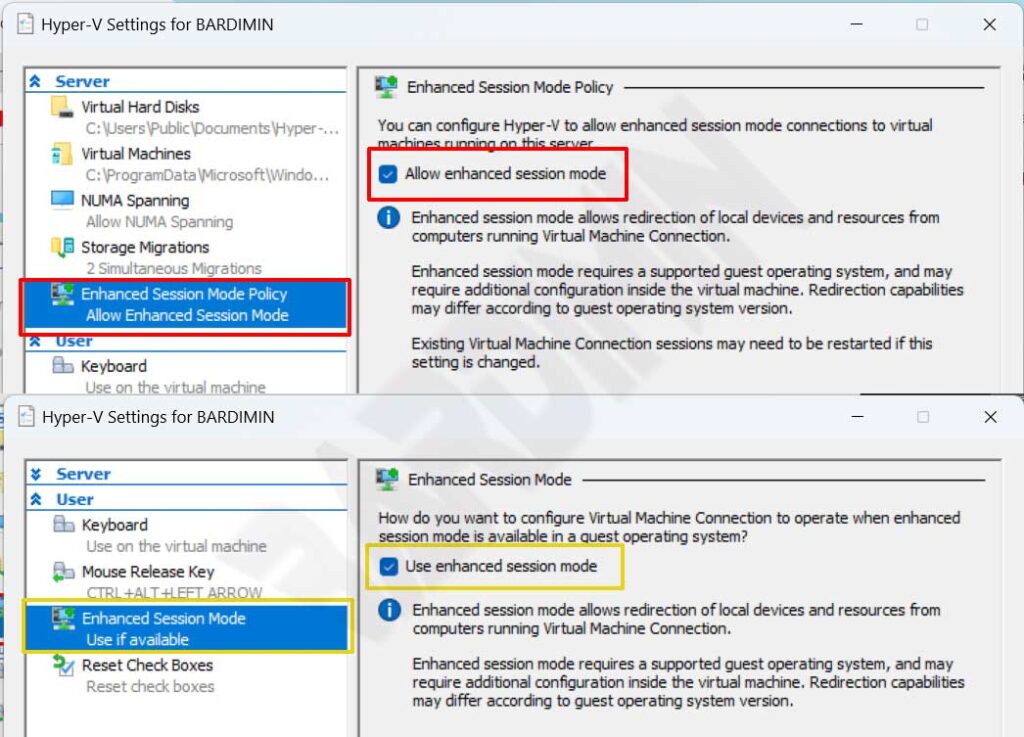
If your host runs Windows 11, Windows 10, or Windows 8.1, Enhanced Session Mode is turned on by default. On Windows Server, you need to manually enable it as shown above.
Once the mode is enabled, proceed to configure the local resources you want to share. This configuration step appears each time you start the virtual machine unless you save the settings:
- Start the virtual machine. Before the connection session begins, the Connect to Virtual Machine dialog will appear.
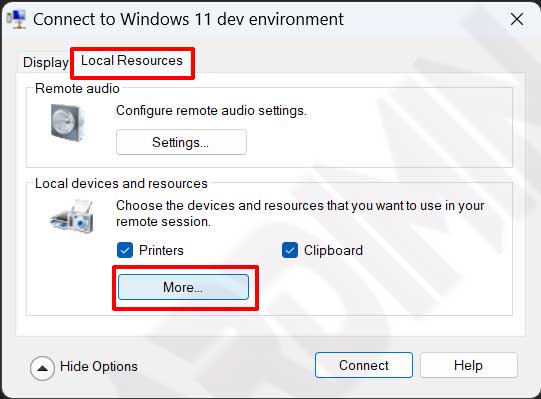
- Click Show Options to expand the settings panel.
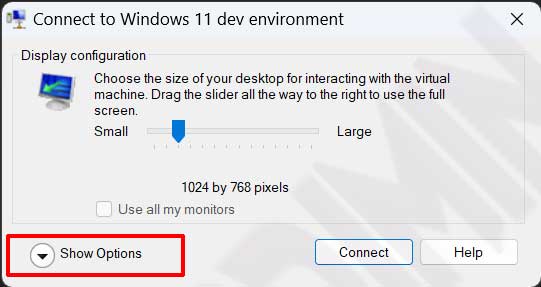
- Select the Local Resources tab, then press the More button.
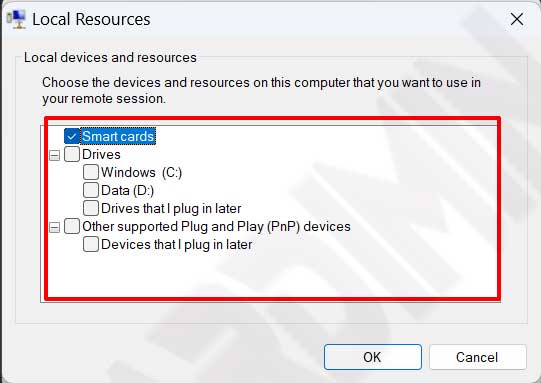
- In the Local devices and resources window, expand Drives and tick the drives you want to share. You can also select other devices as needed.
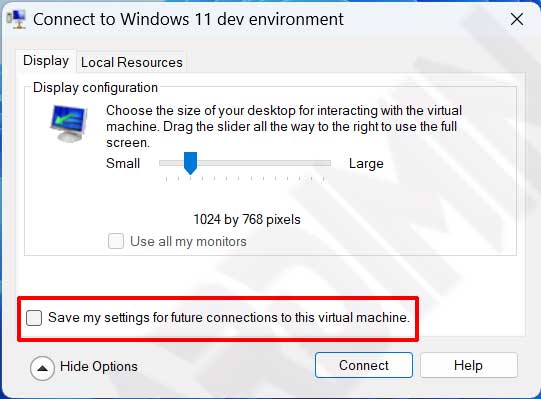
After connecting, the host drives will be visible in the guest’s File Explorer under Redirected drives and folders. You can copy files directly from those drives, or use the familiar copy-paste operation since the clipboard is also integrated. For greater convenience, tick Save my settings for future connections to this virtual machine so the configuration persists. This way, you avoid repeating the setup every time.
If you later need to modify a saved configuration, run the following command from Command Prompt:
VMConnect.exe <ServerName> <VMName> /edit
Enhanced Session Mode is ideal for test environments and administration tasks that demand quick interaction with the guest system. However, it relies on a stable RDP session. For GUI-free transfers and greater automation, you can switch to PowerShell Direct.
Method 2: File Transfer Using PowerShell Direct and Copy-VMFile
PowerShell Direct is one of the most reliable methods to transfer files in Hyper-V because it does not depend on a network connection. Using the Copy-VMFile cmdlet, you can copy files from host to guest directly over the VMBus. This approach is perfect for automation scripts and bulk file transfers without network overhead.
The main prerequisite for this method is an active Guest Service Interface, as described earlier. Additionally, the credentials you use must have access rights to the file locations on both sides. To begin, open an elevated PowerShell session on the host and use the following syntax:
Copy-VMFile "VM Name" -SourcePath "C:\path\to\file.txt" -DestinationPath "C:\destination\on\guest\file.txt" -CreateFullPath -FileSource Host
The -CreateFullPath parameter builds the destination folder structure if it does not already exist. With this approach, you can embed file transfers into provisioning or backup scripts. For large files, PowerShell Direct often delivers more consistent throughput than folder-sharing methods because it bypasses the networking stack entirely.
You can also copy files from guest to host by swapping the source and destination parameters, although Copy-VMFile is most commonly used in the host-to-guest direction. As an alternative, you could open a PowerShell Direct session to execute commands inside the guest and copy files out over the network. More details about this cmdlet are available in the Microsoft documentation.
If the guest lacks the latest Integration Services, update them through Windows Update or download them from the Hyper-V Integration Services page. Outdated versions frequently cause Copy-VMFile commands to fail.
Method 3: Folder Sharing via Network (Network Share)
In scenarios where host and guest must remain persistently connected and share data bidirectionally, creating a network shared folder remains a reliable traditonal solution. This method requires a virtual switch configuration that allows the guest to reach the host’s network, or at least provides a proper route. Its main advantage is cross-platform compatibility, you can access the share from Linux guests as easily as from Windows.
Start by ensuring the virtual machine uses an external or internal virtual switch that the host can reach. An internal virtual switch establishes a private network between the host and all connected VMs, ideal for closed environments. Once connectivity is verified (for example, via ping), follow these steps:
- On the host system, create the folder you want to share. Right-click it and choose Properties.
- Go to the Sharing tab and click Advanced Sharing.
- Tick Share this folder and assign a share name.
- Click Permissions to set access rights as needed.
- Ensure the host firewall allows File and Printer Sharing traffic for the network profile in use.
- Inside the guest operating system, open File Explorer and access the folder using the format \\<Host_IP>\<ShareName> or \\<Hostname>\<ShareName>.
Network share is extremely flexible because it supports non-Windows guest operating systems. Transfer performance, however, is heavily influenced by virtual network speed. For occasional small files, this method works without hassle. Under heavy workloads, consider dedicating a separate virtual switch or using PowerShell Direct instead.
Tips for Optimizing File Transfers
Keep the following points in mind to ensure efficient, trouble-free file sharing:
- Keep Integration Services up to date. These components receive updates through Windows Update. Older versions often cause feature mismatches.
- Review firewall rules. An overly restrictive firewall on either host or guest can block RDP connections, PowerShell Direct, or shared folder access.
- Choose the right virtual switch. For network-based methods, an internal switch is safer than an external one if the guest does not need internet access.
- Leverage scheduling. Combine PowerShell Direct with Task Scheduler to perform automated file backups from guest to host at predefined times.
- Match the method to file size. Copy-VMFile excels with large files and bulk operations, while copy-paste via Enhanced Session Mode is quicker for small, ad-hoc files.
- Verify basic connectivity. Before using network share, confirm the guest and host can ping each other. Run
Test-Connection <IP>from PowerShell to check.
By combining several of the approaches above, you can build a file sharing workflow that precisely fits your daily operational requirements. No single method is perfect for every situation, so flexibility remains key.
Conclusion
Sharing files between host and guest Hyper-V does not have to be a roadblock. Microsoft offers a range of integrated solutions, from the straightforward Enhanced Session Mode, to the highly reliable PowerShell Direct, to the universally compatible network share. Understand each method, align it with your security policies and infrastructure, and then apply the steps systematically. With this guide, you can select and implement the most effective file transfer technique without compromising the stability or security of your virtual machines.