When Windows suddenly refuses to boot, your critical data does not have to disappear. Two proven methods allow you to recover data from an unbootable Windows system: physically connecting the drive to a working PC or launching a temporary operating system via Hiren’s BootCD PE.
Boot failures strike without warning. A corrupted system file, a bad sector, or an interrupted update can lock you out of your documents, projects, and saved games in an instant. Before attempting any repair, your first objective must be to secure the raw files stored on the disk. A calm, methodical approach prevents permanent loss and keeps the drive intact for further diagnosis.
This article explains two field‑tested recovery paths designed for professionals, technicians, and gamers who need their data back quickly. The first method relies purely on hardware removal and direct attachment. The second gives you a familiar Windows‑like desktop even when the installed operating system is completely dead. Both strategies avoid writing new information to the troubled drive, preserving every recoverable byte.
Method 1: Connecting the Drive to Another PC
This approach is the most straightforward. As long as the physical platters or flash memory chips remain intact, a healthy computer can read the file structure and let you copy everything securely. You only need basic tools, an anti‑static strap, and an adapter that matches your storage interface.
Remove the Hard Drive or SSD Safely
Shut down the affected machine and disconnect all power cables. Wear an anti‑static wristband or regularly ground yourself by touching a bare metal surface. Open the case according to the manufacturer’s manual. Locate the storage device, gently detach the SATA data and power connectors, and lift the drive out without twisting the cables.
Attach the Drive to a Working Machine
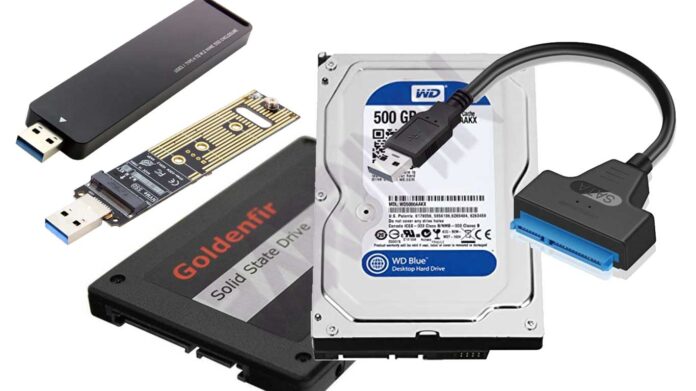
Two connection options exist. You can install the drive as a secondary disk directly on a spare SATA or M.2 slot if the donor motherboard has room. A more portable solution is a USB adapter. Choose a SATA‑to‑USB 3.0 bridge for 2.5‑inch SSDs or mechanical hard drives, or an NVMe‑to‑USB enclosure for modern M.2 sticks. After hooking up the data and power leads, plug the adapter into a functioning PC.
Critical Rule: Never save new files onto the troubled drive. Every write operation can overwrite sectors that still hold your original data, significantly reducing recovery chances.
Browse and Copy Your Files
Once the disk appears in File Explorer, navigate to folders such as Users, Documents, and Downloads. If Windows blocks access due to permission issues, right‑click the folder, open Properties → Security, and take ownership using an administrator account. Transfer the data to a separate backup drive immediately.
What to Do When a Partition Is Not Visible
If the BIOS detects the drive but Windows does not assign a letter, the partition table may be logically damaged. Do not format. Instead, rely on free recovery tools. TestDisk repairs corrupted partition structures and boot sectors. For retrieving accidentally deleted files, Recuva performs deep scans and extracts content even when file system metadata is missing.
Method 2: Booting from Hiren’s BootCD PE (Live CD)
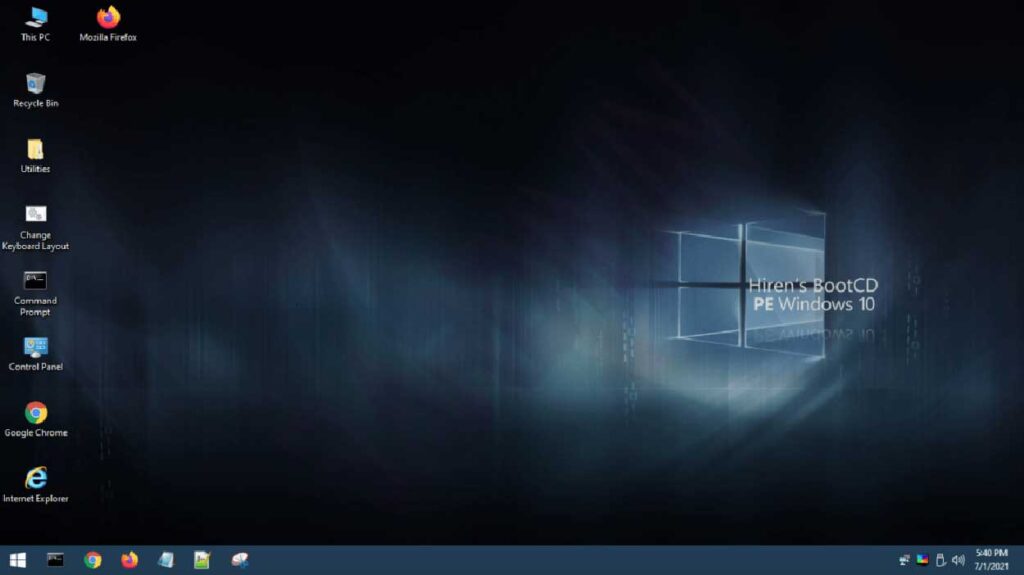
When the PC hardware remains fully functional but the installed Windows refuses to start, a Live CD environment becomes the most efficient rescue tool. Hiren’s BootCD PE delivers a lightweight Windows 11 PE desktop equipped with dozens of utilities. It eliminates the need to open the case or locate a donor computer. A USB flash drive of at least 8 GB is all you need to create a bootable recovery medium.
Creating a Bootable USB Drive
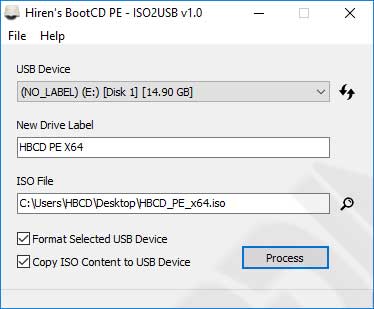
Download the Hiren’s BootCD PE ISO from the official website. The development team provides a dedicated tool, ISO2USB.exe, that formats the flash drive and installs the bootloader automatically. Launch it, point to the ISO file, select your USB drive, and click Create Bootable USB. The process erases all existing data on the flash drive, so back it up first. Technicians often use Rufus as an alternative, especially when GPT partition scheme for UEFI systems is required.
Launching the Live Environment
Restart the problematic PC and repeatedly press the boot‑menu shortcut key. Common keys are Esc, F2, F10, or F12. If your firmware enforces Secure Boot, temporarily disable it because Hiren’s BootCD PE may lack a Microsoft signing certificate on certain hardware. Select the USB drive from the list and allow the Windows PE kernel to load.
Accessing and Copying Data
After the desktop appears, open File Explorer. Internal partitions, including the previously inaccessible C: drive, are listed just as in a native Windows installation. Insert a second USB drive or external hard disk as backup destination. Drag and drop folders like Documents, Pictures, and AppData safely. The file manager handles large transfers without issue.
Hiren’s BootCD PE bundles a full suite of recovery utilities, so you never need to install extra software to handle missing partitions or deleted files.
Fixing Damaged Partitions from the Live Desktop
If a drive appears raw or unallocated, launch DMDE or TestDisk from the Utilities menu. These tools scan for recognizable file system signatures and rebuild the partition table. Select the physical disk, start a quick scan, and write the newly found structure. The partition usually becomes accessible instantly, letting you continue the copy job without a reboot.
Specific Advice for Gamers
Most game progress is stored in C:\Users\[Name]\Documents\My Games or Saved Games. Steam stores user data inside C:\Program Files (x86)\Steam\userdata. Also back up configuration folders from AppData\Local to preserve control settings and achievements. Even titles that sync to the cloud should be backed up locally, because synchronization does not always run perfectly after a system crash.
Ensuring a Successful Data Salvage Operation
Whichever method you choose, the principle stays the same: halt all write operations on the source drive. Quick action greatly improves the odds of retrieving every important file. Save the backed‑up data onto a separate medium and keep it apart from the damaged disk. Once you have secured the data, you can move on to bootloader repair or a clean Windows installation with confidence.
For field technicians and IT professionals, owning a SATA‑USB adapter and a flash drive with Hiren’s BootCD PE is a small investment that pays off instantly. The combination forms a mobile recovery kit that handles emergency data extraction at client locations without a full lab. Familiarity with tools like TestDisk or Recuva further shortens the response time and leaves a strong profesional impression.
Following a structured procedure not only protects your data but also minimizes the risk of permanent storage damage. Use this guide as your technical reference whenever you face an unbootable Windows system, and you will have the files back safely before most panic has even set in.