Factory reset Windows 11 restores the operating system to a clean state while resolving persistent errors and driver conflicts. This procedure removes corrupted registry entries and eliminates software conflicts without requiring external installation media. Technicians and gamers can rely on this method for reliable system recovery.
Windows 11 operates efficiently immediately after a fresh installation. File access remains responsive during initial usage periods. Extended operation gradually degrades overall performance metrics. Users frequently encounter freezing applications or sudden blue screen errors. Various factors trigger these system failures. Incomplete updates frequently destabilize critical background services. Third party software often creates registry conflicts. Malware infections silently corrupt core system files. Therefore, a factory reset Windows 11 becomes necessary. This process rebuilds the file structure automatically. Technicians save significant troubleshooting hours. Gamers restore stable frame rates efficiently. However, data preservation requires careful planning beforehand.
Pre Recovery Preparation Checklist
Proper preparation prevents irreversible data loss during recovery. System administrators always verify backup integrity before execution. Documenting current network configurations accelerates post recovery setup. The entire procedure consumes thirty to ninety minutes. Hardware specifications directly influence completion speed. Schedule this task during planned maintenance windows.
Essential Pre Reset Steps
- Transfer critical documents to external storage or cloud services
- Record software license keys for seamless reactivation
- Download network adapter drivers to prevent offline issues
- Verify battery levels exceed eighty percent or connect power
- Disable BitLocker encryption temporarily to avoid access locks
- Export browser bookmarks and email client configurations
Step-by-Step Factory Reset Procedure
Execute the following sequence to complete a safe recovery operation. Each phase ensures system stability and minimizes confirguration errors.
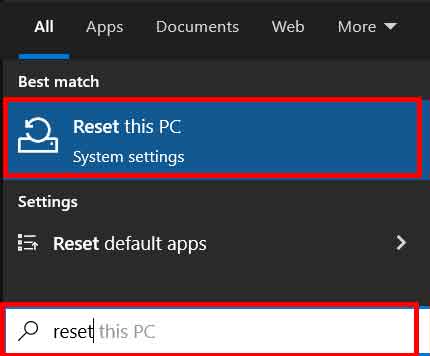
- Open the Start menu and type recovery options. Select Reset this PC from the system search results.
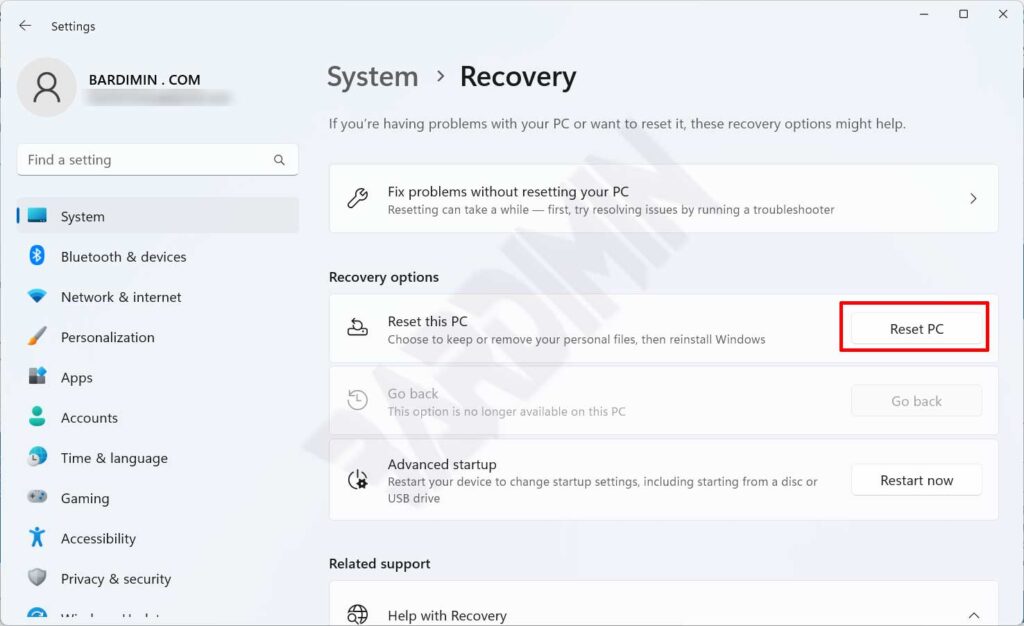
- Press the Reset PC button inside the settings window. The environment will initialize the recovery wizard.
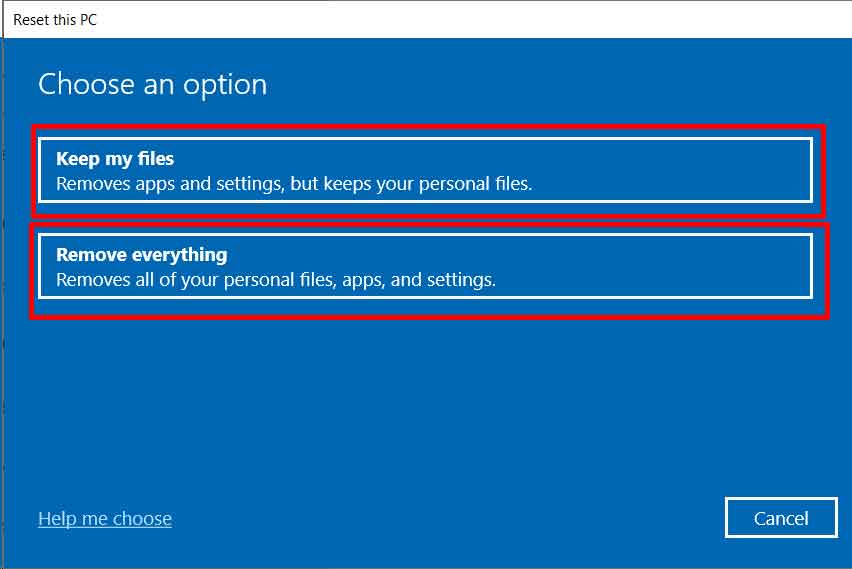
- Select Keep my files to preserve user directories. This choice removes installed programs and resets system settings. Alternatively, choose Remove everything for a complete wipe. The latter option deletes all user accounts and personal data.
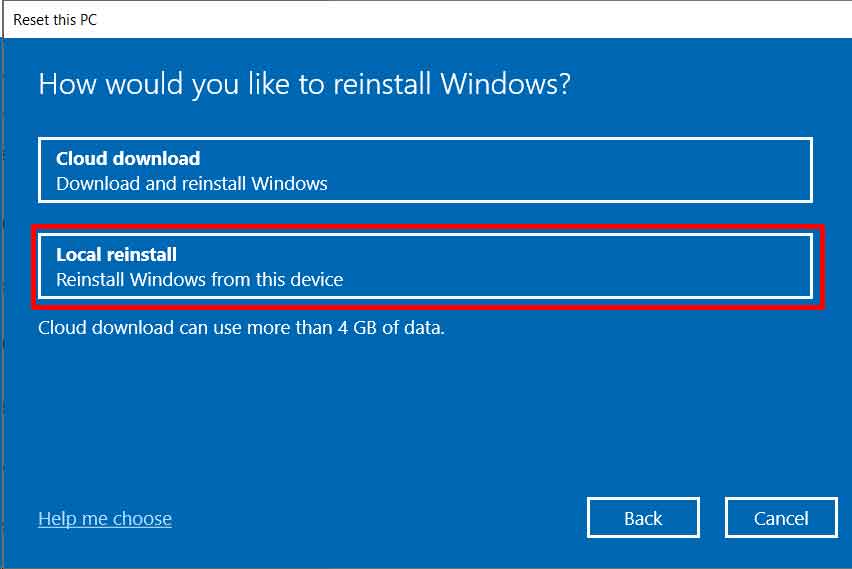
Technical Note: The local reinstall option uses existing system files. Cloud download fetches fresh binaries directly from Microsoft servers. Select cloud installation when local recovery images show corruption.
- Choose Local reinstall for rapid execution. This method bypasses large internet downloads. Alternatively, select Cloud download when system files require replacement.
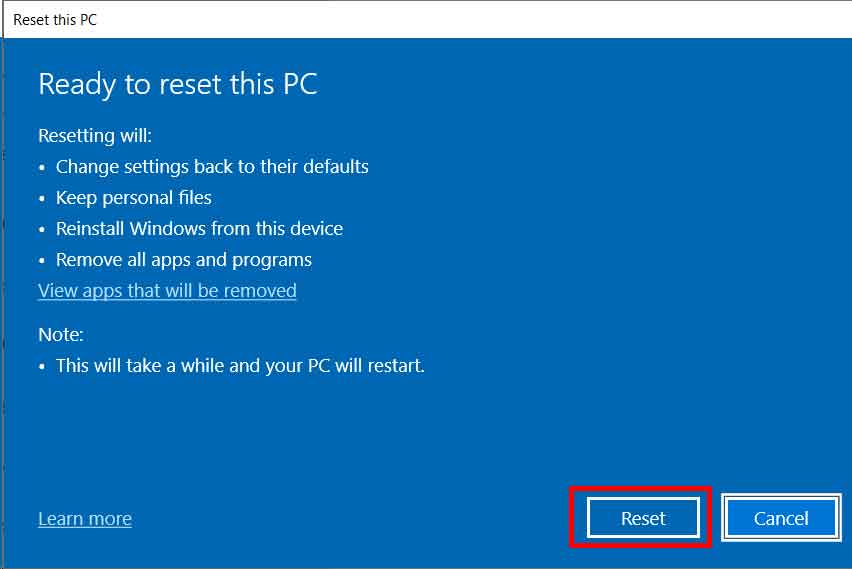
- Click Next to review the pending actions. The interface displays a complete summary of affected components.
- Press the Reset button to authorize the operation. The machine will reboot immediately into recovery mode.
- The system performs multiple automatic restarts during file reconstruction. Do not disconnect power during this critical phase. Wait patiently until the initial setup screen appears.
- Complete the Out of Box Experience configurtion. Connect to your local network and finalize user preferences.
Understanding Local versus Cloud Reinstall Mechanisms
The operating system offers two distinct recovery pathways. Local reinstall relies on cached WinSxS components. This directory stores original binaries from previous updates. The process extracts clean files directly from the local drive. Network connectivity remains unnecessary during execution. Completion times typically remain under forty minutes. Cloud download retrieves fresh installation packages remotely. Microsoft hosts verified system images on secure content delivery networks. This pathway replaces corrupted local files entirely. Download sizes frequently exceed four gigabytes. Stable broadband connections ensure successful package retrieval. Technicians prefer cloud methods for heavily compromised machines. Local methods serve perfectly for routine maintenance cycles.
Post Recovery Optimization and Validation
System recovery requires immediate optimization steps. Install chipset drivers before adding other peripherials. GPU manufacturers provide dedicated software for hardware monitoring. Visit official websites for the latest stable releases. Apply all pending Windows updates through the security panel. This patching process resolves known vulnerabilities. Configure power plans to match your workload requirements. Gamers should enable hardware accelerated GPU scheduling. Professionals benefit from adjusting background app permissions. Install essential productivity suites gradually. Monitor system stability after each installation. Avoid mass software deployment immediately. Consequently, system responsiveness improves significantly.
System stability depends on controlled software deployment. Install applications sequentially to isolate potential conflicts during early operation.
Verify file system integrity using command line tools. Open terminal with administrative privileges. Execute the sfc slashscannow command. This utility scans protected system files automatically. Repair corrupted binaries when detection occurs. Subsequently, run the Dism command for component store validation. This process fixes deep registry corruption effectively. Additionally, disable startup programs that consume unnecessary resources. Navigate to task manager for application management. Restrict background execution for non essential services. Regular driver audits maintain optimal hardware communication. Outdated audio drivers frequently produce crackling sounds. Update network adapters to fix packet loss issues. Configure display refresh rates for maximum visual clarity.
Security Protocols Following System Recovery
Security software requires immediate reinstallation. Real time protection shields the system from latent threats. Schedule full disk scans within seven days. Enable ransomware protection folders for critical projects. Backup applications should run automatically after configuration. Cloud synchronization services restore archived data seamlessly. Verify firewall rules for corporate network compliance. Test VPN tunnels for remote access requirements. Document security certificates for enterprise authentication. Store digital signatures securely in encrypted vaults. Audit user account privileges regularly. Remove administrative rights from standard accounts. Implement password rotation policies for shared workstations. Enable multi factor authentication on all critical platforms. Monitor event viewer logs for anomalous activity patterns. Report suspicious network traffic to security teams immediately.
Proactive monitoring prevents recurring system degradation. Implement automated maintenance schedules for sustained operational excellence.
Storage management demands careful attention post recovery. Delete temporary files to reclaim drive space. Run disk cleanup utilities for old update remnants. Optimize solid state drives using manufacturer software. Enable TRIM commands for sustained read and write speeds. Monitor drive health with SMART tools. Replace failing storage devices before catastrophic failures occur. Memory performance also requires verification. Run diagnostic tools to confirm RAM integrity. Faulty memory modules cause recurring system instability. Replace defective modules promptly to ensure reliability. Document hardware changes for future troubleshooting. Maintain detailed logs for system administration.
Conclusion and Best Practices
Executing a factory reset Windows 11 restores baseline performance efficiently. The procedure eliminates accumulated software conflicts and registry bloat. Technicians utilize this method for rapid client device recovery. Gamers achieve stable frame rates after removing conflicting overlays. Data preservation strategies prevent permanent information loss. Follow structured preparation steps before initiating recovery. Apply post recovery optimizations immediately after setup completion. Monitor system metrics regularly for early anomaly detection. Implement routine backup protocols for future protection. Begin the recovery process today to resolve persistent technical issues.