Showing hidden files and folders in Windows 11 gives you direct access to system data that’s normally kept out of sight to prevent accidental changes. This guide is essential for technicians and gamers who need to manage configuration files or locate game save data.
Windows 11 hides many files and folders by default so that critical data is not deleted unintentionally. However, IT professionals, repair technicians, and experienced gamers often need full visibility. Mastering how to show hidden files in Windows 11 is the first step toward editing application settings, troubleshooting, or manually backing up saved games stored in protected directories.
Every file and folder on a Windows system carries attributes that control its appearance in File Exploerer. The Hidden attribute makes an item invisible, while the System attribute adds an extra layer of protection reserved for operating system files. This article explains both mechanisms in detail, provides step‑by‑step instructions, and highlights practical use cases for professionals and gamers alike.
What Are Hidden Files and Folders?
Hidden files and folders are objects marked with the Hidden attribute. When this attribute is set, File Explorer does not display them unless you explicitly change its viewing settings. This feature has been part of Windows since Windows 95 and serves as a safeguard against casual deletion of important data.
Applications, including modern games, frequently store preferences, caches, and configuration files inside hidden folders. A prime example is the AppData folder located inside each user profile. By revealing hidden items, you can access .ini, .cfg, or .sav files that are vital for advanced customization.
Why Windows Hides Certain Files
The main reason is protection against user error. Critical files such as bootmgr, ntldr, and pagefile.sys are intentionally hidden. Removing or modifying them can prevent Windows from booting or cause significant functionality loss. Hiding these items also keeps everyday navigation clean and focused on user-created content.
Beyond standard hidden files, Windows 11 implements a stricter safeguard called protected operating system files. These files carry the System attribute and remain invisible even after the Hidden items option is turned on. This dual-layer approach ensures that only users who fully understand the risks can interact with core system components.
Hidden vs. System Files: Two Levels of Protection
It is crucial to distinguish between regular hidden files (Hidden attribute) and protected system files (System attribute). Regular hidden items can be revealed through the View > Hidden items menu. System‑protected files require an additional step inside Folder Options. Without understanding this distinction, you might believe all hidden data is visible when, in fact, essential system files remain concealed.
Never delete or modify protected operating system files unless you fully understand their purpose. A single mistaken change can render Windows unbootable.
Examples of System‑attributed files include desktop.ini, older thumbs.db files, and specific DLLs inside the Windows directory. These items are excluded from default searches and backups, making them essential for forensic analysis or deep troubleshooting.
How to Show Hidden Files in Windows 11
You have two primary methods. The first uses the View menu for quick access, while the second configures Folder Options for a permanent change. Detailed steps follow below.
Quick Method: Enable Hidden Items via the View Menu
- Launch File Explorer by pressing Win + E.
- Navigate to the drive or folder you want to inspect, such as C:\.
- Click the View tab in the ribbon at the top.
- Hover over Show, then check the Hidden items option.
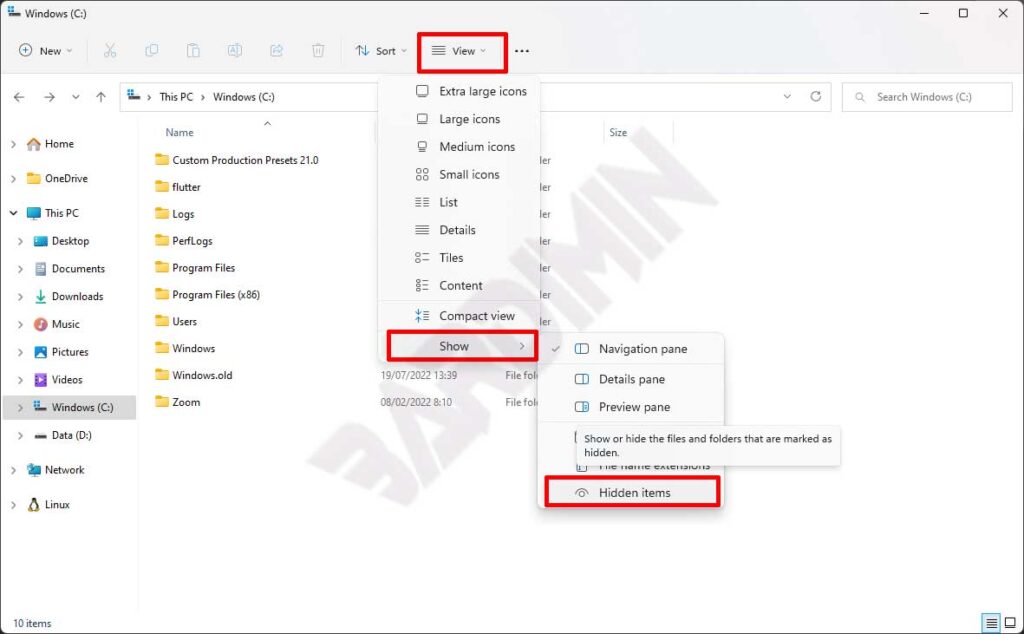
This method works well for temporary tasks. The setting remains active across File Explorer sessions until you manually uncheck it. Once enabled, all files and folders with the Hidden attribute become immediately visible.
Complete Control: Managing Visibility Through Folder Options
For a more precise and persistent configuration, open the Folder Options dialog. This allows you to control hidden files and protected system files simultaneously.
- Open File Explorer (Win + E).
- Click the three‑dot icon (…) on the command bar and select Options.
- Switch to the View tab in the Folder Options window.
- Scroll through the Advanced settings list.
- Locate Hidden files and folders and select Show hidden files, folders, and drives.
- Click Apply, then OK.
This global setting affects all File Explorer windows. Keep in mind that files with the System attribute still remain hidden; you must perform one additional step to reveal them.
Unhiding Protected Operating System Files
System‑protected files stay invisible even after Hidden items is turned on. To access them, you must disable the Hide protected operating system files option. This action exposes core Windows components that are extremely sensitive.
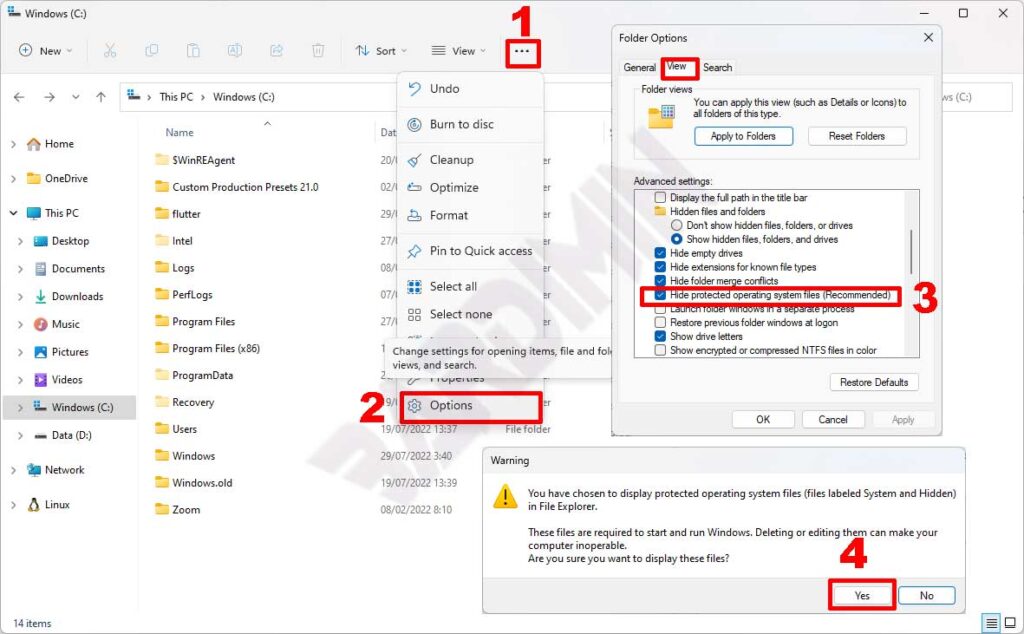
- Return to Folder Options via … > Options in File Explorer.
- Go to the View tab.
- Scroll down and locate Hide protected operating system files (Recommended).
- Clear the checkbox. A security warning will appear.
- Click Yes to confirm that you accept the risk.
- Press Apply and then OK.
After completing these steps, files like bootmgr, hiberfil.sys, and swapfile.sys will appear in the root drive. It is highly advisable to re‑hide them by re‑enabling the option once your work is done to avoid accidentaly modifications.
Managing File Attributes via Command Prompt
Many IT professionals prefer using Command Prompt or PowerShell for rapid file attribute management. The command dir /ah lists all hidden files in a directory. To remove the Hidden attribute from a specific file, use attrib -h "filename". If the file also has the System attribute, add the -s switch.
For example, attrib -h -s "C:\config.sys" strips both attributes at once. Always run the command prompt as an Administrator to ensure you have the necessary permissions. Verify your file list carefully before executing batch operations to prevent accidental data exposure.
Risks and Essential Precautions
Key risks when accessing hidden and protected files:
- Boot failure: Deleting or altering BCD, winload.exe can stop Windows from starting.
- Data loss: Hidden folders may contain registry hives. Incorrect modifications can corrupt user profiles.
- System vulnerability: Exposed system files become easier targets for malware that scans for hidden items.
Always create a system restore point or a full backup before making any low‑level changes. If you only need to view or copy hidden files, use a standard user account to minimize the risk of unintended modifications.
Real‑World Value for IT Pros and Gamers
Accessing hidden folders in Windows 11 is far more than a visual tweak. Technicians can diagnose system faults by reading error logs stored in the hidden C:\ProgramData folder or replace malfunctioning DLLs. Gamers, on the other hand, can locate save files and configuration data tucked away inside AppData\Local or AppData\Roaming. Titles such as Minecraft, The Witcher 3, and Cyberpunk 2077 store crucial progression and settings files in these directories.
The same procedure simplifies tasks like transferring a user profile to a new PC or recovering application licenses whose files reside in hidden locations. By combining the ability to show hidden files and to unhide protected system files, a seasoned professional can perform a comprehensive security audit of the Windows directory.
Restoring Default View Settings Securely
Once your task is complete, lock your system back down. Open Folder Options, re‑check Hide protected operating system files, and select Don’t show hidden files, folders, or drives. This simple step minimizes the risk if a casual user later operates the machine. You can also create a shortcut to Folder Options using the Run dialog (Win + R) and the command control folders.
With these clear, measured steps, you gain full control over your storage content without relying on third‑party tools. Always balance your actions with a thorough understanding of the associated risks. For official guidelines, refer to the Microsoft support page.