Cloning a hard drive to a Samsung SSD has never been more straightforward. Using Samsung Data Migration, you can copy your entire operating system, applications, and personal files to a new drive in a matter of minutes. No reinstallation, no data loss. This step-by-step guide gives technicians and power users a clear, assertive pathway to complete the migration with absolute confidance.
Swapping a mechanical hard disk for a Samsung SSD is the single most impactful upgrade any computer can receive. The fear of reinstalling Windows, configuring dozens of applications, and restoring terabytes of data prevents many users from making the switch. Samsung SSD Integrated Software Installer eliminates that fear. It bundles Samsung Magician for drive optimization and Samsung Data Migration, a dedicated tool designed specifically to clone HDD to SSD Samsung drives. This guide concentrates entirely on the cloning process, delivering a sequence of sharp, well-defined instructions that will take you from preparation to first boot in no time.
Preparation Phase: Set the Stage for a Flawless Clone
A structured preparation routine stops failures before they occur. Execute the following checklist meticulously before launching any software.
- Verify target SSD capacity. Open Windows Explorer, right‑click each partition on the source HDD, and note the Used space total. That number must be smaller than the Samsung SSD’s total capacity.
- Connect the SSD directly. For maximum speed and stability, attach the drive to an internal SATA or M.2 port on the motherboard. If you must use a USB adapter, ensure it supports UASP.
- Back up critical data. While cloning is non‑destructive to the source disk, no professional workflow omits a safety copy.
- Disable antivirus and disk‑monitoring tools. Security software can lock the drive and interrupt the migration.
- Guarantee stable power. Use a UPS for desktops and keep the laptop charger plugged in throughout the entire procedure.
- Log in as Administrator. Full read/write permissions are mandatory for sector‑by‑sector access.
Installing Samsung Data Migration
Obtain the authentic software exclusively from the official Samsung Semiconductor support page: Samsung SSD Tools & Software. The download is supplied either as part of the Samsung SSD Integrated Software Installer or as a standalone executable. Launch the installer, accept the license terms, and finish the setup in under a minute. A shortcut will appear on your desktop, ready for action.
Step‑by‑Step: Clone HDD to SSD Samsung
The following procedure is built for confidence. Every step includes a technical rationale so you understand not just what to do, but why it matters.
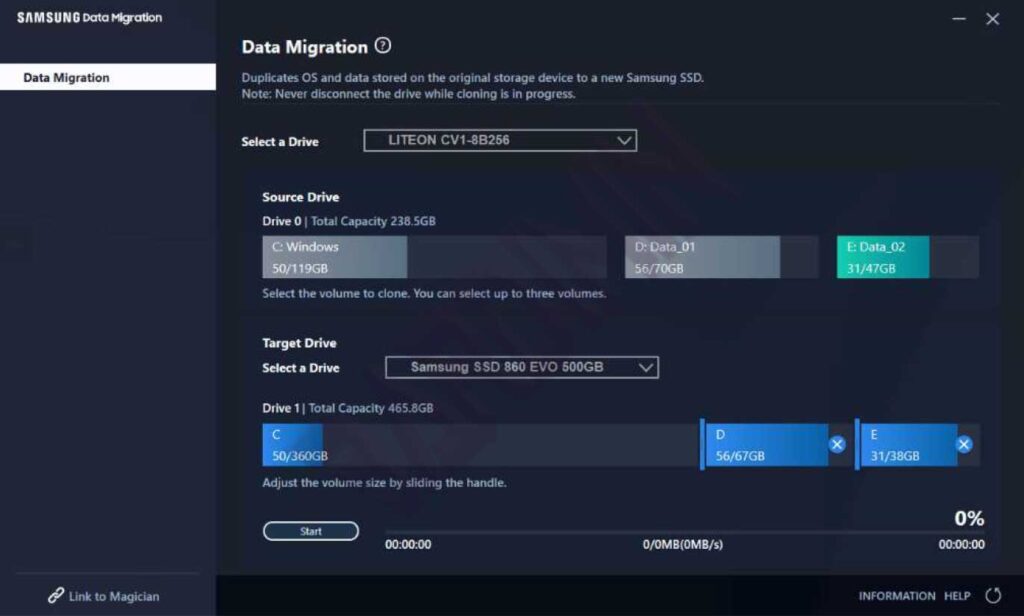
Step 1 – Select the Source Disk Correctly
Launch Samsung Data Migration. In the Source Disk pane, pick the hard disk that hosts your operating system. The software lists all detected partitions; verify that the system partition (typically C:) and any data volumes you need are included. Recovery and hidden partitions will be cloned automatically.
Step 2 – Choose the Samsung SSD Target
Move to the Target Disk section and select the connected Samsung SSD. Only Samsung‑branded drives appear in this list. Watch the capacity indicator. If the used space on the source exceeds the SSD’s total space, the Start button remains grayed out. You must either slim down the source data or acquire a larger SSD.
Step 3 – Start the Cloning Operation
Press the Start button. A warning dialog reminds you that all existing data on the target SSD will be overwritten and cannot be recovered. Confirm with Yes. A progress bar tracks the copy task. Do not shut down the computer, unplug cables, or launch heavy applications while the bar moves. A typical 500 GB HDD cloned over a SATA III connection finishes in 25 to 45 minuts.
Leave the computer completely idle during cloning. Any power fluctuation or competing disk activity can corrupt the migration.
Step 4 – Boot from Your New Samsung SSD
When the progress bar reaches 100%, close the application and shut down the PC. Disconnect the old HDD’s data cable to avoid boot conflicts. Power on and enter the BIOS/UEFI setup by pressing F2, Del, or Esc during startup.
- Navigate to the Boot tab and set the Samsung SSD as the first boot device.
- Ensure the storage controller mode is set to AHCI. IDE or legacy modes cripple performance and disable TRIM.
- Save the settings and exit.
Windows will now load directly from the SSD. The experience is instantly recognizable: boot times shrink to seconds, applications launch almost immediately, and file transfers become dramatically faster.
Troubleshooting Post‑Clone Boot Failures
If the system throws a blue screen or a “Boot Device Not Found” message, remain calm. Quick remedies:
- Re‑inspect the boot priority. The SSD must occupy the top slot.
- Switch SATA mode to AHCI. Many older HDDs were configured as IDE; adapt the setting accordingly.
- Use Windows installation media to run Automatic Repair or open Command Prompt and execute
bootrec /fixmbrfollowed bybootrec /rebuildbcd. - Load NVMe drivers if your SSD is an M.2 PCIe model. Some systems require the driver to be present before the drive is recognized as bootable.
Post‑Clone Optimization for Peak Performance
Booting successfully is only half the journey. Take advantage of Samsung Magician, included in the integrated installer, to maintain long‑term health and speed. Critical actions you can apply straight away:
- Performance Optimization (TRIM): Click the Optimize button to inform the SSD which data blocks are no longer in use. Schedule the task daily or weekly for consistent performance.
- Overprovisioning: Allocate roughly 10% of the drive’s capacity as spare area. The controller uses this space to even out cell wear, extending the SSD’s lifespan. Set it from the dedicated tab.
- Enable RAPID Mode only if your system has at least 8 GB of RAM and is protected by a UPS. It caches frequently accessed data in system memory for ultra‑low latency.
- Firmware updates: Check the Update section periodically. New firmware often brings critical stability and speed improvements.
Professional Tips for a More Efficient Clone
- Clean the source disk first. Run Windows Disk Cleanup to purge temporary files, system caches, and the recycle bin. Less data to copy means faster completion.
- Temporarily disable hibernation and reduce the pagefile when the SSD capacity is tight. After cloning, re‑enable hibernation with
powercfg /h on. - Favor a direct SATA connection over USB for cloning. The full 6 Gbps bandwidth of SATA III can cut the migration time in half.
- Perform a Secure Erase on a used SSD target via Magician beforehand. This restores the drive to fresh‑out‑of‑box performance and eliminates any leftover partition conflicts.
Operating System Compatibility
Samsung Data Migration and Magician support Windows 7 SP1 (32/64‑bit), Windows 8/8.1 (32/64‑bit), Windows 10 (32/64‑bit), and Windows 11 (64‑bit). Even on Windows 7, which no longer receives official Microsoft support, the tool functions fully. For the best security and driver support, Windows 10 or 11 is strongly recommended.
Download Directly from the Official Source
Visit the Samsung Semiconductor support hub to get the latest installer: Samsung SSD Tools & Software. Here you will find the Samsung SSD Integrated Software Installer that contains both Magician and Data Migration, plus standalone links if you only need the cloning utility.
For detailed Magician documentation, including video guides and the most recent release notes, go to Samsung Magician Official Page.
By following the assertive steps above, you can confidently clone HDD to SSD Samsung without any stumbling blocks. The combination of official software, clear preparation, and post‑migration optimization ensures your new solid‑state drive delivers its full potential from the very first boot.