The Windows.old folder generated after a Windows 11 upgrade can consume tens of gigabytes of storage space. Safely and permanently delete Windows.old using built-in Windows tools without risking system data loss.
Every time you upgrade Windows, for instance from Windows 10 to Windows 11, the system automatically creates a folder named Windows.old. This folder contains a complete copy of your old installation, including system files, installed programs, and user settings. Its purpose is to provide a rollback option if the new version becomes unstable or data migration fails.
Unfortunately, Windows.old can grow very large, often reaching 10–30 GB or even more. This space is precious, especially for users with limited-capacity SSDs, such as gamers who need room for modern games. Deleting this folder is an important step to optimize storage, but only after you are sure the new Windows version runs without issues.
⚠ Important Warning: Before deleting Windows.old, make sure you will not need to revert to your previous Windows version. After this folder is removed, a rollback is impossible. Also, copy any personal files that might still reside inside the folder to another location.
What Is the Windows.old Folder and Why Does It Appear?
Windows.old is a backup directory created by the operating system when you perform an in-place upgrade (keeping apps and data) or a fresh installation without formatting the partition. This folder holds three main components:
- Old system files – The entire Windows, Program Files, and Program Files (x86) directories from the previous version.
- User profiles – Data from C:\Users, including documents, downloads, and desktop items.
- Registry settings – A registry backup that enables configuration recovery.
This folder is very useful for technicians and advanced users who need to perform troubleshooting. For example, if a specific driver is incompatible with Windows 11, you can extract the driver file from Windows.old. However after a grace period (usually 10 days), Windows automatically deletes this folder if storage space runs low. The automatic proccess does not always run on time, so manual deletion is still necessary.
When Is the Right Time to Delete Windows.old?
Do not rush to delete Windows.old immediately after the upgrade. Allow at least 3–5 days to test the stability of the new system. Signs that Windows 11 is safe to use:
- All hardware (printer, GPU, audio) works normally.
- Your favorite applications, including AAA games, run without errors.
- No blue screen of death (BSOD) or sudden crashes occur.
- Features like Windows Update and Recovery function properly.
If you are confident, Windows.old can be deleted. For gamers, cleaning this space means you can install new games or store high-resolution gameplay recordings without worrying about a full SSD.
How to Delete Windows.old Using Storage Settings (Primary Method)
The easiest and recommended method is through the built-in Storage Settings. These steps apply to both Windows 11 and Windows 10 (version 1809 and later).
- Open Settings using the keyboard shortcut
Win + I. - Navigate to System > Storage.
- On the right panel, click Temporary files. The system will scan for temporary items.
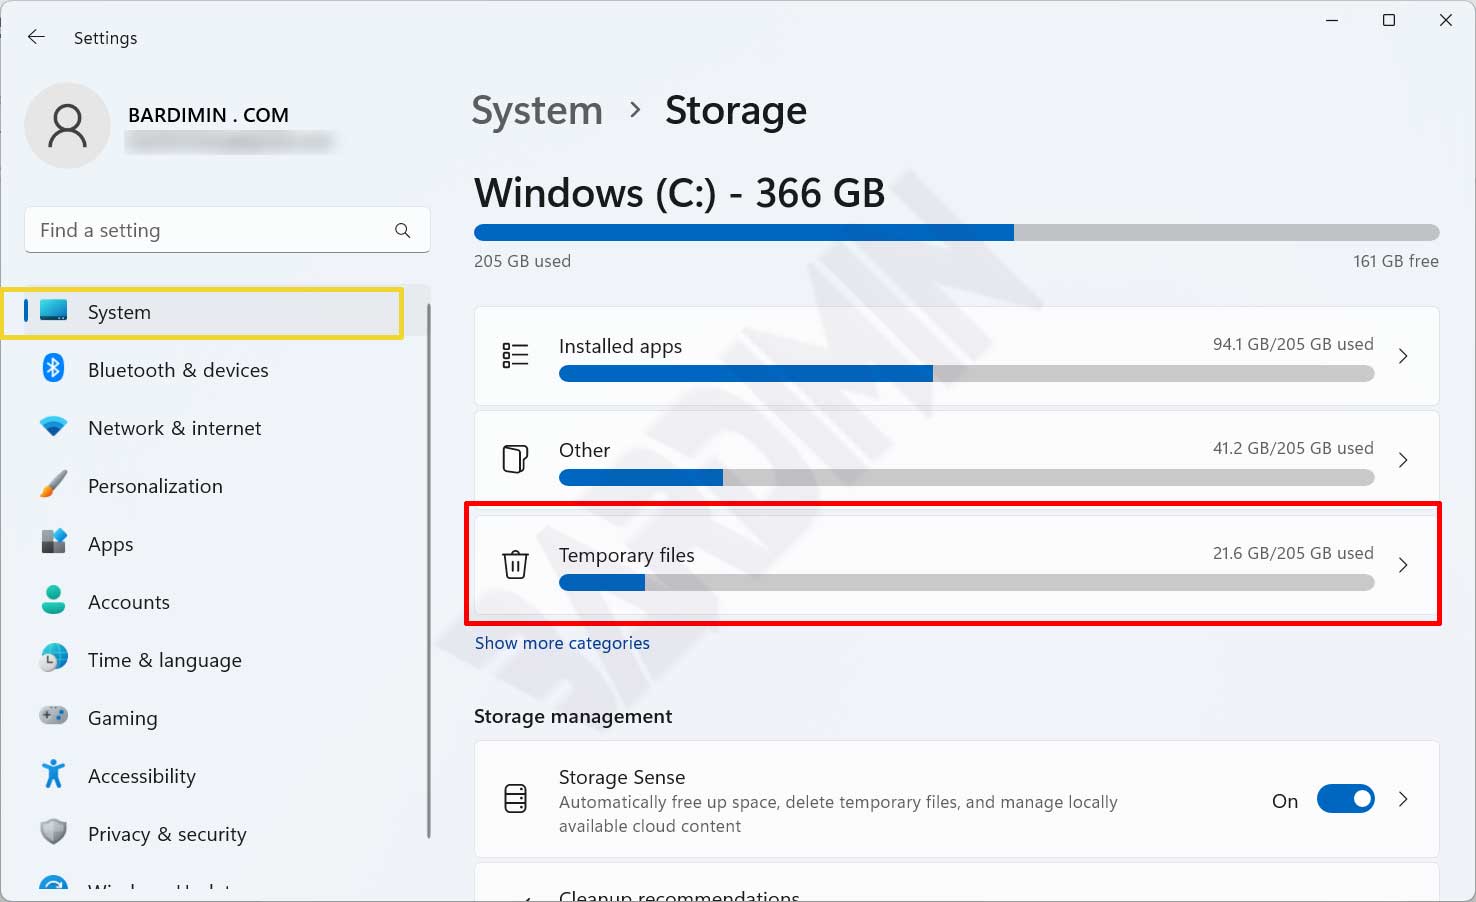
- Scroll down until you find Previous Windows Installation(s). Check the box next to it. You can also check Windows Update Cleanup to remove leftover update files.
- Click the Remove files button. Windows will ask for confirmation.
- In the confirmation dialog, click Continue to start the deletion proccess.
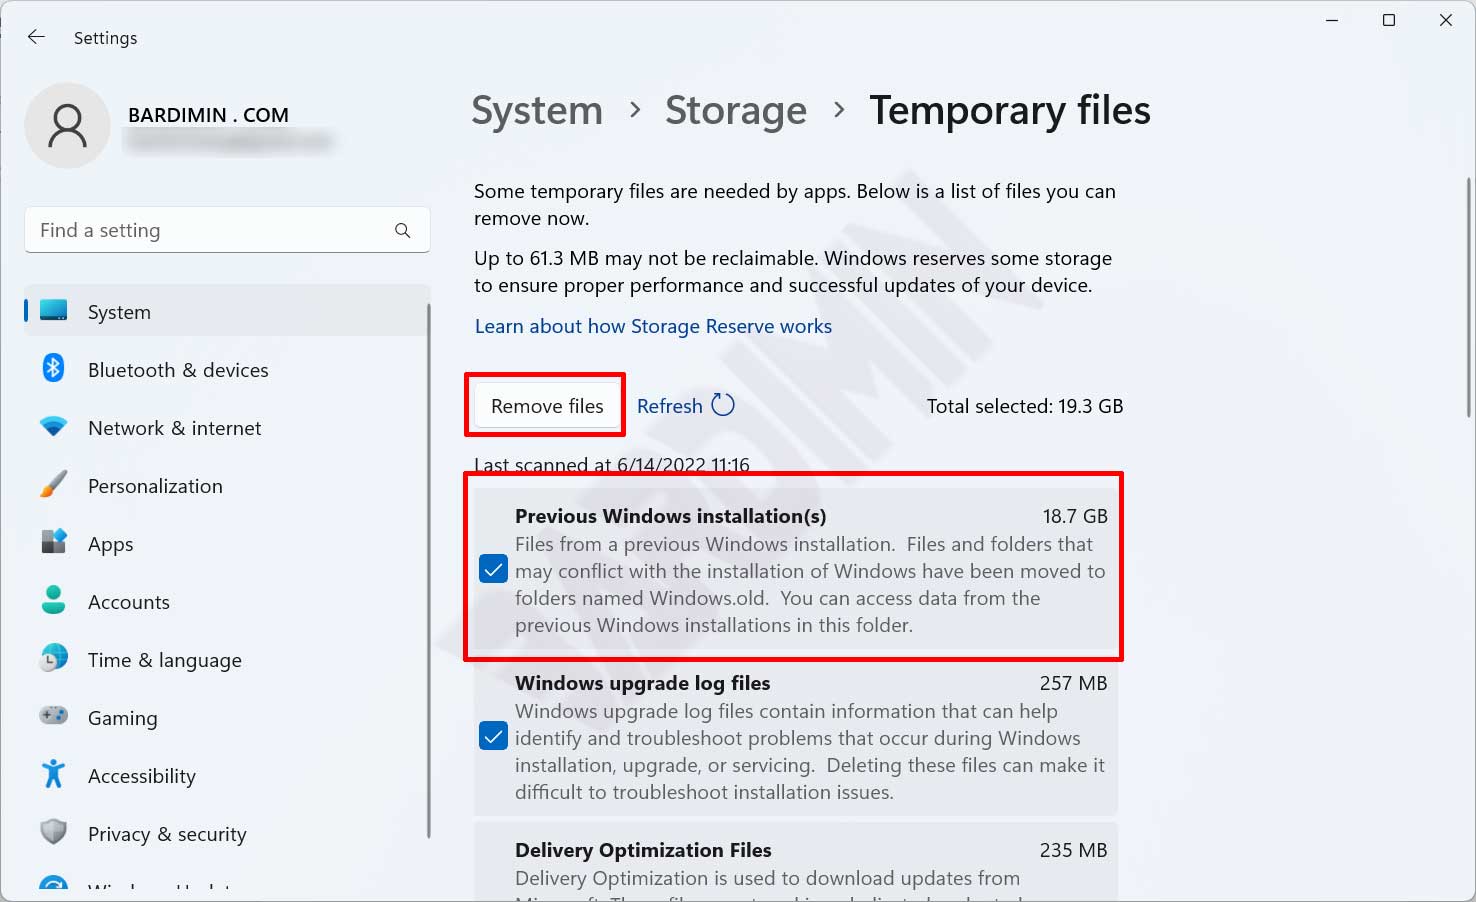
The deletion proccess takes a few minutes depending on the folder size. Once completed, storage space will increase immediately. You do not need to restart your computer.
Alternative Methods: Disk Cleanup and Command Prompt
If you prefer classic tools or need to perform remote deletion, the following two methods are good options.
1. Using Disk Cleanup (cleanmgr)
Disk Cleanup is a built-in utility from the Windows 98 era. Here is how to use it:
- Press
Win + R, typecleanmgr, then press Enter. - Select the drive where Windows is installed (usually C:).
- Click Clean up system files (this button requires administrator privileges).
- After the rescan, check Previous Windows installation(s).
- Click OK, then delete the files.
This method is identical to Storage Settings, but it works on all Windows versions including Windows 7 and 8.
2. Deleting Windows.old via Command Prompt (Admin)
For technicians who want full control or need to delete the folder from a recovery environment, Command Prompt is a robust solution.
Open Command Prompt as administrator. Type the following command:
RD /S /Q C:\Windows.oldThe command RD /S /Q forcefully deletes the folder along with all subfolders and files without any confirmation prompt. Make sure you have typed the path correctly. This method is very fast and leaves no traces.
Note for IT professionals: If Windows.old resides on a different partition (e.g., D:), adjust the path accordingly. Run dir C:\ first to verify the folder exists.
Avoid deleting Windows.old using regular File Explorer. The Delete button will not work because this folder has system attributes and access protection. Forcing deletion by changing folder ownership can damage security permissions and cause system errors.
Important Tips Before Deleting Windows.old
Although the procedures above are considered safe, several points are often overlooked by users:
- Back up important data – Check
C:\Windows.old\Users\[Your_Username]. There might be documents or project files that did not carry over to the new installation. - Ensure critical drivers are saved – If you use special drivers (e.g., for capture cards or industrial devices), copy the folder
C:\Windows.old\System32\DriverStoreto a safe location. - Check space after deletion – Open Storage Settings again to confirm no leftover files remain. Sometimes Windows Update Cleanup also needs to be run separately.
- Avoid third-party cleaning software – Many applications like CCleaner can delete Windows.old, but they risk removing other important files. Stick with built-in Windows methods.
Why Gamers Should Care About Windows.old
Modern games like Call of Duty: Modern Warfare II or Starfield require up to 150 GB of space. A 500 GB NVMe SSD can fill up quickly. An undeleted Windows.old folder can take 10–20% of your SSD capacity. The impacts:
- Reduced game performance – An SSD that is nearly full (above 90%) will slow down read/write speeds, affecting game loading times.
- Failed game updates – Platforms like Steam or Epic Games need free space equal to twice the update size.
- Inability to record gameplay – Background recording features such as NVIDIA ShadowPlay or Xbox Game Bar require buffer space.
Therefore, regularly cleaning Windows.old after an upgrade is a good habit for gamers who want to maintain performance and available space.
✅ Quick Summary: The most efficient way to delete Windows.old is through Settings > Storage > Temporary files. This method is safe, requires no technical commands, and frees up tens of gigabytes instantly. Do this only after ensuring Windows 11 has run stably for at least 3 days.
By following this guide, you not only clean up storage but also ensure your system stays optimal for professional work and gaming. Always remember to back up important data before performing any mass deletion.