Windows 11 features malfunctioning can be fixed via in-place upgrade using official ISO file, preserving personal data and installed applications without full reinstallation.
Windows 11 operating system may experience performance degradation over time. Certain features stop working optimally. System errors appear without clear cause. You need an effective repair solution. In-place upgrade method with ISO file offers precise answer. This process repairs corrupted system files. User data remains secure. Installed applications stay intact. System settings are preserved. This solution suits professionals, technicians, and gamers requiring stable systems.
Why Choose In-Place Upgrade Method with ISO
In-place upgrade method differs from clean installation. This process selectively overwrites Windows system files. Personal files and applications remain untouched. You avoid losing valuable data. Recovery time becomes shorter. Custom configurations need no reconfiguration. This method suits system error repairs. Registry damage can be resolved. Problematic drivers update automatically. Corrupted system components get fresh replacements.
Important Note: Always backup critical data before starting repair process. Although this method is safe, technical risks always remain posible.
Preparing Official Windows 11 ISO File
First step involves downloading official ISO file. Visit Microsoft download portal. Access official Windows 11 ISO download page. Select “Download Windows 11 Disk Image” option. Choose Windows edition matching your needs. Click download button. Select system language. Confirm your selection. Download 64-bit ISO file. File size reaches several gigabytes. Ensure stable internet connection. Verify sufficient storage space.
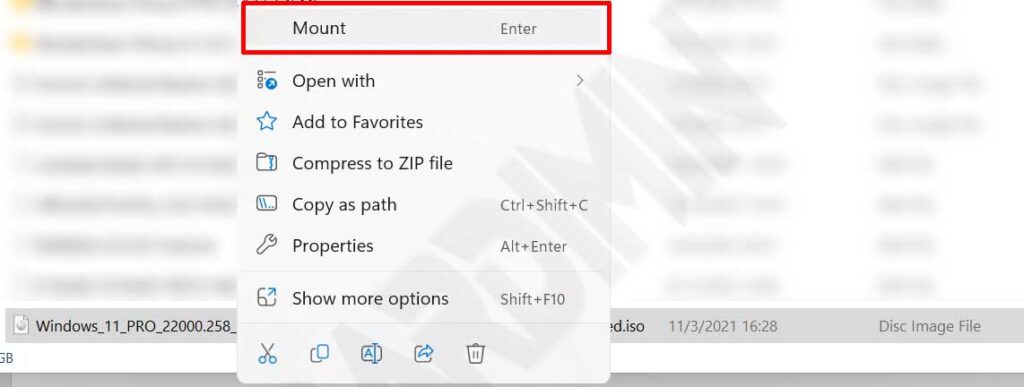
After download completes, locate ISO file. Right-click on the file. Select “Mount” menu from context options. System creates virtual DVD drive. New drive appears in File Explorer. Drive name usually shows “DVD Drive”. You now access installation contents. Setup.exe file ready to run. Mounting process does not alter original file. You can unmount anytime needed.
In-Place Upgrade Process for Windows 11 Repair
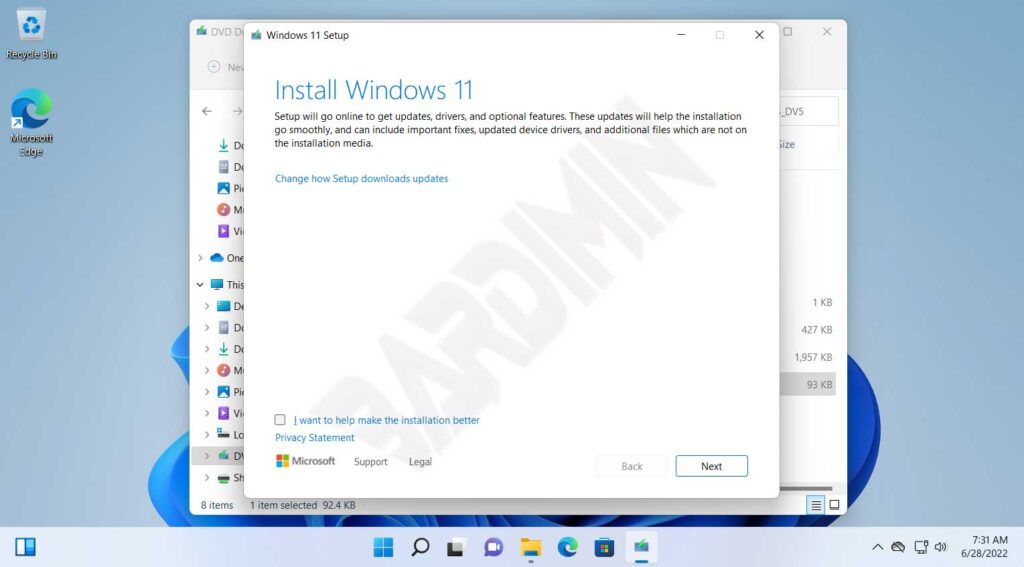
Step 1: Launching the Installer
Open File Explorer application. Navigate to mounted virtual drive. Locate “Setup.exe” file. Double-click to run installer. User Account Control window appears. Click “Yes” granting administrative privileges. Windows 11 installer now launches. Click “Next” button on initial screen. System checks online updates automatically. Ensure active internet connection. This process guarantees latest version usage.
Step 2: Accepting License and System Check
Accept Microsoft license agreement terms. Check the approval checkbox. Click “Accept” to proceed further. Installer performs compatibility verification. This process takes several minutes. Verification results display clearly. If compatibility issues exist, system shows warning. You may cancel or continue process. For Windows 11 repair, proceed with installation.
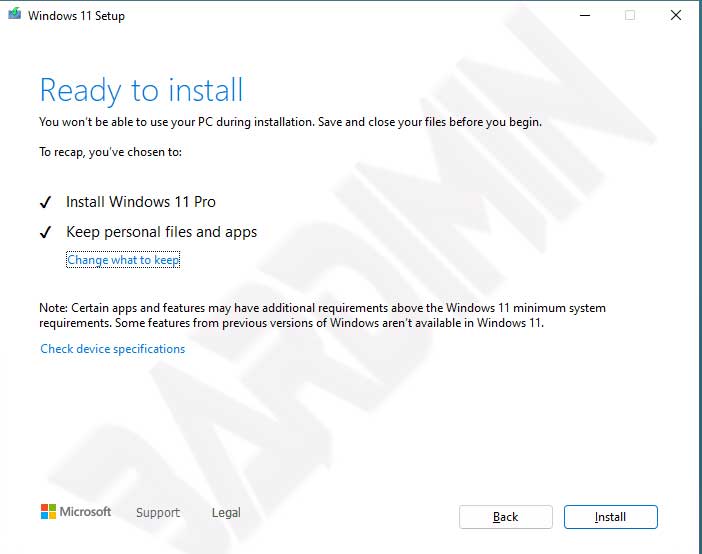
Ensure “Keep personal files and apps” option remains selected. This setting proves crucial for preserving your data during Windows 11 ISO repair process.
Step 3: Configuring Data Retention Options
“Ready to install” screen will appear shortly. Verify “Keep personal files and apps” option. This option must stay active. If not, click “Change what to keep”. Select appropriate retention option. Click “Next” for confirmation. “Install” button becomes active now. Click to start repair process. System begins installing components. Progress bar displays installation advancement.
Monitoring Process and Upgrade Completion
Installation process runs automatically now. System will restart multiple times. Never power off PC during process. Ensure stable power supply source. Use UPS device if available. Laptop should connect to adapter. Process may take 30-90 minutes. Duration depends on hardware specifications. System components update one by one. Corrupted files get valid replacements. Registry repairs automatically during process.
- Monitor progress bar on installation screen.
- Allow system restarts without intervention.
- Follow on-screen prompts if they appear.
- Wait until process reaches 100 percent.
- System will boot to Windows 11 desktop.
After process completes, Windows 11 desktop appears. Verify system functionality thoroughly. Previously error features now function properly. Open applications that had issues before. Verify application performance metrics. Check crucial system settings. Update drivers if necessary. Run Windows Update for latest patches. System now operates in optimal condition.
Troubleshooting Tips: If upgrade process fails, check available storage space. Ensure minimum 20GB remains free. Temporarily disable antivirus software. Close background applications. Try running installer as administrator. Redownload ISO file if corruption suspected.
Verifying Results and Post-Repair Optimization
Perform thorough verification after upgrade completion. Open System Information utility. Check Windows 11 build version number. Ensure version matches expectations. Run “sfc /scannow” command in Command Prompt. This command verifies system file integrity. Scan results display system health status. Use “DISM /Online /Cleanup-Image /RestoreHealth” for advanced repairs.
Check Device Manager for driver status indicators. Update drivers showing warning symbols. Run Windows Update for latest security patches. Optimize application startup behavior. Disable unnecessary programs via Task Manager. Configure power plan matching usage needs. For gamers, ensure optimal GPU settings. Enable Game Mode for maximum performance gains.
In-place upgrade method with ISO file represents professional solution for Windows 11 repair. This process combines data security with effective system restoration capabilities.
Document all system changes performed during repair. Record build versions before and after upgrade. Save installation logs for future reference. Create new restore point after system stabilizes. This step simplifies recovery if issues reappear later. IT professionals can automate this process for large-scale deployments.
Conclusion and Practical Recommendations
Windows 11 repair using ISO file offers effective solution. In-place upgrade method preserves user data completely. Corrupted system files get repaired without total reinstallation. This process suits various troubleshooting scenarios effectively. Technicians can save significant system recovery time. Gamers regain stable gaming environment quickly. Professionals maintain productivity without technical interruptions.
Always use official ISO files from Microsoft sources. Avoid untrusted download sources completely. Verify file checksum before mounting operation. Ensure hardware meets system requirements properly. Perform data backup as preventive measure always. Follow step-by-step guide with careful attention. With proper approach, Windows 11 repair becomes predictable and reliable process.