Disabling unnecessary startup programs in Windows 11 is the single most effective way to cut boot time by up to 50% and improve overall system responsiveness. For professionals, technicians, and gamers, managing auto-start applications reduces CPU load, frees RAM, and stabilizes frame rates (FPS) in competitive games.
Every time Windows 11 starts, several programs quietly launch in the background. Apps like Skype, Spotify, Adobe Creative Cloud, or game launchers (Steam, Epic Games, GOG Galaxy) often add themselves to the startup list without asking. This lengthens boot time, wastes resources, and on devices with limited RAM (8 GB or less), gaming performance can drop sharply due to memory thrashing.
However, not all startup apps are harmful. Antivirus software (Windows Defender, Norton, McAfee), hardware drivers (NVIDIA, AMD, Realtek), and battery management utilities on laptops must run from the start to ensure security and stability. Therefore, you need to carefully select which programs stay and which should be disabled.
This article provides a complete technical guide to disable startup Windows 11 using six different methods: Settings, Task Manager, Registry Editor, Startup Folder, PowerShell, and third‑party tools like CCleaner and Autoruns. Each step includes a performance impact analysis, especially for gaming and professional multitasking scenarios.
1. Disable Startup via Windows 11 Settings (Easiest Method)
Microsoft provides a dedicated interface for managing startup apps in Windows 11. This method is ideal for casual users and professionals who want to optimize quickly without touching the registry or command line.
- Press Win + I to open Settings.
- Navigate to Apps → Startup (or search “startup” in Settings).
- You’ll see a full list of programs with their On/Off status and Startup Impact column (Low, Medium, High).
- Toggle the switch to Off for any app you don’t need at boot.
- Repeat for all non‑essential programs.
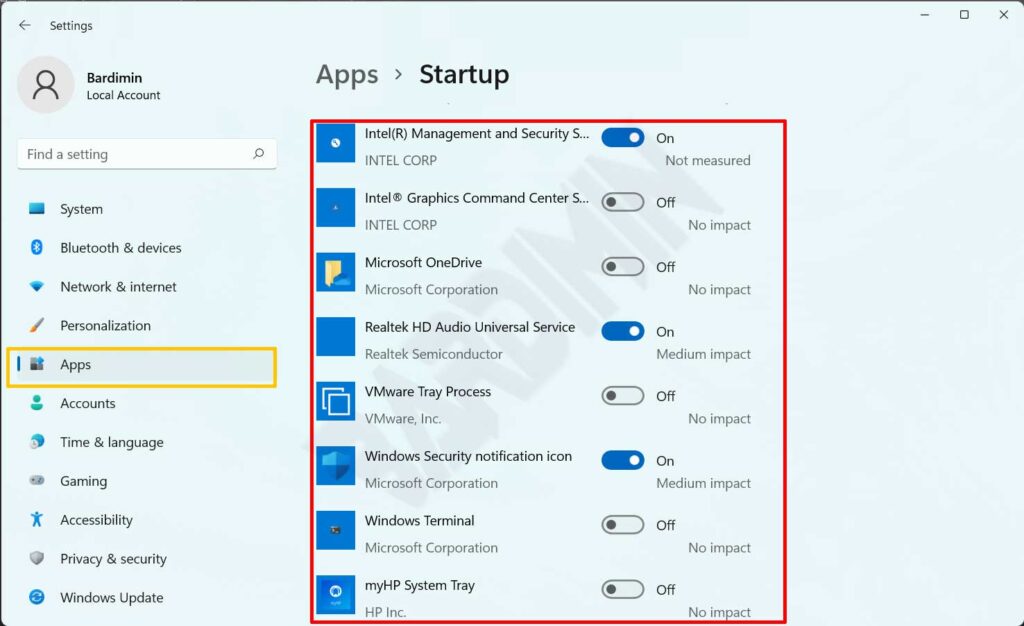
For gamers, pay attention to apps like OneDrive, Teams, Discord, or Game Launchers that often have Medium or High impact. Disabling them can reduce input latency and improve FPS stability, especially in titles like Valorant, Call of Duty: Warzone, or Counter‑Strike 2.
After disabling 5 unnecessary startup apps, my NVMe SSD boot time dropped from 22 seconds to 11 seconds. FPS in Cyberpunk 2077 increased by 8‑12 FPS becuase RAM became less crowded.
– Rizky, technician and pro gamer
2. Use Task Manager to Analyze and Disable Startup
Task Manager offers more detailed information than Settings. Here you can see CPU usage at startup, Disk I/O, and Power consumption for each program. This method is very useful for technicians who need to identify which apps burden the system the most.
- Open Task Manager by pressing Ctrl + Shift + Esc (or right‑click the taskbar and select Task Manager).
- If it opens in compact view, click More details at the bottom.
- Click the Startup tab (or Startup apps on newer Windows 11 builds).
- Look at the Status column (Enabled/Disabled) and Startup impact.
- Right‑click the target app and choose Disable.
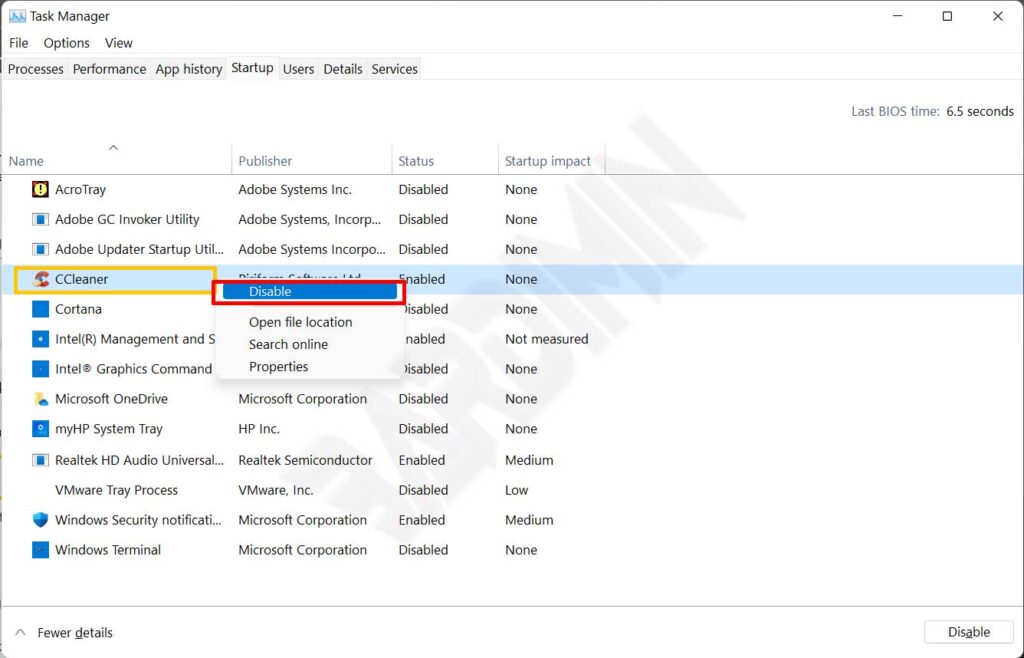
A key advantage of Task Manager is the CPU at startup column (available in Windows 11 build 22621 and later). The higher the value (in milliseconds), the more processor power is consumed during login. For professional laptops, disabling apps with values above 10 ms can save up to 15% battery life over an 8‑hour work cycle.
3. Advanced Techniques: Registry, Startup Folder, and PowerShell
The previous methods only disable startup entries; they don’t remove them permanently. For full control, technicians and power users can use the following three approaches. Warning: Back up the registry before making any changes.
3.1 Registry Editor (Most Powerful)
The registry stores startup entries for all users. This method is effective for removing mild malware or stubborn programs that restore themselves.
- Press Win + R, type
regedit, and press Enter. - Approve the UAC (User Account Control) prompt if it appears.
- Navigate to:
HKEY_CURRENT_USER\Software\Microsoft\Windows\CurrentVersion\Run - In the right panel, delete the string value of the unwanted app (right‑click → Delete).
- Repeat for:
HKEY_LOCAL_MACHINE\SOFTWARE\Microsoft\Windows\CurrentVersion\Run(requires admin rights).
⚠️ Critical Info: Do not delete entries you don’t fully recognize. Processes like RTHDVCPL (Realtek HD Audio) or IgfxTray (Intel Graphics) are necessary for hardware functions. If unsure, search the process name online first.
3.2 Classic Startup Folder (For Manual Shortcuts)
The Startup folder holds physical shortcuts to programs. This method still works in Windows 11 and is great for adding or removing items manually without touching the registry.
- Press Win + R, type
shell:startup(for the current user) and press Enter. - A File Explorer window opens. Delete shortcuts for apps you don’t need.
- To temporarily disable, move the shortcut to another folder (e.g., Desktop).
- Repeat with
shell:common startupto affect all users.
3.3 PowerShell for Mass Automation
Technicians and administrators can use PowerShell to disable startup entries in bulk. Here is a safe example script:
# List all startup entries
Get-CimInstance -ClassName Win32_StartupCommand | Format-Table Name, Command, Location

# Disable a specific scheduled task
Disable-ScheduledTask -TaskName "AdobeGCInvoker" -ErrorAction SilentlyContinue

# Remove a registry startup entry for current user (careful!)
Remove-ItemProperty -Path "HKCU:\Software\Microsoft\Windows\CurrentVersion\Run" -Name "Spotify" -ErrorAction SilentlyContinue
The commands above only display and disable; they do not permanently delete except for the last line. Always test scripts in a non‑production environment first.
4. Use CCleaner and Autoruns for Professional Startup Management
Unlike built‑in Windows methods, third‑party tools like CCleaner and Autoruns (Sysinternals) can permanently delete startup entries, not just disable them. CCleaner suits regular users, while Autoruns is the ultimate weapon for technicians.
4.1 CCleaner (Free, Easy)
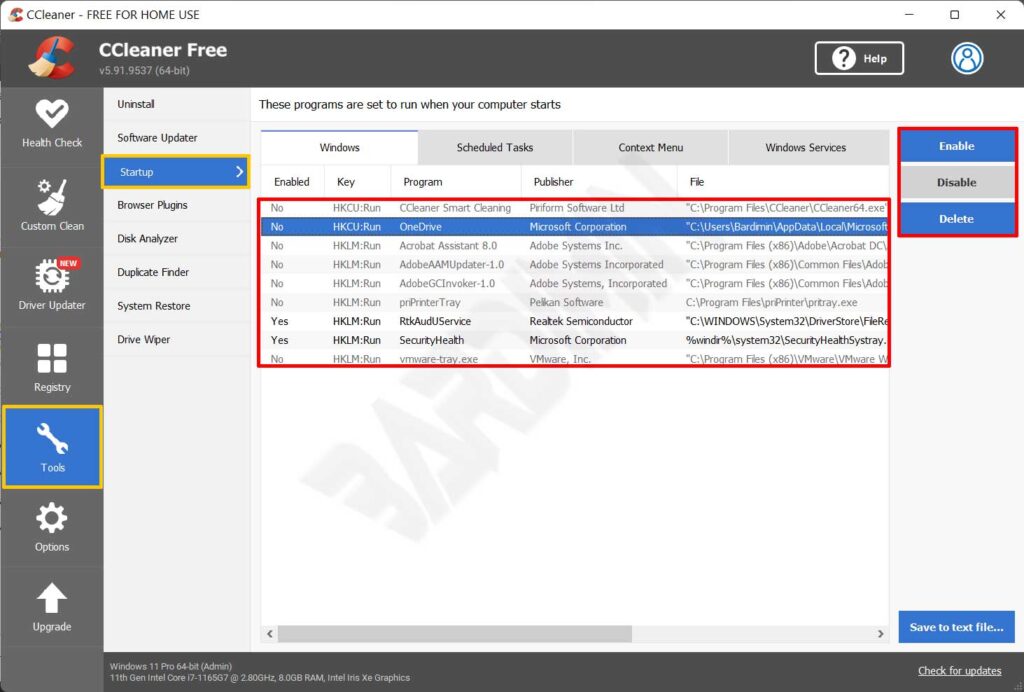
- Open CCleaner, go to Tools → Startup.
- You’ll see several tabs: Windows, Task Scheduler, Context Menu, etc.
- Select an app on the Windows tab, then click Disable or Delete.
- The Delete option permanently removes the entry from the registry, so it won’t reappear after a restart.
3.2 Autoruns from Microsoft Sysinternals (For Technicians)
Autoruns is free, portable, and extremely detailed. It displays over 50 startup locations, including shell extensions, Windows services, drivers, and scheduled tasks. Every Windows technician should have this tool.
- Download Autoruns from the official Microsoft site (extract and run as administrator).
- Let the scan finish (may take 10‑30 seconds).
- Uncheck an entry to disable it, or right‑click → Delete to remove it permanently.
- Don’t forget to click File → Save to store a configuration snapshot before making changes.
For gamers, I recommend using Razer Cortex or MSI Afterburner, which include a “Game Boost” feature. This temporarily disables startup programs while a game runs and re‑enables them afterward. This approach is more practical and avoids permanent configuration changes.
Impact of Startup on Gaming and Productivity Performance
A study from Microsoft Docs notes that each additional startup process increases boot time linearly by about 0.5–2 seconds per process on NVMe SSDs, and 5–10 seconds per process on hard disk drives (HDD). Therefore, disabling 5‑10 unnecessary apps can save 30‑60 seconds every time you turn on your computer.
For gamers, background programs like game launchers (Steam, Ubisoft Connect, Epic Games) consume 200–500 MB of RAM and 1–5% of CPU even when idle. Disabling them can give you an extra 5–15 FPS in AAA games like Cyberpunk 2077, Starfield, or Hogwarts Legacy, especially if you have only 8 GB of RAM.
Professionals working with heavy applications such as AutoCAD, Adobe Premiere Pro, SolidWorks, or virtual machines (VMware, VirtualBox) will notice significantly improved multitasking stability. A clean startup reduces disk thrashing and page file swapping, so video rendering or code compilation runs smoother without stuttering.
As a video editor, I was frustrated by laggy previews in Premiere Pro. After disabling 12 startup apps (including game launchers and Adobe updater), boot time dropped from 1 minute 20 seconds to 35 seconds. Timeline preview became smooth without re‑rendering.
– Dewi, professional video editor
As a final note, re‑evaluate your startup list every 3 months, especially after installing new software or updating drivers. Combine the methods above based on your skill level. By following this guide, you will successfully disable startup Windows 11 effectively, improve daily computing experience, and achieve optimal gaming and work performance.