

Error 0x8007007f during Windows 11 upgrade signals a stalled Installation Assistant. The root cause can be traced to insufficient administrator rights, outdated graphics drivers, critically low disk space, or damaged system files. This targeted guide delivers proven, step-by-step remedies that technicians, IT professionals, and gamers can apply immediately to resume a flawless migration.
Transitioning to Windows 11 should not end with a cryptic error code. When the Installation Assistant halts and displays 0x8007007f, the underlying issue is rarely hardware failure. Instead, the utility has detected a pre-existing condition in your current environment that blocks a safe upgrade. Addressing these conditions in a logical order restores the path forward. This article breaks down every major trigger and prescribes concrete, actionable fixes that have been validated across real-world deployments and technical forums.
Error 0x8007007f falls under generic operational failures, yet its appearance is tightly coupled to the manual upgrade workflow. Unlike routine Windows Update glitches, this stop code is specific to the Installation Assistant’s pre-flight checks. Once you understand which subsystem is raising the flag, the remediation becomes straightforward. The instructions that follow are structured for readers who need reliable reference material—clear enough for a junior technician, yet detailed enough for a seasoned system administrator.
How Error 0x8007007f Manifests in the Installation Assistant
The Windows 11 Installation Assistant is a lightweight Microsoft utility that orchestrates an in-place upgrade from Windows 10. Before downloading a single megabyte, it runs a comprehensive battery of prerequisite checks. These include verifying processor generation, TPM 2.0 status, driver compatibility, available storage, and the integrity of core system files. If any parameter deviates from expected values, the tool throws error 0x8007007f and displays a generic “Something went wrong” prompt.
This error code is not documented in depth by Microsoft, but the pattern of reported cases points to a consistent set of triggers. Recognizing these triggers dramatically shortens troubleshooting time and avoids the frustration of repeating the same failed upgrade attempt.
Primary Causes Behind Error 0x8007007f
Each trigger disrupts the assistant’s workflow in a distinct way. Understanding the mechanism behind the failure helps technicians prioritize the right fix from the start.
Insufficient Administrator Privileges
The Installation Assistant needs unrestricted write access to protected folders and registry hives. Launching the executable with standard user rights causes the User Account Control subsystem to deny these operations. On domain-joined machines with tightened group policies, even an admin account may face restrictions unless elevation is explicitly requested.
Outdated or Incompatible Graphics Drivers
Windows 11 introduces the DirectX 12 Ultimate feature set along with Auto HDR. Graphics drivers built for older Windows Display Driver Models cannot satisfy the assistant’s compatibility scan. Gamers who deliberately lock their NVIDIA, AMD, or Intel drivers to a legacy version for stability often encounter this specific blockade.
Critically Low Disk Space
The upgrade engine requires substantial temporary working room. In addition to the 5 GB installation image, the system must accommodate extracted component payloads, a backup of the existing configuration, and volatile cache files. Microsoft advises a minimum of 64 GB of free space, but field experience suggests keeping at least 70 GB available avoids edge-case failures.
Corrupted System Files
Unexpected shutdowns, incomplete previous updates, or malware can leave critical system files in a corrupted state. The Installation Assistant performs a lightweight integrity verification that fails immediately upon encountering anomalies in DLL, SYS, or .NET assembly files. The System File Checker tool remains the primary remedy.
Third-Party Security Software Interference
Non-Microsoft antivirus solutions frequently hook deeply into the kernel. During an upgrade, these hooks can trap legitimate file operations and flag them as suspicious, causing the assistant to abort. Real-time scanning components are the usual offenders, even in products from well-known vendors.
Overly Modified System Configuration
Power users who debloat Windows, disable core services, or tune registry parameters for gaming performance unwittingly create a non-standard environment. The Installation Assistant expects many of these components in their default state, and deviations can trigger the 0x8007007f stop code without any obvious warning.
Step-by-Step Resolution for Error 0x8007007f
The following sequence moves from the simplest, highest-success remedy to more involved technical procedures. Each step addresses one or more root causes identified above.
1. Run the Installation Assistant with Full Administrator Rights
This single action eliminates permission-related roadblocks. Locate the Windows11InstallationAssistant.exe file you downloaded from the official Microsoft website. Right-click the file and select Run as administrator from the context menu. Accept the UAC elevation prompt, then proceed through the wizard normally. For many users, this resolves error 0x8007007f immediately.
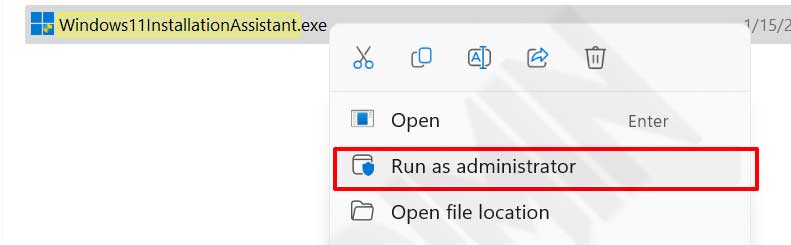
Important note: Before launching the assistant, temporarily disable any third-party antivirus software. Microsoft Defender provides sufficient real-time protection during the upgrade window. Re-enable your security solution once the migration is complete.
2. Reclaim Free Space on the System Partition
A cramped system drive is a common culprit. The assistant must download and stage large temporary files, and the process fails rapidly if free space dips below the guard threshold. Target at least 70 GB of available capacity on drive C: before retrying.
- Open Disk Cleanup from the Start menu.
- Select your system drive and click Clean up system files.
- Check Windows Update Cleanup, Delivery Optimization Files, and Temporary files.
- Confirm the deletion and wait for completion.
- Move large personal files (videos, ISO images, project archives) to external storage if needed.
After cleaning, restart the computer once to ensure all handles are released before relaunching the Installation Assistant.
3. Upgrade Graphics Drivers to the Latest Release
Modern graphics drivers are a prerequisite for Windows 11 compatibility checks. Visit the official support page for your GPU vendor and download the newest driver package. Even if Device Manager shows no warnings, a structurally outdated driver can still block the assistant.
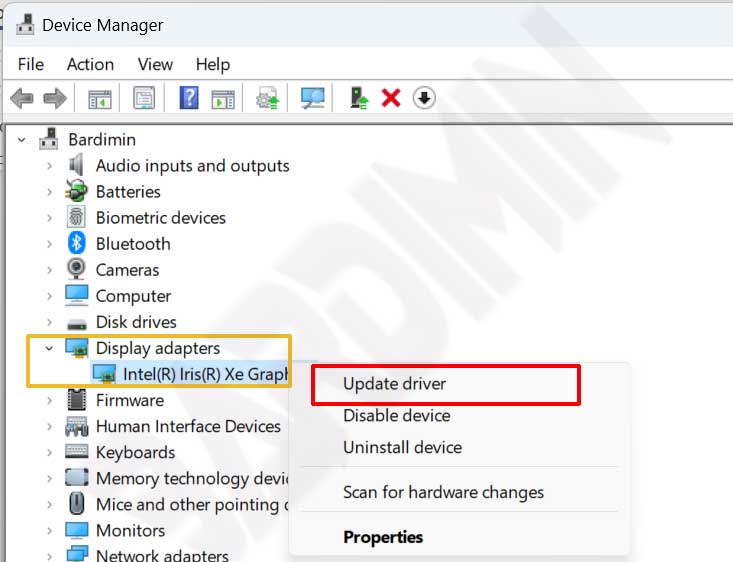
Use the official download portals listed below:
- NVIDIA: GeForce Driver Download Page
- AMD: AMD Support & Drivers
- Intel: Intel Driver & Support Assistant
After installation, reboot the machine. This clears the driver cache and ensures the new version is active during the next upgrade attempt.
4. Restore System File Integrity with SFC and DISM
Hidden corruption in system files undermines the assistant’s verification routines. The methodical combination of DISM and SFC restores core components to a known-good state.
Step 4a: Repair the Component Store
Open Command Prompt as Administrator. Execute the following command and let it finish:
DISM /Online /Cleanup-Image /RestoreHealthDISM fetches fresh copies of damaged payloads from Windows Update. A stable internet connection is required.
Step 4b: Scan All Protected System Files
In the same elevated Command Prompt window, run:
sfc /scannowThis operation enumerates every protected file and replaces any corrupted versions with cached originals. Once the verification reaches 100%, restart the computer.
5. Revert System Configuration to Defaults
If you have previously used tweaking utilities, debloating scripts, or manual registry edits, these changes may conflict with the upgrade path. Reversing them often eliminates error 0x8007007f when no other cause is apparent.
An overly customized Windows environment remains a hidden source of upgrade blockers. Restoring defaults brings the system back into a state the Installation Assistant recognizes.
Open the tweaking tool you used and apply its “Restore defaults” or “Reset” function. For manual registry alterations, navigate back to the keys you modified and return them to their original values. Reboot the system after making these changes.
6. Initiate a Clean Boot to Isolate Conflicts
Third-party services and startup programs can lock files that the assistant needs to access. Booting with a minimal set of drivers removes those potential collisions.
- Press Win + R, type
msconfig, and press Enter. - On the Services tab, check Hide all Microsoft services, then click Disable all.
- Switch to the Startup tab and open Task Manager.
- Disable every startup entry one by one.
- Click OK and restart the computer.
Run the Installation Assistant while in this clean state. If the upgrade proceeds, one of the disabled services or apps was the source of interference. Re-enable components in small groups until you identify the culprit.
7. Use the Media Creation Tool as an Alternate Upgrade Path
When the Installation Assistant persistently fails despite all the preceding steps, the Media Creation Tool provides a different engine for in-place upgrades. Download the tool from the official Microsoft Windows 11 download page. Launch it with administrator privileges and choose Upgrade this PC now. This method bypasses many of the assistant’s internal checks while achieving the identical outcome.
Preventing Error 0x8007007f in Future Upgrades
After a successful migration, adopt a few maintenance habits to avoid similar issues during subsequent feature updates. Keep graphics drivers updated through the manufacturer’s official channels, and refrain from deep system modifications unless you document each change and create a restore point beforehand. Maintain a buffer of at least 70 GB of free space on your system drive, and schedule a monthly SFC scan to catch file corruption early.
Error 0x8007007f, while disruptive, is fundamentally a safeguard that prevents a mid-installation failure. By addressing the precise condition that triggers it, you regain control of the upgrade process and achieve a stable Windows 11 environment ready for professional workloads and high-performance gaming.