

Hardware failures often begin with a cryptic Device Manager error code. Understanding each code and its precise fix restores system stability and prevents prolonged downtime for technicians, IT professionals, and gamers.
Device Manager acts as the central dashboard for all hardware components in Windows. When a graphics card, network adapter, or system controller malfunctions, it immediately flags the device with a yellow warning icon. The information displayed is far more than a simple alert. Device Manager error codes provide the critical first clue for diagnosing the root cause before any repair attempt.
Each numeric code carries a specific technical meaning tied to driver integrity, resource allocation, or firmware health. For system builders, support engineers, and competitive gamers who depend on flawless hardware interaction, decoding these messages is essential. This article breaks down every common code encountered in Windows 10 and Windows 11 and offers clear, actionable resolution steps.
How to Check Hardware Status Using Device Manager
Before interpreting any code, you need to locate the device status panel. The procedure remains identical across modern Windows editions.
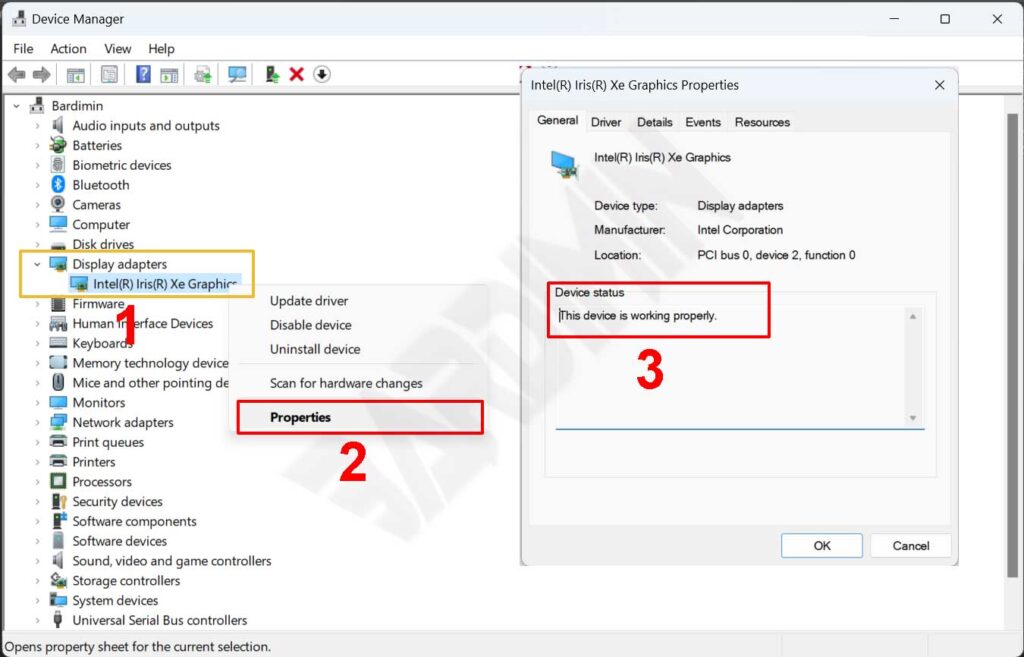
- Open Device Manager. Press Windows + X simultaneously and select it from the quick access menu. Alternatively, type “device manager” into the Start search box.
- Expand the category of the suspected hardware component by clicking the small arrow next to it. A malfunctioning device displays a yellow triangle containing an exclamation mark.
- Right‑click the problematic device and choose Properties from the context menu.
- Under the General tab, inspect the Device status box. The Device Manager error code appears here along with a short description of the failure.
Complete List of Device Manager Error Codes and Solutions
Each entry below explains the technical trigger and the most effective repair sequence. Accurate identification of the code is the first step toward a reliable fix.
Code 1
Cause: The device lacks a driver, or the installed driver is configured incorrectly. This base code signals a complete absence of communication between Windows and the hardware.
Solution: Download the latest driver from the manufacturer’s official website. Run the installer and reboot the system. If a driver is already present but the code persists, use the Update Driver option from the device’s right‑click menu and select automatic search.
Code 3
Cause: The driver is corrupt, or the system has run out of physical or virtual memory. This often appears on machines with limited RAM that are running heavy workloads.
Solution: Open Task Manager and verify memory usage. If consumption consistently exceeds 90%, adding a RAM module may be necessary. For the driver, uninstall the device through Device Manager, restart the PC, and allow Windows to redetect and install the driver automatically.
Code 9
Cause: Windows detects an invalid hardware ID. This points to a failed device enumeration, usually caused by corrupted firmware or a physically damaged chip.
Solution: A driver update rarely resolves this. Contact the hardware vendor for warranty assessment or a replacement unit if the device is still covered.
Code 10
Cause: The device cannot start. This widespread code is often triggered by an incompatible driver or a missing FailReasonString value in the registry. It frequently appears after a Windows feature update.
Solution: Perform a clean driver installation. Uninstall the device in Device Manager, then download the latest driver directly from the component maker. Install it and restart. If the problem persists, roll back the driver to the previous version.
Code 12
Cause: Two or more devices are assigned the same I/O port, IRQ, or DMA channel. Resource contention prevents normal operation.
Solution: Enter the BIOS/UEFI setup. Locate the resource configuration section and manually assign a unique I/O range or IRQ to the conflicting device. Save changes and reboot.
Code 14
Cause: A transient state that requires a system restart to complete device configuration.
Solution: Restart the computer. If the code remains after reboot, check for pending Windows updates that may involve driver changes.
Code 16
Cause: Windows cannot identify all resources needed by the device. It is only partially configured and needs manual intervention.
Solution: Open the device properties and switch to the Resources tab. Disable the Use automatic settings checkbox and select a configuration that does not conflict with other hardware.
Code 18
Cause: The driver installation failed. Driver files may be incomplete or the process was interrupted.
Solution: Reinstall the driver using the latest package from the hardware manufacturer rather than the version offered by Windows Update.
Code 19
Cause: The registry configuration for the device is corrupt. This happens when multiple services are assigned to a single device or a service key cannot be opened.
Solution: Uninstall the driver from Device Manager and then reinstall it. The process rewrites the damaged registry entries. In severe cases, use System Restore to roll back to a point before the code appeared.
Code 21
Cause: Windows is currently removing the device. This is a temporary code that exists only during the removal procedure.
Solution: Wait a few moments and restart the computer. The removal process completes after reboot.
Code 22
Cause: The device has been manually disabled by a user in Device Manager.
Solution: Right‑click the device and select Enable device. It will resume normal function immediately.
Code 24
Cause: The device is physically absent, has failed, or its driver is improperly installed. This often occurs after a device is disconnected without using the safe removal process.
Solution: Remove the device from Device Manager. If the hardware is still connected, use Action > Scan for hardware changes to let Windows detect it again.
Code 28
Cause: No driver is installed. This is extremely common after a fresh Windows installation when chipset and onboard component drivers are missing.
Solution: Visit the motherboard or laptop manufacturer’s support page. Install the chipset driver package first, then proceed with the drivers for all other devices.
Code 29
Cause: The device firmware has not enabled the required resources. This usually means the component is disabled at the BIOS level.
Solution: Reboot into BIOS/UEFI. Look for the disabled device under Integrated Peripherals or Onboard Devices and enable it.
Code 31
Cause: Windows cannot load the driver needed for the device. The driver may be incompatible with the current Windows version.
Solution: Download and install the latest driver that explicitly lists Windows 10 or Windows 11 support. Use the Update Driver wizard in Device Manager.
Code 32
Cause: The driver’s start type is set to “Disabled” in the registry, preventing Windows from loading it at boot.
Solution: Manually reinstall the driver. This resets the registry start type to “Automatic.”
Code 33
Cause: The resource translator that determines what the device needs has failed. This low‑level issue is often linked to BIOS programming.
Solution: Update the BIOS/UEFI to the latest version from the motherboard manufacturer. If the problem persists, reconfigure or replace the hardware.
Code 34
Cause: Windows cannot determine the settings for the device. Manual configuration through resource settings is required.
Solution: Consult the hardware vendor’s documentation. Use the Resources tab in device properties to manually set I/O, IRQ, and DMA values.
Code 35
Cause: The Multiprocessor System (MPS) table in the BIOS lacks an entry for your device. This concerns how resources are allocated on multi‑processor systems.
Solution: Obtain a BIOS update that corrects the MPS table from the computer or motherboard manufacturer. This code is rarely seen on modern platforms.
Code 36
Cause: An interrupt request (IRQ) translation has failed. The system cannot convert the physical IRQ into a usable format for the device.
Solution: Change the IRQ reservation settings in the BIOS. You may need to assign a specific IRQ to the problematic device manually.
Code 37
Cause: The driver returned a failure while executing its DriverEntry routine, the first function called when the driver loads.
Solution: Reinstall the driver. Make absolutely sure the version matches both the hardware model and the Windows edition in use.
Code 38
Cause: A previous instance of the driver is still loaded in memory, blocking the new instance from starting.
Solution: Restart the computer. A full reboot clears memory and reloads all drivers from scratch.
Code 39
Cause: The driver file is missing or damaged. Windows cannot locate a valid driver to operate the device.
Solution: Remove the broken driver through Device Manager and perform a clean installation using official media.
Code 40
Cause: The information in the driver’s registry service subkey is invalid, typically due to corruption or a failed installation.
Solution: Manually reinstall the driver. This overwrites the faulty subkey with a valid configuration.
Code 41
Cause: A driver for a non‑Plug and Play device has been installed, but Windows cannot find the physical hardware.
Solution: Verify that the hardware is properly connected and detected. If the device is no longer in use, uninstall its driver via Device Manager.
Code 42
Cause: A duplicate device has been detected. This occurs when a bus driver creates two identically named sub‑processes or a serial‑numbered device moves to a new location before being removed from the old one.
Solution: Restart the system. Windows cleans up duplicate entries during boot. If the error remains, remove all instances of the device in Device Manager and restart.
Code 43
Cause: One of the drivers controlling the device reported a failure to the operating system. This is a very common code for graphics cards and network adapters, often triggered by corrupt drivers, unstable overclocks, or physical hardware damage.
Solution: Perform a clean installation of the graphics or device driver. Use a utility like Display Driver Uninstaller (DDU) to remove leftover files before installing the newest version. Also check the device temperature and power supply stability.
Code 44
Cause: An application or service has temporarily shut down the hardware, often to save power or resolve a conflict.
Solution: Restart the computer. The device will return to its normal operational state.
Code 45
Cause: This is a status indicator, not an error. The device that was previously connected is now physically disconnected.
Solution: No action is required. Reconnect the hardware and the code disappears automatically as soon as Windows detects the device.
Code 46
Cause: The device is unavailable because the operating system is shutting down. This code only appears during the shutdown sequence.
Solution: No repair is needed. The hardware will function normally the next time you start the computer.
Code 47
Cause: You used the Safe Removal application to prepare the device for ejection or pressed a physical release button. The device is in a “safe to remove” state but has not yet been unplugged.
Solution: Disconnect the device from the computer, then plug it back in. If the code does not clear, restart the system.
Code 48
Cause: The driver software for this device has been blocked by Windows because it is known to cause stability problems.
Solution: Contact the hardware vendor and obtain the latest driver that has passed Windows certification. Install the updated driver on your system.
Code 49
Cause: The system hive in the registry has exceded its maximum size. New devices cannot function until it is reduced. This typically stems from too many registered devices, including hardware that is no longer physically installed.
Solution: Uninstall any hardware you no longer use through Device Manager. This removes unnecessary registry entries and shrinks the system hive size.
Code 50
Cause: Windows cannot apply all properties for the device. These properties describe the device’s capabilities and security settings.
Solution: Attempt a manual driver reinstallation. If the problem continues, contact the hardware manufacturer for a compatible driver.
Code 51
Cause: This device is waiting for another device or a set of devices to start. It is a dependency issue within the device hierarchy.
Solution: Examine other failed devices in the same hierarchy. Identifying why a dependent device cannot start often reveals the solution to this code.
Code 52
Cause: The driver lacks a valid digital signature or its files are corrupt. Windows blocks unsigned drivers for security reasons.
Solution: Download the latest digitally signed driver from the hardware manufacturer’s official website. Never install drivers from untrusted sources.
Code 53
Cause: The device is reserved for use by the Windows kernel debugger during this boot session. This is a special development and debugging configuration.
Solution: Disable kernel debugging by opening Command Prompt as administrator and running bcdedit /debug off. Restart the computer for normal device startup.
Code 54
Cause: An intermittent code assigned while an ACPI reset method is executing. If the device never restarts due to a failure, it remains stuck in this state.
Solution: Restart the computer. The reboot completes the ACPI reset cycle and clears the temporary condition.
Advanced Diagnostics with DxDiag for Gamers and Professionals
For gamers and technicians who need deeper analysis, the DirectX Diagnostic Tool (DxDiag) is an indispensable complement to Device Manager. It not only reports related error codes on graphics and audio devices but also provides detailed information about DirectX drivers, GPU memory, and recorded system faults.
Launch DxDiag by pressing Windows + R, typing dxdiag, and pressing Enter. On the Display and Sound tabs, you can view device status and any error notes in the Notes section. A system that is stable will show “No problems found,” while failing hardware typically generates a technical error description.
In gaming systems, Device Manager error codes often correlate with crashes recorded in DxDiag as LiveKernelEvent or BlueScreen entries. Analyzing both data sources together provides a complete picture of hardware stability and driver health.
Important Note for IT Professionals: Before performing any repair, always document the exact Device Manager error code and the device’s Hardware ID. You can find the Hardware ID on the Details tab of the device properties by selecting Hardware Ids from the dropdown. This information is invaluable when searching for the correct driver or communicating with vendor technical support.
Understanding every Device Manager error code allows you to diagnose hardware problems with surgical precision. A systematic approach that moves from identifying the code, to sourcing the correct driver, to manually configuring resources will restore system reliability. For further reference, consult the official Microsoft documentation and the detailed guide from Computer Hope.