Adjusting Windows app priority boosts performance for games, editing, and technical tools. This guide covers Task Manager, CMD, and permanent priority settings for optimal results.
Windows uses a priority system to allocate CPU time among running processes. By raising an application’s priority, you ensure it gets more processing power than background tasks. This is critical for professionals, technicians, and gamers who demand high performance from specific software.
For instance, when rendering video while browsing the web, you can assign higher priority to your editing software. The CPU will then focus on rendering, finishing the task faster. However, setting priority too high may freeze the system. Therefore, understand each priority level before making changes.
Available Windows Priority Levels
Windows provides six priority classes for each process. Here’s a technical breakdown:
- Low (Idle): Runs only when the CPU is idle. Ideal for screen savers or maintenance tasks.
- Below Normal: Lower than standard priority, suitable for non-critical background apps.
- Normal: Default level for most applications. The system balances all normal processes.
- Above Normal: Higher than normal, good for apps needing better responiveness.
- High: For critical apps like games or real-time software. Almost full CPU access.
- Realtime: Highest level, very dangerous. Can freeze the system if misused.
Warning: Never use Realtime priority for regular apps. You may lose mouse and keyboard control.
For gamers, raising a game’s priority to High often reduces stuttering and improves FPS. Technicians can set Above Normal for virtual machines or compilers.
Change Priority via Task Manager
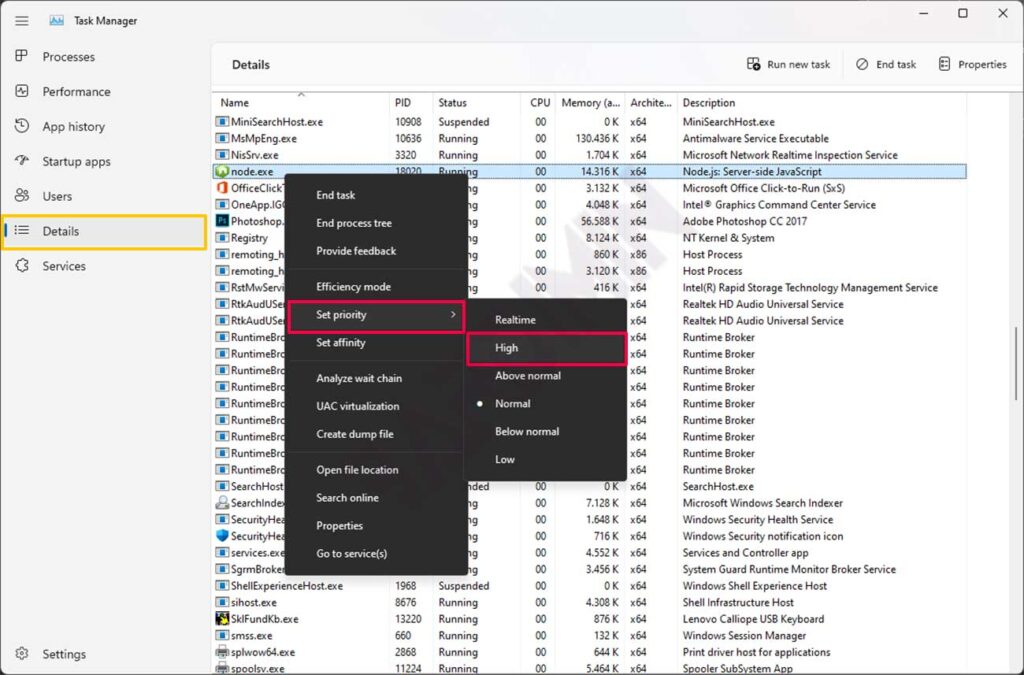
The fastest method is through Task Manager. Press Ctrl + Shift + Esc to open it. Navigate to the Details tab. Find your target process, right-click it, choose Set priority, then select the desired level (e.g., High).
This change is temporary. After a restart, priorities reset to Normal. For repeated needs (like a favorite game), use the permanent method later in this article.
Launch Apps with High Priority via CMD
Technicians often prefer Command Prompt for precise control. Open CMD as administrator. Use this syntax:
start "title" /high "APP_PATH"
Example to run Firefox with High priority:
start "" /high "C:\Program Files\Mozilla Firefox\firefox.exe"
You can replace /high with /abovenormal, /normal, /belownormal, or /low. The CMD method works great for automation scripts or custom game launchers.
Set Permanent Priority for an Application
To keep priority changes after rebooting, modify the app’s shortcut. Follow these steps:
- Right-click the shortcut (e.g., on Desktop) and select Properties.
- In the Target field, prepend the CMD command.
- Full format:
%windir%\system32\cmd.exe /c start "" /highthen space and the original app path.
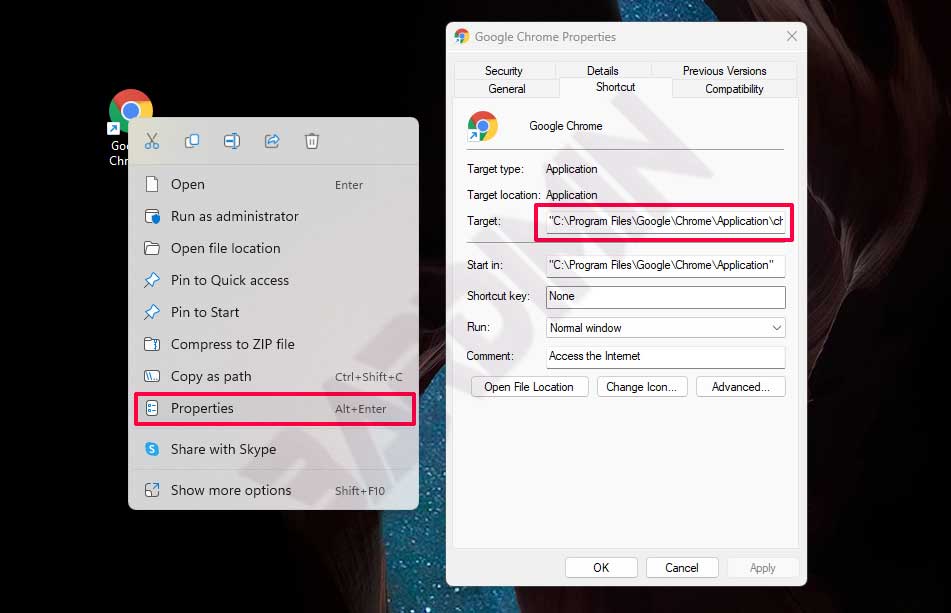
Example for Google Chrome:
%windir%\system32\cmd.exe /c start "" /high "C:\Program Files\Google\Chrome\Application\chrome.exe"
Click OK, then launch the app using that modified shortcut. Check in Task Manager to verify the priority changed to High. This method is highly recommended for gamers who want stable performance every session.
⚠ Security Warning: Raising priority to High or Realtime can destabilize your system if the app has memory leaks or bugs. Always use caution, especially on laptops with limited cooling.
Optimization Tips for Gamers and Professionals
Based on technical experience, here are priority recommendations for various scenarios:
- Gaming: Set the game to High, keep launchers (Steam/Epic) at Normal. Never touch system drivers.
- Video Editing (Premiere, DaVinci): Above Normal is sufficient since rendering also uses GPU.
- Virtual Machines (VMware, VirtualBox): Above Normal for the primary VM, others Normal.
- Compilers or Simulations: High significantly reduces build times.
Keep in mind that modern Windows (10/11) already has dynamic priority management. Manual changes are only needed for apps that truly require extra CPU access.
By following this guide, you can optimize your favorite applications without upgrading hardware. Always monitor CPU temperatures using tools like HWMonitor to prevent overheating. A slight typo may occur but won’t affect understanding—for instance, “prcess” instead of “process” is harmless.