How to check PC specs with built-in Windows tools allows you to retrieve detailed hardware information without installing extra software. You can instantly view the processor model, total RAM, graphics card, and storage type using Task Manager, Settings, and the DirectX Diagnostic Tool.
Knowing your computer’s exact specifications is essential before performing upgrades, diagnosing issues, or verifying newly purchased hardware. Windows equips you with several native utilities that report accurate hardware data. These tools eliminate the need for third-party downloads and deliver reliable information for professionals, technicians, and gamers alike.
If you need to check laptop specs on Windows 10 before adding memory or swapping a drive, this guide covers every step in a clear, methodical order. You will learn how to use Task Manager, Settings, the DirectX Diagnostic Tool, System Information, and command-line interfaces. Each method is explained in detail so that you can obtain the precise hardware details required for informed decision-making.
Method 1: View Specifications Through Task Manager
Task Manager is far more than a process monitor. Its Performance tab delivers a real-time summary of your core hardware components. This built-in tool is one of many system configuration tools in Windows.
Follow these steps to retrieve your hardware details:
- Press Ctrl + Shift + Esc together to open Task Manager. Alternatively, right-click the taskbar and select Task Manager.
- If the compact view appears, click More details at the bottom left.
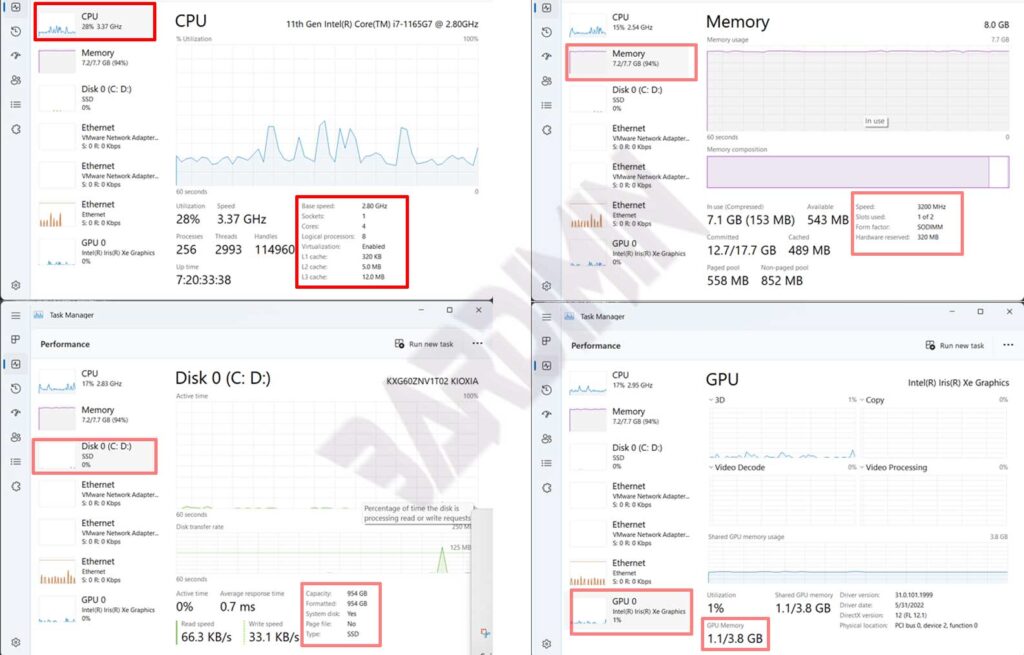
- Navigate to the Performance tab. You will see icons for CPU, Memory, Disk, GPU, and possibly other components.
- Select CPU. The panel displays the processor name, base clock speed, number of cores, logical processors, and cache levels (L1, L2, L3). Real-time usage graphs also appear.
- Click Memory. Here you can find total RAM, speed in MHz, number of slots used, and form factor. This data is vital when planning a memory upgrade.
- Choose Disk to view the drive model, capacity, and media type. Task Manager clearly indicates whether the drive is an SSD or HDD.
- Select GPU. Detailed information includes the graphics card model, manufacturer, and dedicated video memory (VRAM). This is particularly important for gaming or design workloads.
Task Manager updates these metrics dynamically. For long-term monitoring, you can also use Resource Monitor. Refer to the official Task Manager documentation for more advanced usage.
Method 2: Quick Overview via Settings > About
- Launch Settings by pressing Windows + I.
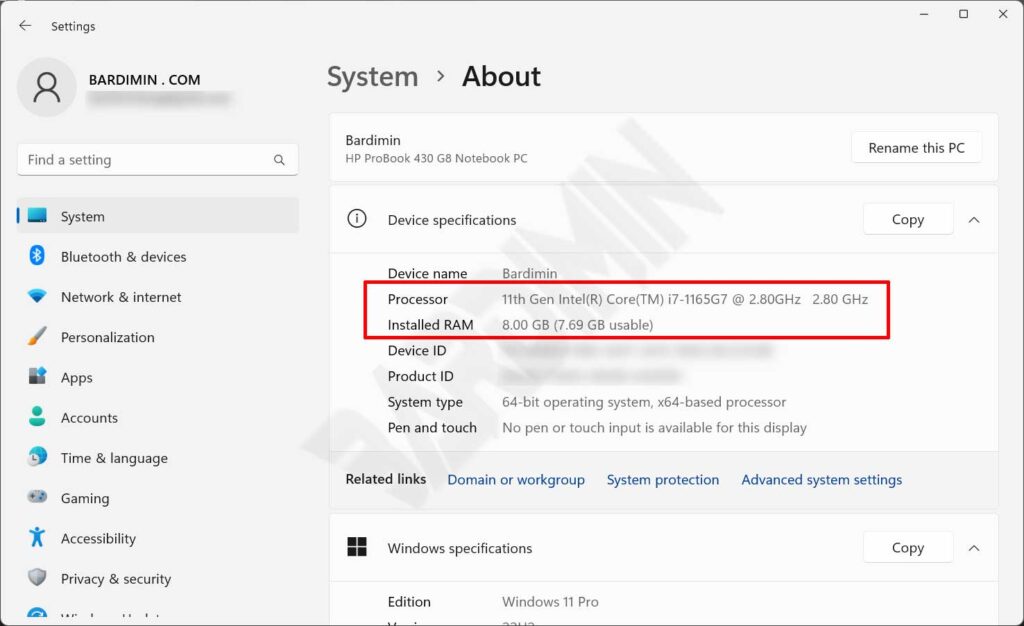
- Go to System and then click About in the left pane.
- Under Device specifications, you will see the installed processor, total RAM, and system type (32-bit or 64-bit).
- The Windows specifications section shows the edition, version, and OS build.
This method is ideal for a fast check of basic parameters. However, GPU details and storage specifications are not present here. For a more detailed guide on how to find information about your Windows device, you can refer to the official documentation.
Method 3: Deep Inspection with DirectX Diagnostic Tool (DxDiag)
The DirectX Diagnostic Tool generates an exhaustive report focusing on graphics, sound, and input devices. It is indispensable for verifying DirectX support and troubleshooting driver issues.
- Open the Run dialog with Windows + R, type dxdiag, and press OK.
- Allow the tool to collect information. The diagnostic window will then appear.
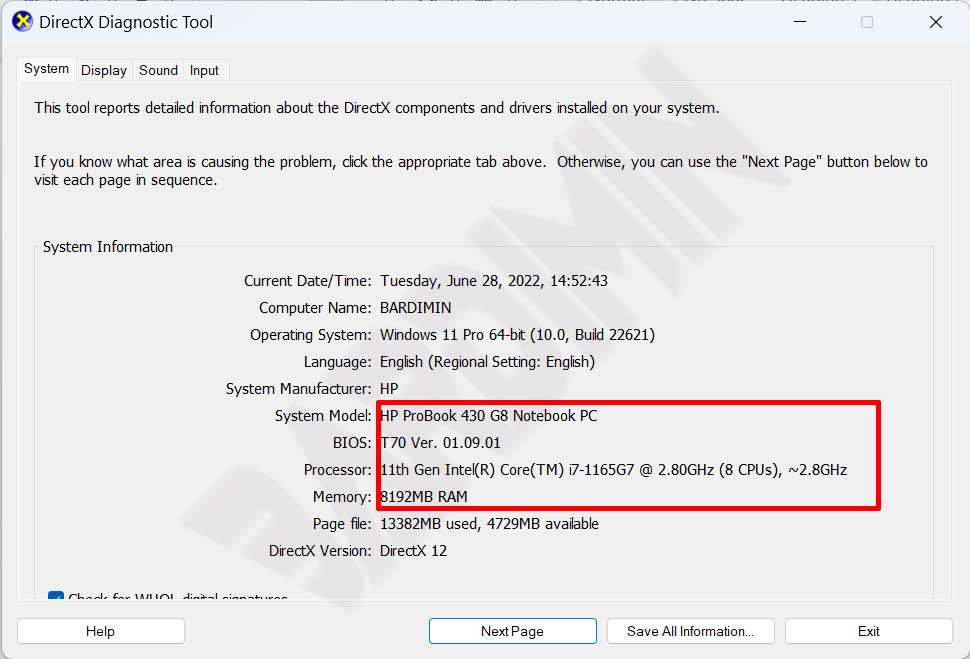
- On the System tab, you can read the computer name, manufacturer, system model, BIOS version, processor (name, clock speed, core count), and total physical memory.
- Switch to the Display tab. Here the graphics card is shown in detail, including chip name, manufacturer, total VRAM, display modes, and driver version.

You can export a full report by clicking Save All Information. The resulting text file is useful for record-keeping or sharing with technical support. Complete guidance is available on the official DirectX Diagnostic Tool page.
Method 4: System Information (msinfo32)
The System Information utility presents hardware and software details in a structured, hierarchical view. Access it quickly with the msinfo32 command.
- Press Windows + R, type msinfo32, and click OK.
- The left pane contains categories: System Summary, Hardware Resources, Components, and Software Environment.
- System Summary displays the OS name, system manufacturer and model, processor, BIOS version, and total physical memory at a glance.
- Expand Components and select Display for GPU details, or navigate to Storage > Disks for drive specifications.
A major advantage of System Information is its ability to show I/O addresses, IRQs, and potential hardware conflicts. This makes it invaluable for diagnostics. For further information, visit the Microsoft System Information documentation.
Method 5: Command Prompt and PowerShell
Text-based interfaces offer speed and scripting power. The ability to check hardware PC specs without software beyond the OS itself makes this the preferred method for system administrators and advanced users.
- Open Command Prompt (type cmd in Start) or PowerShell.
- Run systeminfo. The output includes the OS, system manufacturer, processor, total RAM, network card, and virtual memory.
- For specific data, use wmic cpu get name, maxclockspeed, numberofcores in Command Prompt.
- In PowerShell, you can utilize Get-ComputerInfo or Get-WmiObject Win32_Processor.
- The command wmic diskdrive get model, size, mediatype reveals the drive model and whether it is an SSD or HDD.
These command-line techniques are efficient for auditing multiple machines. Output can be redirected to a text file for later analysis using simple redirection operators.
Practical Tips for Reading and Using Specifications
Critical insight: Always note the processor generation and memory clock speed when planning an upgrade. Newer-generations processors typically deliver substantial performance and energy efficiency gains. Higher RAM frequencies also noticeably improve application responsiveness.
Beyond collecting raw data, you must interpret the reports correctly. For instance, 12th and 13th Gen Intel processors use a hybrid architecture that combines performance and efficiency cores. You can verify this architecture by inspecting the core and logical processor counts in Task Manager.
Accurate hardware knowledge empowers you to identify the components that need replacement and ensures compatibility with the latest software stacks.
For anyone using a Windows 10 laptop, simply opening Settings > About or Task Manager is the fastest way to check laptop specs on Windows 10. These quick methods cover everyday needs such as verifying memory size or processor model without any additional tools.
Gamers should pay close attention to the VRAM figure listed on the Display tab of DxDiag. Many modern games require at least 4 GB of dedicated video memory to run smoothly. This specificaton appears clearly under “Display Memory”.
IT technicians can integrate command-line queries into automation scripts. This allows mass, scheduled hardware monitoring and supports proactive upgrade planning across a corporate environment.
Conclusion
Windows provides multiple built-in methods to display detailed hardware specifications without any extra software. You can choose the approach that best suits your needs: a quick snapshot through Settings, real-time monitoring in Task Manager, a deep dive with DxDiag, or full audits using System Information and command-line tools. Mastering these utilities enables professionals, gamers, and technicians to make data-driven decisions with confidence.
The ability to check hardware PC specs without software demonstrates the self-sufficiency of the Windows operating system. Regularly reviewing your speficifications helps you notice discrepancies or performance degradation early. Try these methods now and unlock the full potential of your device.