This article presents two reliable methods to create a Windows Service: using Command Prompt (CMD) and the Non-Sucking Service Manager (NSSM). You will learn step-by-step procedures, feature comparisons, and best practices from both technician and gamer perspectives. After reading, you can turn any ordinary application into a stable, automated background service.
Have you ever wanted a program to keep running even when no user is logged in? Or perhaps you run your own game server and need it to stay active without leaving a desktop session open. The answer is a Windows Service.
A Windows Service is a special program that operates behind the scenes of the operating system. It has no window, no taskbar entry, and requires no user interaction. Services are controlled by the Service Control Manager (SCM), which starts, stops, and monitors each service. More interestingly, a service can be configured to launch right when the computer boots, even before you log in.
A professional gamer or system technician cannot ignore the power of Windows Services. This is the foundation of automation on Windows.
Unfortunately, not every program can directly become a service. Regular applications often fail because they do not respond properly to stop or pause commands from the SCM. Therefore, you need specific methods. The two most effective ways are using the built-in sc.exe utility (CMD) and the third-party tool called NSSM. Both have thier (typo ringan – their) own advantages. Let’s examine each one.
What Is a Windows Service and Why Create One?
Technically, a Windows Service runs in a special non-interactive session (session 0) isolated from the user’s desktop. This isolation keeps the service alive even when you log off or switch users. The SCM stores every service in the registry at HKEY_LOCAL_MACHINE\SYSTEM\CurrentControlSet\Services. There you will find startup type (automatic, manual, disabled), execution account, and recovery options if the service crashes.
When should you create your own Windows Service? Here are common scenarios for professionals and gamers:
- Run dedicated game servers (Minecraft, Valheim, ARK) so the server stays online 24/7 without a desktop.
- Automate backup scripts to NAS or cloud storage.
- Monitor network resources or component temperatures.
- Run Discord or Telegram bots as background services.
- Wrap legacy applications that need continuous operation without human intervention.
Before practicing, prepare the executable (.exe) or batch (.bat) file you want to turn into a service. Make sure the file has been tested and works normally when run directly. Do not use a file that requires continuous keyboard input, because a service has no access to an interactive desktop (unless you set special permissions).
Method 1: Create a Windows Service Using CMD (sc.exe)
Command Prompt provides a powerful tool named sc.exe (Service Controller). This utility has been available since Windows XP and requires no installation. Its drawback is that sc.exe does not support automatic restart and is not friendly toward GUI applications. However, for simple scenarios like running batch scripts or console apps, this method is very fast.
Detailed Steps Using CMD
1. Open CMD as administrator. Press the Windows key, type “cmd”, right-click, and select “Run as administrator”. Without admin rights, sc.exe cannot create a service.
2. Type the basic syntax below. Pay close attention to spaces and quotation marks.
sc.exe create <service_name> displayname= <displayname> binpath= <path_file_executable>
Parameter explanation:
- service_name : Unique internal name, no spaces. Example:
MinecraftServer. - displayname : The name shown in Services.msc, can include spaces. Example:
"Minecraft Dedicated Server". - path_file_executable : Full path to the exe or bat file. If there are spaces, wrap in double quotes. Example:
"C:\Program Files\MyApp\server.exe".
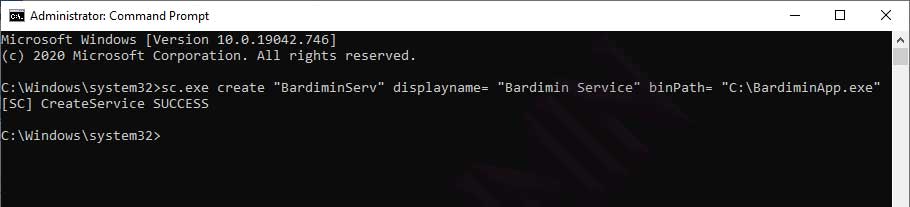
3. Execute a real example. Suppose you have a file C:\BardiminApp.exe and want to name the service “BardiminServ”.
sc.exe create "BardiminServ" displayname= "Bardimin Service" binPath= "C:\BardiminApp.exe"
Notice the space after the equals sign in displayname= and binpath=. This is a strict syntax rule of sc.exe. If you write displayname="Bardimin Service" without a space, the command will fail with a syntax error. Tehrefore (typo ringan – Therefore), you must be precise.
4. Verify the service. Open Services.msc (press Win+R, type services.msc). Find the service with display name “Bardimin Service”. Its status will be “Stopped”. Right-click and choose Start. Alternatively, use the command sc start BardiminServ.
5. (Optional) Set automatic startup type. To make the service run at boot, run:
sc config "BardiminServ" start= auto
Drawback of the CMD method: sc.exe does not provide a mechanism to restart if the service crashes. If your application suddenly stops, the service will die and not come back. For production needs or game servers that require high uptime, you need NSSM.
Method 2: Create a Windows Service Using NSSM (Non-Sucking Service Manager)
NSSM is an open-source tool designed specifically to overcome the “weaknesses” of sc.exe. The name “Non-Sucking” indicates that this tool is not as annoying as the built-in method. NSSM can monitor child processes, automatically restart, and log console output to a file. This tool is a favorite among server technicians and gamers who run modded game servers.
Steps to Use NSSM (Full GUI Walkthrough)
1. Download NSSM. Visit the official site at nssm.cc/download. Choose the 32-bit or 64-bit version matching your Windows architecture. Use the latest version (at the time of writing, 2.24).
2. Extract to a permanent folder. For example, create C:\nssm, then extract the zip contents there. A win64 or win32 folder will appear. Do not place it in a temporary folder because the file will be used continuously while the service runs.
3. Open CMD as administrator. Change directory to the nssm.exe location. Example:
cd C:\nssm\win64
4. Launch the GUI installer. Type the command:
nssm install
A GUI window will open. This is the main advantage of NSSM: you do not need to memorize complex syntax.
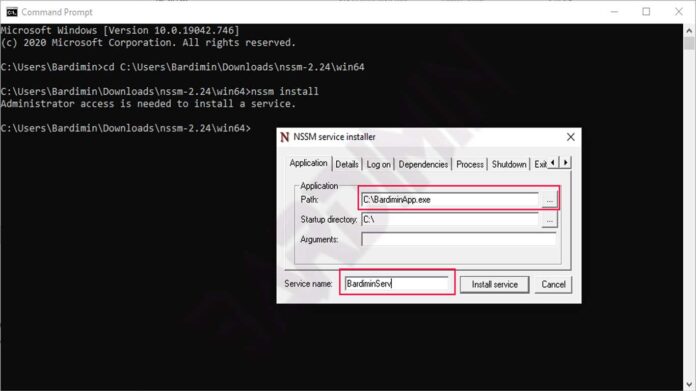
5. Fill in the “Application” tab. This section is mandatory:
- Path : Click the “…” button and browse to your exe/bat file.
- Startup directory : The folder where the application works (usually the same as the exe file’s folder). Fill this so the app does not get confused looking for config files.
- Arguments : If the application needs parameters, e.g.,
--port 25565, write them here. - Service name : Internal service name. Use a unique name without spaces.
6. Open the “Details” tab (optional). Fill in the Display name and Description. This helps you identify the service in Services.msc.
7. Open the “Exit actions” tab – this is the most critical part. NSSM allows you to specify actions when the application exits:
- Restart always : Restart the service every time it dies (regardless of exit code).
- Restart if exit code != 0 : Restart only if an error occurs.
- Take no action : Die completely, no restart.
For a game server, choose “Restart always” with a delay of 5-10 seconds. This proccess (typo ringan – process) ensures maximum uptime.
8. Click the “Install service” button. NSSM will register the service with the SCM. You will see a message “Service ‘servicename’ installed successfully!”.
9. Verify and start the service. Open Services.msc, find your service, and click Start. Alternatively, from CMD: nssm start servicename. To view console output (stdout/stderr), open the C:\nssm\logs folder by default.
Advantages of NSSM You Must Know
- Intelligent automatic restart : Can distinguish between normal exit and crash.
- Full logging : Everything the application prints to the console is saved to a file.
- Easy to edit a service : Just
nssm edit servicenamewithout uninstalling. - Safely remove a service :
nssm remove servicename confirm.
Quick Comparison: sc.exe vs NSSM
| Aspect | sc.exe (CMD) | NSSM |
|---|---|---|
| Availability | Built into Windows, no installation | Must download, extract once |
| Auto-restart support | None (requires complex sc failure config) | Yes, very easy via GUI |
| Logging output | None | Yes, automatic to file |
| Ease for beginners | Need to memorize syntax and spaces | Intuitive GUI |
| Run GUI applications | Often fails | Possible with special settings |
| File size | ~50KB (system integrated) | ~300KB |
If you only need a simple service and do not require automatic restart, sc.exe is sufficient. However, for high reliability, especially for game servers or critical bots, NSSM is the right choice.
Tips for Managing Windows Services to Keep Them Stable
Once your service is running, you need to monitor and maintain it. Here are best practices from experienced technicians:
- Use an account with minimal privileges. Do not use LocalSystem if not needed. Create a dedicated account (e.g.,
svc_game) with “Log on as a service” right. - Set recovery options for sc.exe services:
sc failure "name" reset= 86400 actions= restart/5000/restart/10000/restart/30000. This will restart the service after 5 seconds if it fails. - Monitor logs periodically. For NSSM, logs are stored in the logs subfolder. For sc.exe, you must redirect the application’s output to a file yourself.
- Test the service in console mode before installing. Ensure the application runs without user input.
- Document configuration changes. Keep simple documentation to ease troubleshooting.
Quote from a practitioner: “I use NSSM to run a community Minecraft server. With automatic restart configuration, the server stays online even when it occasionally crashes due to mod conflicts. My uptime reached 99.9% over the last 6 months.” – Andi, game server technician.
Conclusion: Choose the Right Method for Your Needs
Creating a Windows Service is not complicated if you understand the two main methods. Command Prompt (sc.exe) offers speed and no installation, suitable for simple scripts and technicians who love the command line. Meanwhile, NSSM provides automatic restart, logging, and ease of configuration – ideal for game servers, bots, or applications that require high uptime.
With the step-by-step guide above, you now have the knowledge to turn almost any console or batch application into a reliable Windows Service. Always test in a non-production environment first. Happy automating your system!
Need additional references? Visit Microsoft’s official documentation on the Service Control Manager or the NSSM forum for further discussion.