Virtual Memory Windows 11 extends RAM capacity by leveraging secondary storage. This paging file feature keeps applications smooth when physical memory runs low. Proper configuration significantly boosts system stability and responsivness.
PC or laptop performance often drops when physical memory exhausts. Many users immediately decide to add more RAM. However, a more efficient solution exists through Virtual Memory Windows 11 configuration. This feature redirects rarely used data to secondary storage without extra cost.
The operating system maps virtual memory pages to RAM during process execution. Memory consumption grows with task complexity. When total processes exceed physical RAM, the OS stores partial data to the page file. Replacement algorithms determine which data gets swapped. This exchange causes minor delays but prevents system crashes.
Important note: Improper page file settings can destabilize the operating system. Always test changes gradually and monitor their impact on your daily performance.
What Is Virtual Memory and How It Works
Virtual memory represents a memory management technique introduced during early computing eras. This system creates an illusion of larger RAM capacity than physically installed. Active data remains in RAM while passive data moves to secondary storage. This process is called swapping or paging.
Windows 11 manages page files automatically under normal conditions. However, certain scenarios require manual adjustment. Examples include running heavy applications like video editing or modern games. Custom settings let you allocate more space for specific tasks. Consequently, the system stays responsive even when workload increases dramatically.
Memory replacement algorithms use the Least Recently Used principle. Data accessed least frequently moves to the page file first. When that data is needed again, the system retrieves it from secondary storage. This process has higher latency than direct RAM access. Therefore, optimizing settings becomes crucial for optimal performace.
Virtual Memory in Windows 11
On Windows 11, virtual memory stores rarely loaded page files to the hard drive. This feature enables the system to use faster physical memory for active applications. The result is better performance while preventing system freeze when memory exhausts. Windows sets initial page file size equal to installed physical RAM.
Page file size ranges from 1.5x minimum to 3x maximum of your total physical RAM. For instance, a device with 8GB RAM will have a 12GB to 24GB page file. However, these numbers remain flexible based on usage patterns. Gaming users may need different values compared to graphic design professionals.
When You Should Configure Virtual Memory Manually
Windows 11 automatic settings suffice for standard usage. However, some situations need manual intervention. First, when you see “Your system is low on virtual memory” warnings. Second, when heavy applications frequently crash or freeze without clear reasons. Third, if you run multiple virtual machines simultaneously.
Gamers should also consider manual adjustments. Modern games like Cyberpunk 2077 or Elden Ring require large memory amounts. A page file that is too small can cause stuttering or long loading times. Furthermore, content creators working with 4K files or 3D rendering also benefit from this optimization.
Manual page file configuration provides greater control. However, extreme changes without technical understanding risk reducing system stability instead.
Steps to Increase Virtual Memory Windows 11
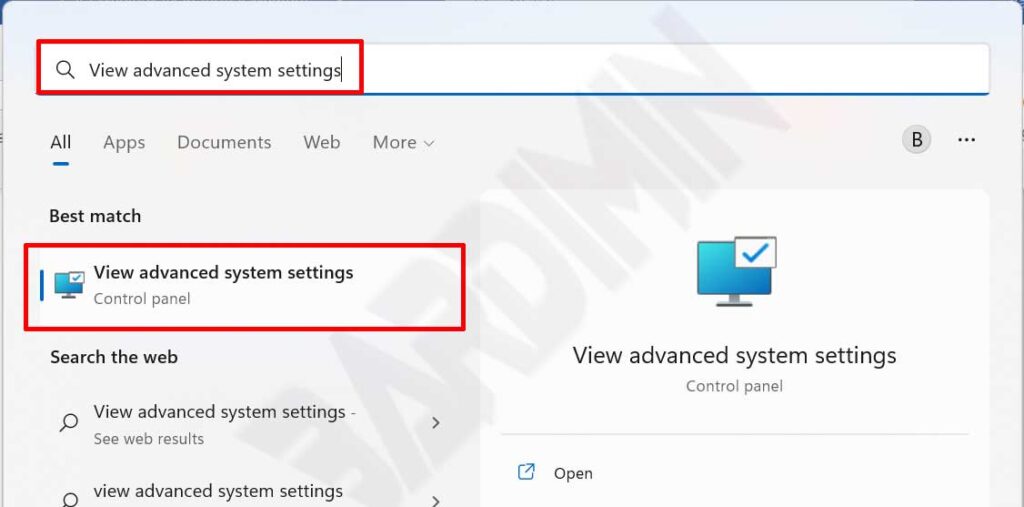
- Open Windows search menu, type “view advanced system settings”. Select the appearing result to open System Properties window.
- On the Advanced tab, Performance section, click Settings button. Performance Options window will appear.
- Select the Advanced tab again, then click Change button in Virtual memory section.
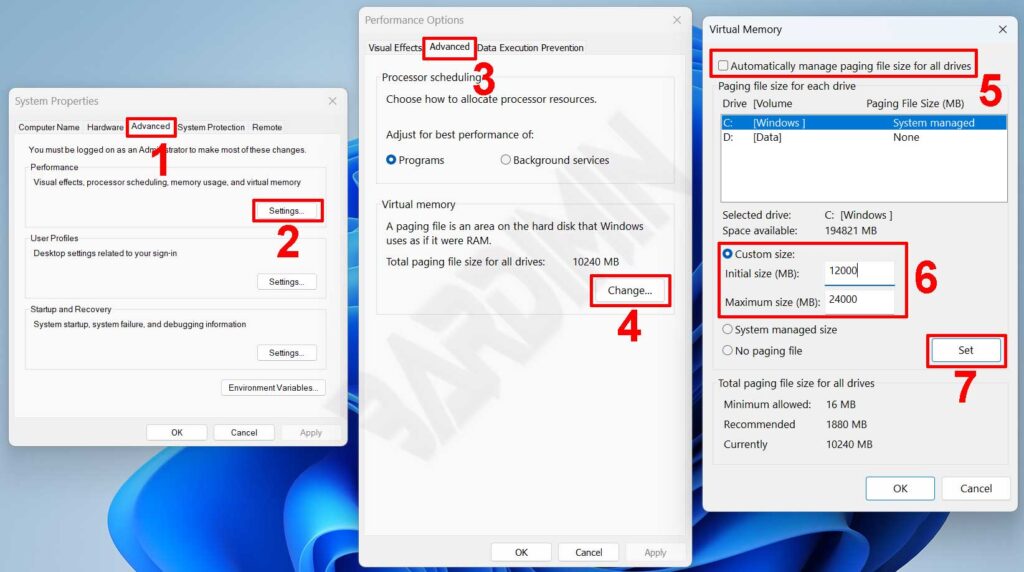
- Uncheck “Automatically manage paging file size for all drives”. Select system drive, then enable Custom size option.
- Enter Initial size and Maximum size values. Recommended starting point: 1.5x RAM for minimum, 3x RAM for maximum.
- Click Set button, then OK on all open windows. Restart your PC for changes to take full effect.
Restart process is required because the system must reallocate storage space. Do not power off during this procedure. After system boots again, monitor performance via Task Manager. Check Memory and Disk columns to ensure no new bottlenecks appear.
Paging File Optimization Tips for Gaming and Multitasking
For gamers, place page file on NVMe SSD if possible. SSD read-write speeds reduce swapping latency compared to conventional HDDs. Furthermore, keep at least 20 percent free space on your system drive. This space is needed for efficient paging operations.
Heavy multitasking users can apply different strategies. Allocate separate page files for each physical drive. For example, C drive for system, D drive for secondary page file. This approach distributes I/O load so no single drive bears excessive burden.
Pro tip: Use tools like Microsoft RAMMap to analyze memory usage patterns. This data helps determine page file size most suitable for your workflow.
Common Issues and Solutions for Virtual Memory Settings
Some users report system slowdowns after changing page file settings. Common cause: maximum value set too large, consuming excessive disk space. Solution: reduce maximum value to 2x RAM, then test again. Also ensure target drive has adequate speed capabilities.
Another case: applications still crash despite enlarged page file. This usually indicates driver conflicts or software bugs, not capacity issues. Check Event Viewer for specific error logs. Updating graphics and chipset drivers often resolves these problems.
If system frequently shows blue screen after changes, restore settings to automatic. Use System Restore if necessary. Always backup configuration before modifying critical system parameters. Documenting changes simplifies future troubleshooting efforts.
Optimizing Virtual Memory Windows 11 requires basic memory architecture understanding. However, benefits are significant for users with demanding needs. Proper configuration combines cost efficiency with performance gains. Test each change gradually for best results. Consult official Microsoft documentation for further technical reference Virtual Memory documentation.