Microsoft Deployment Toolkit (MDT) merupakan solusi otomasi instalasi Windows yang sangat efisien untuk jaringan organisasi, meskipun kini statusnya telah resmi dihentikan oleh Microsoft per Januari 2026 dan file instalasinya tidak lagi tersedia di saluran resmi. Panduan ini menguraikan konfigurasi MDT, mulai dari pembuatan Deployment Share, impor image WIM, penyusunan Task Sequence, hingga otomatisasi penuh melalui aturan CustomSettings.ini dan Bootstrap.ini, termasuk solusi praktis mengatasi masalah kompatibilitas dengan Windows ADK versi terbaru.
Kebutuhan akan konsistensi sistem operasi di lingkungan enterprise mendorong administrator TI untuk mengadopsi metode instalasi otomatis. Metode manual tidak lagi efisien ketika organisasi mengelola puluhan hingga ribuan perangkat. Oleh karena itu, Microsoft Deployment Toolkit hadir sebagai kerangka kerja gratis yang memungkinkan teknisi melakukan deployment Windows secara otomatis melalui jaringan.
Toolkit ini mendukung penyebaran Windows 11, Windows 10, Windows Server 2025, serta versi sebelumnya. MDT memanfaatkan Windows Assessment and Deployment Kit (ADK) dan Windows Preinstallation Environment (WinPE) untuk mengeksekusi rangkaian tugas instalasi. Namun, terdapat perubahan penting yang perlu diperhatikan: Microsoft secara resmi menghentikan dukungan untuk MDT pada 6 Januari 2026. File instalasi MDT juga telah dihapus dari Microsoft Download Center. Informasi resmi mengenai penghentian ini dapat dibaca pada halaman pengumuman Microsoft.
Status Terkini MDT (per 2026): Instalasi MDT Anda saat ini masih bisa dijalankan. Namun, file instalasi tidak lagi tersedia di saluran resmi. Jika Anda belum memiliki file instalasi MDT 8456, sangat disarankan untuk mulai merencanakan migrasi ke solusi modern seperti Windows Autopilot atau Configuration Manager OSD untuk menjamin dukungan jangka panjang. Komunitas juga mengembangkan PowerShell Deployment (PSD) Extension sebagai alternatif.
Persiapan Awal dan Instalasi Komponen
Sebelum memulai konfigurasi, Anda perlu menginstal dua komponen utama. MDT sendiri sudah tidak tersedia, tetapi jika Anda memiliki salinan file instalasi MDT 8456, Anda dapat melanjutkan. Jika belum, bagian ini akan menjelaskan alternatifnya.
- Microsoft Deployment Toolkit (MDT) versi 8456 — Sayangnya, tautan unduhan resmi telah dihapus dan tautan tidak resmi seringkali tidak dapat diandalkan. Jika Anda belum memiliki file instalasi, langkah terbaik adalah beralih ke solusi alternatif yang didukung.
- Windows Assessment and Deployment Kit (ADK) untuk Windows 11, version 24H2 atau 26H1 — Diunduh dari situs resmi Microsoft.
- Windows PE add-on untuk ADK yang sesuai — Wajib diinstal setelah ADK, agar WinPE dapat berfungsi.
Versi MDT 8456 secara teknis masih kompatibel dengan Windows 11 dan Server 2025, asalkan Anda menerapkan solusi sementara (workaround) untuk beberapa masalah yang diketahui. Hindari penggunaan ADK versi 1809 (Windows 10) karena tidak mendukung chipset dan driver perangkat keras terbaru. Sebagai alternatif, komunitas telah mengembangkan PowerShell Deployment (PSD) Extension, sebuah proyek yang menulis ulang logika VBScript MDT ke dalam PowerShell modern. Informasi lebih lanjut tersedia di repositori Friends of MDT (PSD).
Menyiapkan Image Windows (WIM)
MDT memerlukan file image dalam format WIM (.wim). File ini bisa diekstrak dari DVD, file ISO Windows resmi, atau diunduh melalui portal langganan Microsoft. Apabila Anda memiliki file ISO, lakukan mount atau ekstraksi, lalu cari berkas bernama install.wim di dalam direktori \sources\.
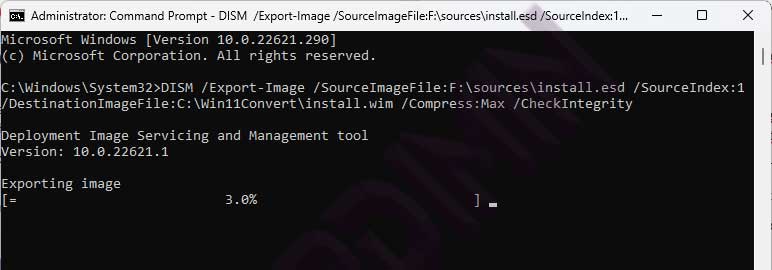
Beberapa image modern hanya menyediakan file install.esd. File ESD harus dikonversi terlebih dahulu menjadi WIM. Gunakan command prompt dengan hak administrator, lalu terapkan perintah Deployment Image Servicing and Management (DISM) berikut:
DISM /Get-WimInfo /WimFile:F:\sources\install.esd
Perintah tersebut menampilkan indeks edisi Windows yang tersedia. Setelah mencatat nomor indeks yang diinginkan, jalankan ekspor image:
DISM /Export-Image /SourceImageFile:F:\sources\install.esd /SourceIndex:1 /DestinationImageFile:C:\Win11Image\install.wim /Compress:Max /CheckIntegrity
Konfigurasi Microsoft Deployment Toolkit (MDT)
Setelah image WIM tersedia, langkah berikutnya adalah membangun Deployment Share dan mengonfigurasi komponen MDT. Deployment Share berfungsi sebagai repositori pusat yang menyimpan semua sumber daya instalasi.
Membuat Deployment Share Baru
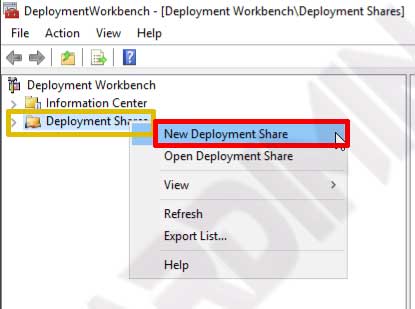
- Buka Deployment Workbench dari menu Start.
- Pada panel kiri, klik kanan pada Deployment Share lalu pilih New Deployment Share.
- Tentukan jalur lokal (misal
C:\DeploymentShare) dan nama share jaringan. Ikuti wizard hingga selesai.
Mengimpor Sistem Operasi
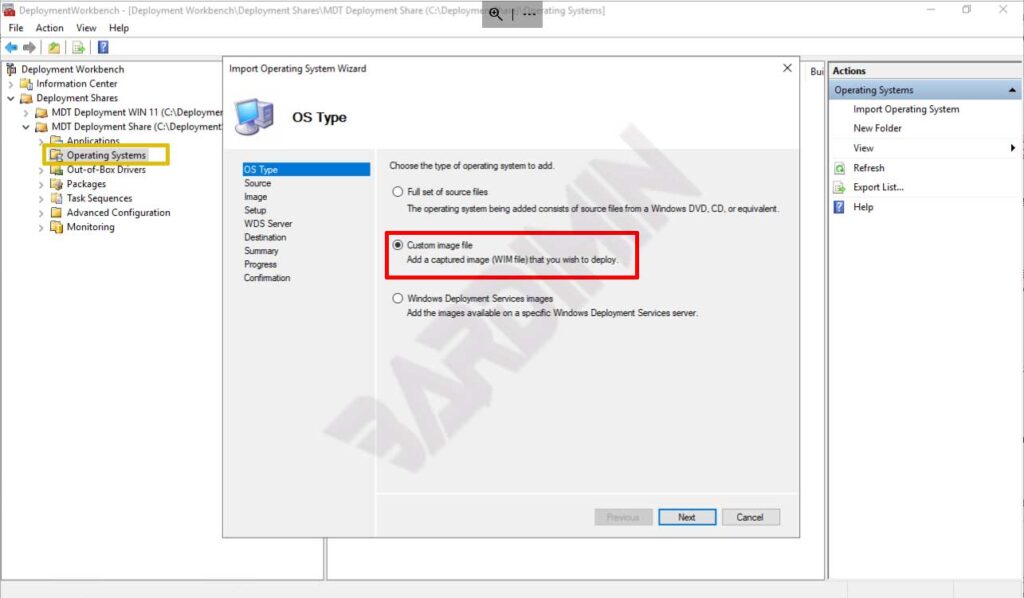
- Di bawah Deployment Share yang sudah dibuat, klik kanan pada Operating Systems dan pilih Import Operating System.
- Pilih opsi Custom image file untuk menggunakan file WIM yang sudah disiapkan.
- Arahkan ke lokasi
install.wimdan selesaikan proses impor.
Menambahkan Aplikasi dan Task Sequence
MDT memungkinkan instalasi aplikasi secara otomatis setelah sistem operasi terpasang. Pada bagian Applications, tambahkan installer aplikasi seperti Microsoft 365, browser, atau perangkat lunak antivirus. Anda wajib menyediakan command line silent install yang sesuai agar proses berjalan tanpa intervensi pengguna.

Selanjutnya, Task Sequence adalah inti dari otomatisasi. Urutan tugas ini menentukan setiap langkah deployment: mulai dari partisi disk, injeksi driver, instalasi OS, hingga konfigurasi akhir. Anda bisa membuat Task Sequence baru dengan klik kanan pada folder Task Sequences dan memilih New Task Sequence. Wizard akan memandu Anda memilih template (misalnya Standard Client Task Sequence) dan image OS yang sudah diimpor.
Perancangan Task Sequence yang cermat menentukan keberhasilan deployment. Pastikan setiap langkah diuji secara bertahap sebelum diterapkan ke seluruh organisasi.
Otomatisasi Menyeluruh dengan Rules
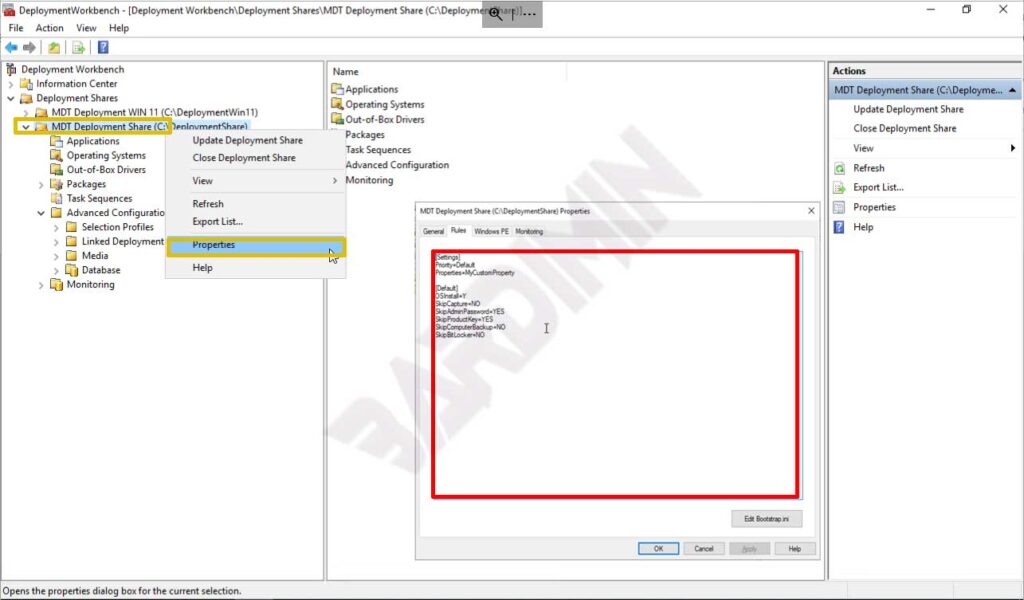
Kekuatan utama MDT terletak pada kemampuannya menghilangkan interaksi manual melalui file konfigurasi CustomSettings.ini dan Bootstrap.ini. Kedua file ini berisi aturan (rules) yang mengontrol setiap aspek proses deployment.
Untuk mengakses editor aturan, klik kanan pada Deployment Share Anda, pilih Properties, lalu buka tab Rules. Di sinilah Anda mendefinisikan nilai default untuk berbagai pengaturan, seperti:
- SkipWizard: Melewati layar selamat datang dan dialog yang tidak diperlukan.
- SkipDomainMembership: Otomatis menggabungkan komputer ke domain Active Directory.
- SkipTaskSequence: Menjalankan Task Sequence tertentu tanpa menampilkan menu pilihan.
- SkipAdminPassword: Menetapkan kata sandi administrator lokal secara otomatis.
- EventService: Mengarahkan log deployment ke layanan monitoring MDT.
Berikut adalah contoh aturan minimal yang mengotomatiskan sebagian besar proses, termasuk koneksi ke share deployment tanpa meminta kredensial:
[Settings]
Priority=Default
[Default]
DeployRoot=\\ServerMDT\DeploymentShare$
UserDomain=domain.lokal
UserID=AkunDeploy
UserPassword=KataSandiAkun
SkipBDDWelcome=YES
SkipDomainMembership=YES
JoinDomain=domain.lokal
Aturan yang lebih kompleks bisa mencakup pengaturan zona waktu, bahasa antarmuka, instalasi aplikasi spesifik berdasarkan model perangkat, dan penamaan komputer otomatis berdasarkan serial number. Setelah mengubah Rules, selalu lakukan Update Deployment Share agar image boot WinPE yang baru menyerap semua perubahan tersebut.
Mengatasi Masalah Kompatibilitas Umum
Penggunaan MDT dengan Windows ADK versi terbaru memunculkan beberapa kendala. Dua isu paling sering muncul adalah kegagalan pembuatan boot image akibat hilangnya dukungan WinPE x86, dan kesalahan saat menghasilkan catalog file untuk image WIM. Berikut solusi yang dapat diterapkan:
1. WinPE x86 Tidak Ditemukan: Mulai ADK for Windows 11 22H2, Microsoft menghapus folder WinPE 32-bit. MDT versi lama masih mencari struktur direktori tersebut dan akan mengalami crash. Solusinya adalah membuat folder kosong secara manual di jalur:C:\Program Files (x86)\Windows Kits\10\Assessment and Deployment Kit\Windows Preinstallation Environment\x86\WinPE_OCs2. Kegagalan Catalog File: ADK versi 24H2 ke atas memisahkan arsitektur Windows System Image Manager (WSIM). MDT akan melempar pengecualian karena tidak menemukan komponen yang diharapkan. Anda perlu mengedit berkas
DeploymentTools.xml di direktori instalasi MDT. Temukan baris yang merujuk pada imgmgr.exe dan ubah menjadi:<tool name="imgmgr.exe">%ADKPath%\Deployment Tools\WSIM\%RealPlatform%</tool>
Workaround ini bersumber dari kontribusi komunitas di Deployment Research dan telah teruji mampu menjaga fungsionalitas MDT pada Windows 11 24H2. Penting untuk dicatat bahwa Microsoft tidak secara resmi mendukung konfigurasi ini, sehingga pengujian mendalam di lingkungan laboratorium sangat disarankan sebelum produksi.
Alternatif dan Masa Depan Deployment
Dengan dihentikannya MDT dan dihapusnya file instalasi dari saluran resmi, organisasi perlu mengevaluasi strategi deployment jangka panjang. Microsoft merekomendasikan dua jalur utama. Pertama, Windows Autopilot yang merupakan solusi berbasis cloud. Perangkat baru dapat langsung didaftarkan ke Azure AD (Entra ID) dan Intune, lalu menerima kebijakan, aplikasi, dan konfigurasi tanpa perlu pencitraan manual. Pendekatan ini ideal untuk tenaga kerja hibrida dan perangkat yang dikirim langsung ke pengguna akhir. Pelajari lebih lanjut melalui dokumentasi resmi Windows Autopilot.
Kedua, Configuration Manager Operating System Deployment (OSD) tetap menjadi opsi on-premises yang didukung penuh. OSD menawarkan kontrol granular melalui task sequence dan sangat cocok untuk lingkungan yang memerlukan instalasi bare-metal atau tidak memiliki konektivitas cloud. Integrasi MDT dengan Configuration Manager sendiri telah dihentikan per 10 Oktober 2025. Panduan resmi dapat diakses di Microsoft Learn: OSD Introduction.
Jika Anda ingin tetap menggunakan infrastruktur MDT, komunitas juga mengembangkan PowerShell Deployment (PSD) Extension, sebuah proyek yang menulis ulang logika VBScript MDT ke dalam PowerShell modern. Proyek ini bisa menjadi jembatan bagi organisasi yang ingin tetap menggunakan infrastruktur MDT sambil bertransisi ke teknologi yang lebih baru. Informasi lebih lanjut tersedia di repositori Friends of MDT (PSD).
Kesimpulan: Microsoft Deployment Toolkit (MDT) tetap menjadi alat yang andal untuk otomatisasi instalasi Windows, meskipun statusnya sudah tidak didukung dan file instalasinya tidak lagi tersedia. Bagi Anda yang masih memiliki file instalasi MDT 8456, langkah-langkah di atas tetap dapat diikuti. Namun, investasi waktu untuk mempelajari Windows Autopilot atau Configuration Manager OSD merupakan langkah strategis yang bijak untuk masa depan infrastruktur TI Anda.