The Microsoft Deployment Toolkit (MDT) is a tool that allows you to perform windows installations automatically.
By using MDT and automating the installation of Windows, it will make it easier for you to distribute Windows in an organization.
MDT supports deployments of Windows1 1, Windows 10, Windows 7, Windows 8.1, and Windows Server.
In this article, Bardimin will provide an MDT configuration guide that allows you to perform an automatic installation of Windows.
Installing the Microsoft Deployment Toolkit (MDT)
For installation, download the following file:
- Microsoft Deployment Toolkit (MDT)
- Windows ADK for Windows 11, version 22H2
- Windows PE add-on for Windows ADK for Windows 11, version 22H2
Download all those files and install them all. When this article was created, there were still compatibility issues between MDT version 8456 and Windows ADK 22H2. If you find any such compatibility issues, use the previous version of the ADK at the following link.
Setting Up a Windows Image
Before you configure, you must have a Windows image file. MDT requires an image file in WIM format (. wim). You can get this file from an ISO file, DVD, CD, or download it on Microsoft.
If what you have is an ISO file, then extract or “Mount” the file. The Windows file we need is the “install.wim” file that is in the directory
\sources\install.wim
If what you find is an “install.esd” file, then you have to do the conversion first.
Converting “esd” files to “wim”
DISM /Get-WimInfo /WimFile:YourSource\install.esd
YourSource = Directory the esd file you are converting, for example
DISM /Get-WimInfo /WimFile:F:\sources\install.esd
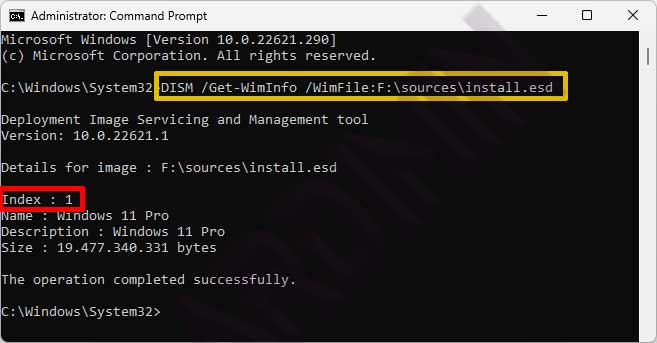
Note the index number of the Windows that you will extract. In one file “install.esd” can contain many versions of Windows.
- Extract the Windows file from the “install.esd” file.
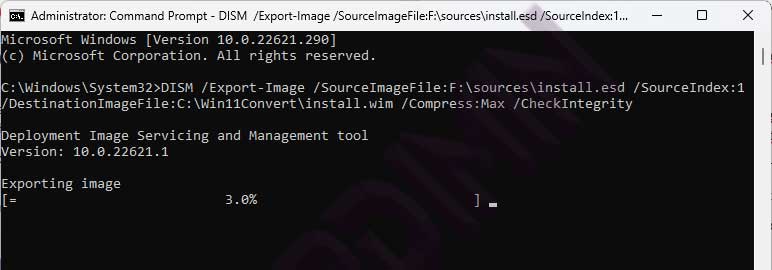
On CMD, type the command
DISM /Export-Image /SourceImageFile:YourSource\install.esd /SourceIndex:YourIndex /DestinationImageFile:YourDestination\install.wim /Compress:Max /CheckIntegrity
YourSource = the esd file directory that you will convert
YourIndex = the Windows index number you will extract (see step 3)
YourDestination = directory to store the conversion results
example
DISM /Export-Image /SourceImageFile:F:\sources\install.esd /SourceIndex:1 /DestinationImageFile:C:\Win11Convert\install.wim /Compress:Max /CheckIntegrity
MDT configuration
Once you have the Windows image file in WIM format, the next step is to create a new Deployment Share and configure it from the Microsoft Deployment Toolkit (MDT).
Create a new Deployment Share
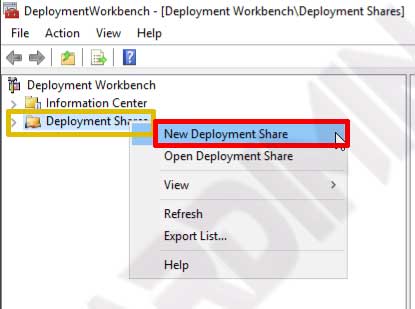
- Open “Deployment Workbench“.
- Then on the left part of the window, right-click “Deployment Share” and select “New Deployment Share“.
- In the “New Deployment Share Wizard” window, specify the “Path” of the Deployment Share. The default value is “C:\ DeploymentShare”, change it to the directory you want or leave it alone. Then click the “Next” button.
- In the “Share” option, you can also change the name of the sharing directory or leave it the default. Click “Next” to continue.
- In the next option, you can also change the value according to what you want. Click “Next” and “Next” again until the New Deployment Share Wizard process is complete.
Microsoft Deployment Toolkit (MDT) configuration
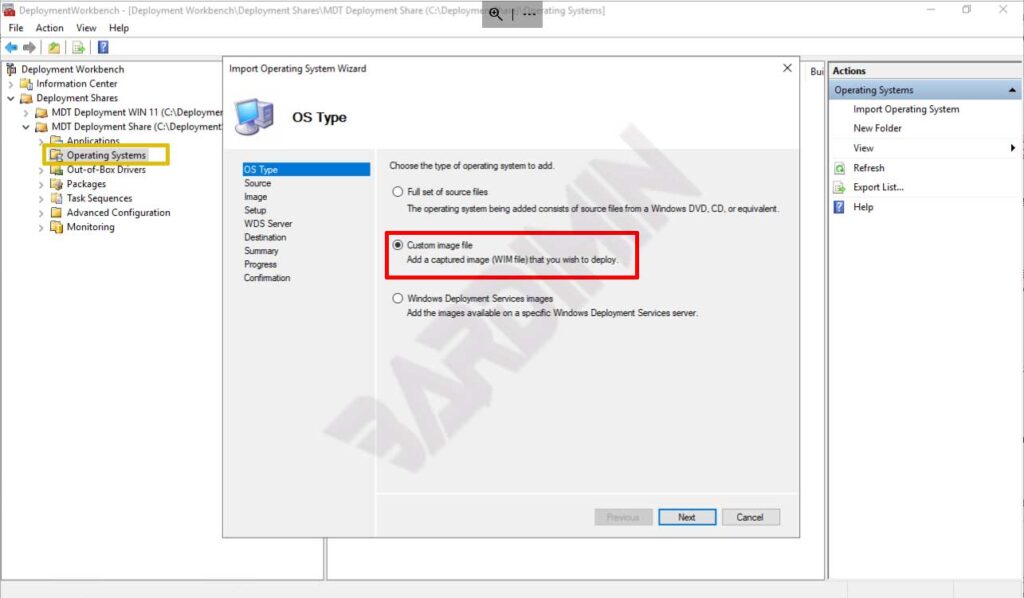
- Open the “Deployment Workbench” and navigate to the “Deployment Share” you created earlier.
- Select “Operating System“, then right-click and select “Import Operating System“. In the Import Operating System Wizard window, select “Custom image file. Next import the “install.wim” file that you created earlier.
- In the “Applications” option, you can add applications that will be installed automatically. You can add applications such as Office, Google Chrome, Acrobat Reader, etc. Then you also have to add the “Silent Install” script of the application.

- Next in “Task Sequences“, in this section, is the sequence of tasks used to implement your production Windows Image reference.
Rule Automation
In the Microsoft Deployment Toolkit (MDT) you can set the Rules that will be used in the installation process. By creating the right Rules, you will be able to automate all the processes.
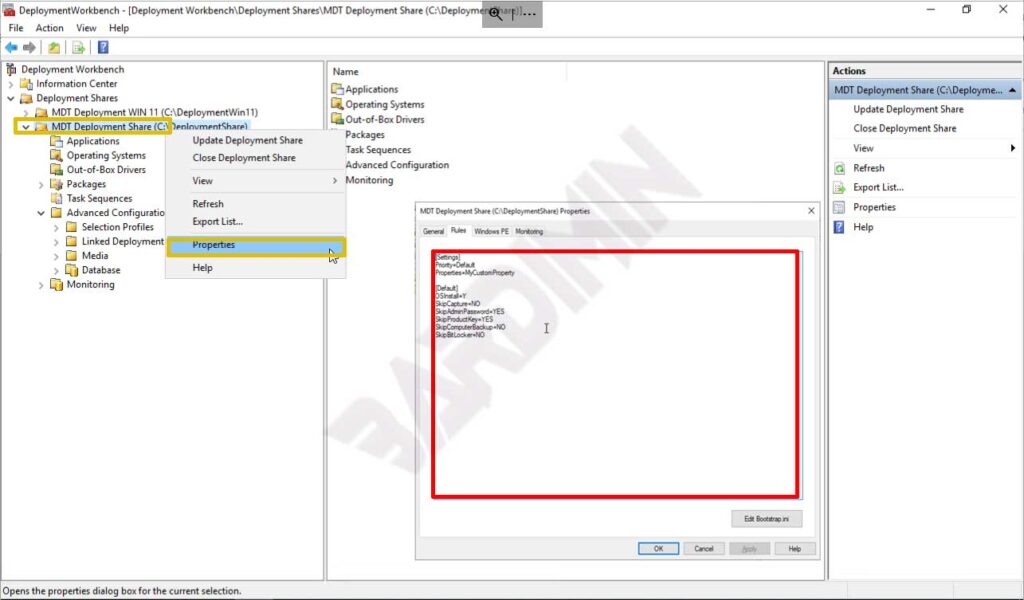
To create a Rule, right-click on the “Deployment Share” you created and select “Properties“. Then select the “Rule” tab and click the “Apply” button to apply it. One of the following examples of Rules created by Sam Schoeller you can use.
MDT customsettings.ini for one touch image deployment
by Sam Schoeller <https://github.com/samuelschoe>

[Settings]
Priority=Default
Properties=MyCustomProperty

[Default]

'sets the default install type
OSInstall=Y
DeploymentType=NEWCOMPUTER

'skips the capture wizard pane.
SkipCapture=YES
DoCapture=YES
ComputerBackupLocation=NETWORK
BackupShare=\\server\DeploymentShare$
BackupDir=Captures
BackupFile=%TaskSequenceID%.wim

'skips setting local admin pass, product key and deployment type wizard panes
SkipAdminPassword=YES
AdminPassword=xxxxxx
SkipDeploymentType=YES
SkipProductKey=YES

'skips the domain join pane, and sets OU and account details to autojoin to the xxx computer OU. Uses limited domain join only delegated account
SkipDomainMembership=YES
MachineObjectOU=OU=xxxxx,OU=xxxxxxxxxx,DC=xxxx,DC=com
JoinDomain=xxxxxxx.com
DomainAdmin=xxxxxxxx
DomainAdminDomain=xxxxxxxxxxxxxx
DomainAdminPassword=xxxxxxxxxxxxxxxxxxxxx

'skips collect user data pane as this is for clean installs
SkipUserData=YES

'auto selects task xxx, the golden image in the xxx server. set to NO or comment out to bring this pane up to select a different task
SkipTaskSequence=YES
TaskSequenceID=xxx

'enables a default value with location and PC serial for xxx, but also enables computer name pane for user input
SkipComputerName=NO
OSDComputerName=XXXNEW-%SerialNumber%

'skips the package display pane
SkipPackageDisplay=YES

'Sets the language and keyboard panes
SkipLocaleSelection=YES
UILanguage=en-us
UserLocale=en-us
KeyboardLocale=en-us

'sets the timezone to pacific.
SkipTimeZone=YES
TimeZoneName=Pacific Standard Time
TimeZone=004

'sets our homepage. It was defined in task, but this is a better, global place to define it, as it does change occasionally.
Home_page=http://xxxxxxxx.com

'skips the application wizard. May want to enable
SkipApplications=NO
'skips apps on upgrade actions. This is redundant, as we are doing new installs, but I left it in to not forget it exists.
SkipAppsOnUpgrade=YES
'installs default themepack
Applications001={xxxxxxxxxxxxxxxxxxxxxxx}
'xxxxxxxxxxxxxxxxxxxx
Applications002={xxxxxxxxxxxxxxxxxxxxxxx}
'installs xxxxxxxxxxxxxxxx
Applications003={xxxxxxxxxxxxxxxxxxxxxxx}
'installs xxxxxxxxxxxxxxxxxxxx
Applications004={xxxxxxxxxxxxxxxxxxxxxxx}
'remove Libaries folder from Desktop
Applications005={xxxxxxxxxxxxxxxxxxxxxxx}

'points at our WSUS server to pull updates
WSUSServer=https://update.xxxxxx.com:8531

'skips the preamble and post amble summary. Will still display post summary in red if there are errors.
SkipSummary=YES
SkipFinalSummary=YES

'sets default screen resolution so low, windows is forced to auto adjust to the correct resolution.
BitsPerPel=32
VRefresh=60
XResolution=1
YResolution=1

'Sets a share location for the logs file
SLShareDynamicLogging=\\server\deploymentshare$\DeploymentLogs

'This is used by the MDT monitoring service for something or other
EventService=http://server:9800
You can also add the default login user and password to “Edit Bootstrap.ini. By adding this Rule, MDT will no longer ask for the user and password and will use these credentials to access them.
[Settings]
Priority=Default

[Default]
DeployRoot=\\MDT\DeploymentShare$
UserDomain=myDomain.local
UserID=myID
UserPassword=myPassword
SkipBDDWelcome=YES
