The Epson L5190 printer is indeed a mainstay multifunction hero for printing, scanning, copying, and faxing. However, behind its reliability, there is a monitoring system that often makes users nervous: the waste ink pad counter.
What is it? It is an internal counter that secretly monitors the volume of waste ink resulting from the printhead cleaning process. This waste ink is stored in a foam or pad inside the printer.
Then, what happens when the counter is full? Your Epson L5190 will immediately “strike” as a form of protection. The symptoms are easily recognizable:
- The “Service Required” or “Parts Life End” Error message adorns your computer screen.
- The Indicator Light Flashes Compact non-stop, and the printer refuses to respond to any print commands.
- The Totally Dead Machine, as if it had said goodbye, even though the ink and paper were still complete.
The impact on productivity is very real. Whether you’re a business owner, a professional worker, or a college student chasing a deadline, a printer that suddenly fails can mess things up and result in unexpected loss of time and costs.
However, don’t panic right away and take it to the serviceman!
This is where the Adjustment Program Epson L5190 comes in as a lifesaver. This particular program is the key to resetting the waste ink pad counter, returning the counter to zero, and getting your printer back up and running normally, in just a matter of minutes.
By mastering how to use this tool, you not only save hundreds of thousands of service costs but also take full control of your device. Keep in mind, this reset is a software solution. Physical steps to replace the waste ink pads that are saturated at some point are still necessary to keep the printer lasting.
Preparation Before Using the Epson L5190 Program Adjustment
Before running the Adjustment-Program Epson L5190, do some important preparations:
1. Install Epson L5190 Driver
Make sure the driver is installed so that the printer can be read on your computer.
2. Use the Original USB Cable
The reset process can only be done via USB, not Wi-Fi. The original cable is more stable and has fewer errors.
3. Temporarily Disable Antivirus
Antivirus or Windows Defender often detects AdjProg.exe files as threats. Turn it off temporarily so that the program can run.
4. Make sure the printer is ready
Check the condition of the electrical, paper, and ink so that there are no additional problems during the reset.
With this preparation, the Epson L5190 reset process will be smoother and safer.
How to Download Epson L5190 Adjustment-Program
How to Use the Epson L5190 Adjustment Program
Make sure you’ve completed all the mandatory preparations (installed drivers, original USB cable installed, etc.) before starting this tutorial. Carry out each step carefully.
1) Extract the downloaded file
- Right-click the ZIP/RAR → Extract file to the local folder (e.g. C:EpsonL5190).
- Make sure that all files (including AdjProg.exe) are in the same folder.
2) Run AdjProg.exe as Administrator
- Right-click AdjProg.exe → Run as Administrator.
- If the UAC prompt appears, select Yes.
- If the program is not open, right-click → Properties → Compatibility → check Run this program as an administrator → OK.
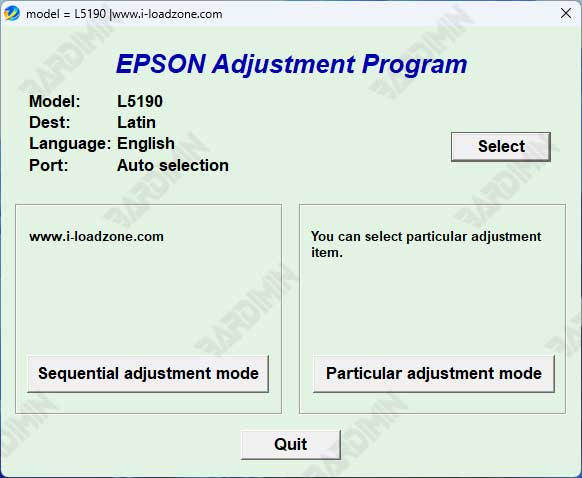
3) Select printer model → Epson L5190
In the initial window, click Select (if applicable), set:
- Model: Epson L5190
- Port: Auto Selection or select port USBxxx (Epson L5190) if detected.
Make sure the printer ON and the USB cable is installed are stable.
4) Go to the menu Particular Adjustment Mode
- Click Particular Adjustment Mode to open a list of specific service functions.
- This menu contains calibration and reset tools for specific components, including waste ink counters.
5) Select Waste Ink Pad Counter
- Click Waste Ink Pad Counter → check Main Pad Counter.
- Press Check to read the current percentage/counter number. If high/”full”, proceed to reset.
- (Optional) Save a screenshot of the value before the reset for technical documentation.
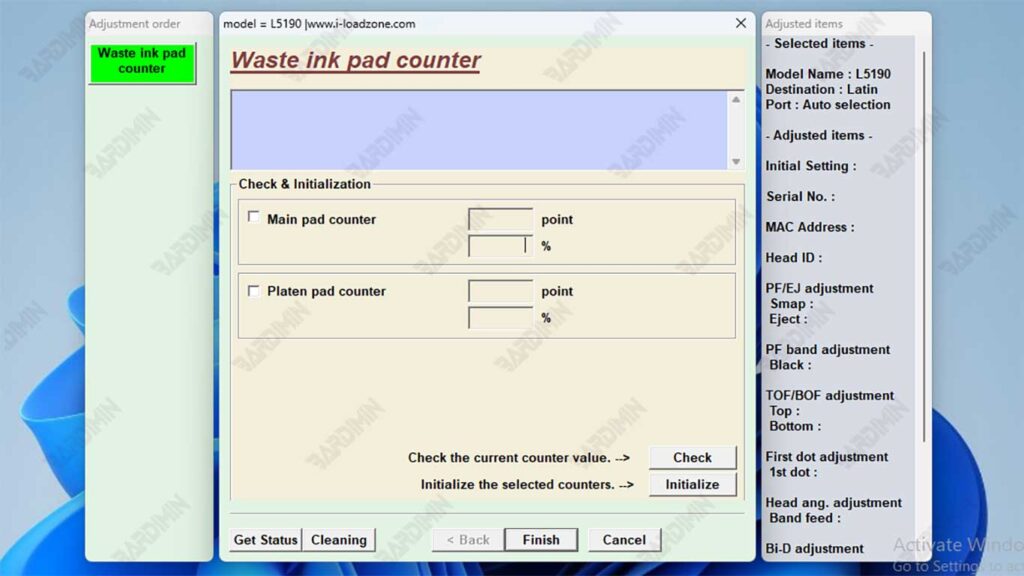
6) Click Initialization
- Press Initialization to run the reset process Waste Ink Pad Counter.
- Do not disconnect the USB/power cord during the process.
- Wait for the notification to finish or the next instruction to appear.
7) Turn off the printer, then turn it back on
- Once the command appears, turn off the printer, wait ±5–10 seconds, and then turn it on again.
- The blinking indicator should disappear, and the Service Required message no longer appears.
