You can hide and unhide the Windows 11 partition that stores your private data whenever you want. Do you want to know how?
Some Windows users use one C drive on an SSD or hard disk on their computer. And others divide hard disks to handle drives that contain large amounts of important data.
When you create a new disk or partition in Windows, it will appear in File Explorer automatically. Each drive is identified by its own Drive Letter. The Windows installation drive, for example, contains the letter “C” as its drive letter.
However, sometimes you need to hide a disk or partition on your computer so that it is no longer visible to other Windows users.
Hiding a partition is a simple technique to restrict access to it. Once your partition is hidden, you may be sure that others won’t be able to see your sensitive data even if they are using your computer.
There are various advantages of hiding disk partitions, for example, preventing children from accessing your data on a specific disk, making the drive difficult to identify, hiding system reserved partitions, and so on.
By hiding your disk in Windows, you can keep important information safe by preventing others from accessing it. If you want to hide your disk in Windows, follow the guide from Bardimin below.
Hide Partitions or Drives using Disk Management
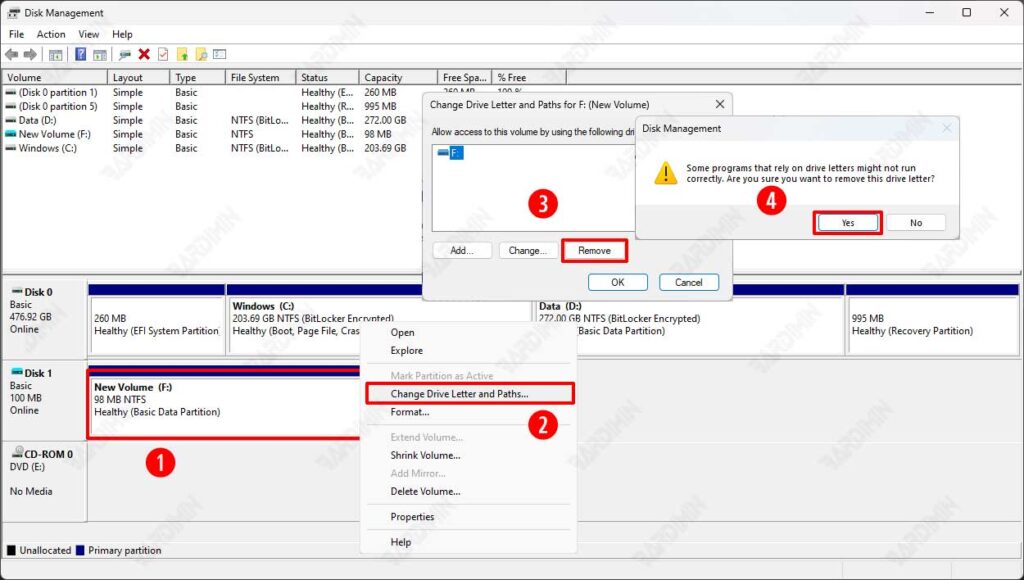
- Open “Disk Management” Windows. You can open it with shortcut keys (WIN + X). Then select the “Disk Management” option.
- Next, select the drive you want to hide. Right-click and select “Change Drive Letter and Paths“.

- In the dialog box that appears, click the “Remove” button.
- Click the “Yes” button on the confirmation dialog box.
View Partitions or Drives using Disk Management
- Repeat steps 1-2 on the previous way to hide.
- In the dialog box that appears, click the “Add” button.
- Then select the drive letter you want to use.
- Click the “OK” button to display again.
Hide Partitions or Drives using Group Policy Editor
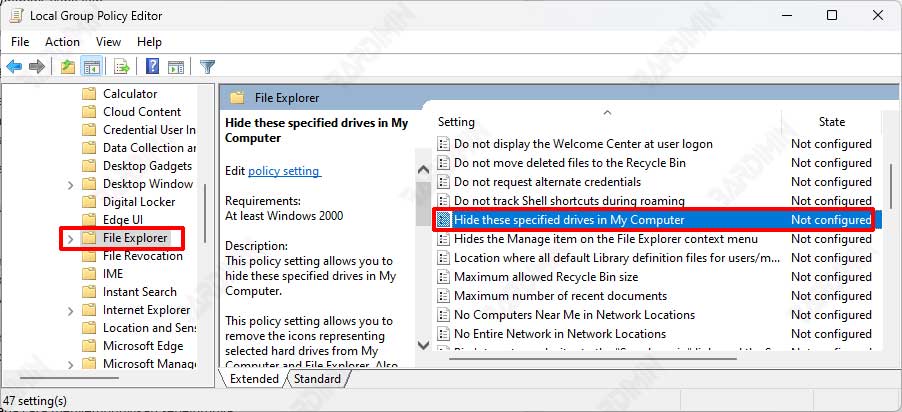
- Open the “Group Policy Editor“. You can open it by using the keyboard shortcut (WIN + R), then type “gpedit.msc” and click the OK button.
- Next, in the Group Policy Editor, navigate to “User Configuration > Administrative Templates > Windows Components > File Explorer.
- Then on the right panel, double-click on “Hide these specified drives in My Computer“.

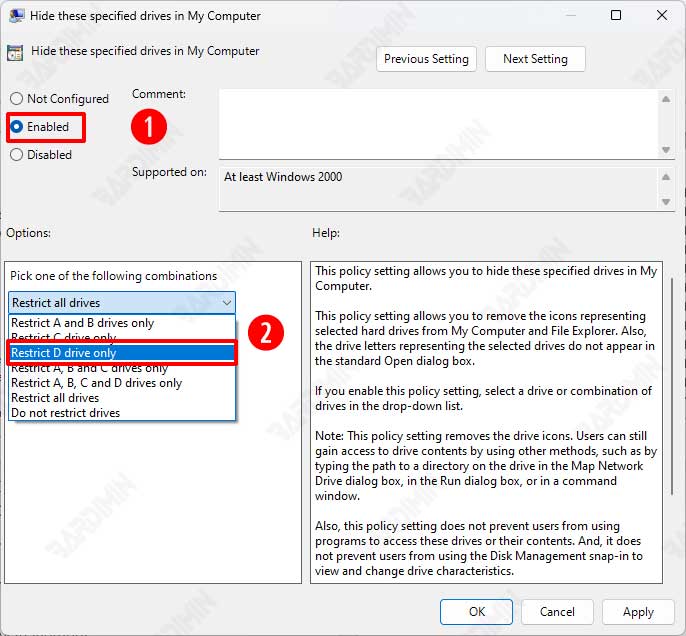
- Next in the dialog box, select “Enabled“.

- And in the options field, click the drop-down button and select the drive you want to hide.
- Click the OK button to save it.
View Partitions or Drives using Group Policy Editor
- Repeat steps 1-3 previously.
- Select “Not Configured” or “Disabled” to display again.

