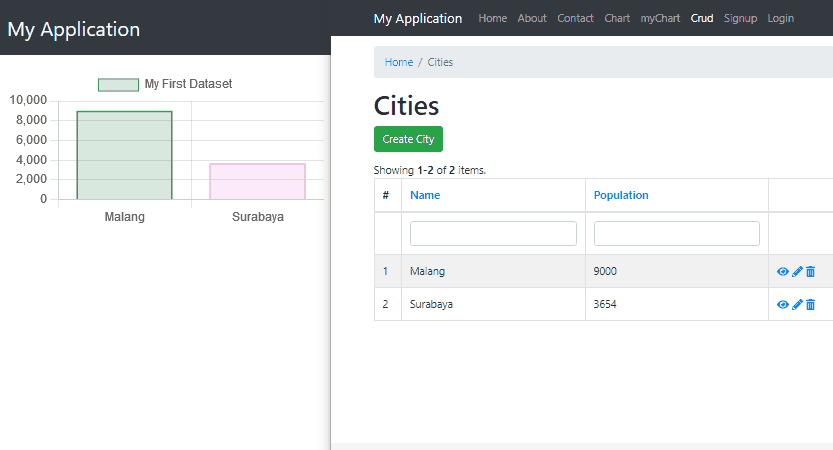
In this article we will create a dashboard that can display graphics from data in real-time. The data we use as simulations is the population of a city. If you update your resident data, add or delete it, the graphic will change in real-time without the need to refresh from the page.
Before we begin, we need to prepare:
- Webserver is installed, see How to Configure Virtual Host XAMPP in Windows 10
. - Yii2 is installed, see How to Install Yii2 Advanced via Composer
. - Node.js is already installed, see Create real-time applications with Nodes.js
. - Chart.js.
Steps to Create a Real Time Application Dashboard with Yii2, Node.js, MySQL and Chart.js
A. Create a table with MySQL
Create tables with the name “city”, and columns with the names “id” and “population”. Or it’s easier to run the following sql scripts.
CREATE TABLE 'city' (
  'id' CHAR(16) NOT NULL PRIMARY KEY,
  'population' INT(11) NOT NULL DEFAULT '0'
) ENGINE=InnoDB DEFAULT CHARSET=utf8mb4;
B. Create a Node server.js
- Set up a Node server.js as in Creating real-time applications with Nodes.js.
- In the “server.js” file, what we need to create is an “API” that will update the data on the graph we create with the Chart.js after the data is successfully stored by Yii.
- When the user first opens the dashboard page, we check whether the initial data for the dasboard graph is available, if not Yii will send the initial data.
app.post('/status', (req, res) => {
    res.send(isInitData);
});

app.post('/initData', (req, res) => {
    if(!isInitData){
        myData = req.body;
        isInitData=true;
    }
    res.send('success');
});- Next we will create an “API” that will update the data on crud operations on Yii.
app.post('/newData', (req, res) => {
    switch (req.body.actions){
        case "create":
            myData.push({id: req.body.id, population: req.body. population});
            break;
        case "update":
            let i = myData.findIndex(label => label.id === req.body.id);
            myData [i] ={id: req.body.id, population: req.body. population};
            break;
        case "delete":
            let l = myData.findIndex(label => label.id === req.body.id);
            myData.splice(l,1);
            break;
    }
    io.emit('newData', {id: req.body.id, population: req.body. population, actions:req.body.actions});
    res.send('success');
});- Full script of the file server.js
var app = require("express")();
var bodyParser = require('body-parser')
var http = require('http'). Server(app);
var io = require("socket.io")(http,{cors: {origin:"*"}});

var myData = [] ;
var isInitData=false;

http.listen(3000, function () {
    console.log("Listening on 3000");
});

app.use(bodyParser.json({type: 'application/json' }));

app.post('/status', (req, res) => {
    res.send(isInitData);
});

app.post('/initData', (req, res) => {
    if(!isInitData){
        myData = req.body;
        isInitData=true;
    }
    res.send('success');
});

app.post('/newData', (req, res) => {
    switch (req.body.actions){
        case "create":
            myData.push({id: req.body.id, population: req.body. population});
            break;
        case "update":
            let i = myData.findIndex(label => label.id === req.body.id);
            myData [i] ={id: req.body.id, population: req.body. population};
            break;
        case "delete":
            let l = myData.findIndex(label => label.id === req.body.id);
            myData.splice(l,1);
            break;
    }
    io.emit('newData', {id: req.body.id, population: req.body. population, actions:req.body.actions});
    console.log("issuer new data "+req.body.id+" :"+req.body.actions);
    res.send('success');
});

io.on("connection", (socket) => {
    console.log("A user is connected");
    if(isInitData){
        console.log("initial data issuer");
        socket.emit('initialData', myData);
    }
});
C. Configuration on Yii2
- Create a class “myCurl.php” with the function “CurlToNodejs”, for how to create a function you can see in [Yii2] How to create and use Functions in Yii2 Basic and Advanced Templates
class myCurl extends Component
{
    public function CurlToNodejs($url.$postdata=null)
    {
        $header = ['Content-type: application/json'] ;
        $curl = curl_init();
        curl_setopt ($curl, CURLOPT_URL, $url)
        curl_setopt($curl, CURLOPT_POST, 1);
        curl_setopt($curl, CURLOPT_RETURNTRANSFER, 1);
        curl_setopt($curl, CURLOPT_HTTPHEADER, $header);
        curl_setopt($curl, CURLOPT_POSTFIELDS, $postdata);
        $response = curl_exec($curl);
        return $response;
    }
}- After that, we create a view “myChart.php” to display the graphics from the dashboard. For chart use.js you can see it on www.chartjs.org
<?php
/* @var $this yiiwebView */
$this->title = 'My Chart Application';
$script = < JS
	$(document).ready(function(){
	//Chart.js Configuration
	    const data = {
            datasets: [{
                label: 'My First Dataset',
                borderWidth: 1
            }]
        };

	    const ctx = document.getElementById('myChart');
	    const myChart = new Chart(ctx, {
	        type: 'bar',
	        data: data,
	    });

	   function UpdateChart(chart, label, data) {
            chart.data.labels=label;
            chart.data.datasets.forEach((dataset) => {
                dataset.data=data;
            });
            chart.update();
       }

Socket.io Configuration
	   const socket = io.connect( 'http://localhost:3000');
       var labels = [] ;
       var values = [] ;
       socket.on('initialData', function(data){
           for (let i = 0; i < data.length; i++){
               labels [i] = [i] (.id data);
               values [i] = [i] (.population data);
           }
           UpdateChart(myChart,labels,values);
       });
        socket.on('newData', function(data){
            switch (data.actions){
                case "create":
                    const i = labels.length;
                    labels [i] = data.id;
                    values [i] = data.population;
                    break;
                case "update":
                    const l = labels.findIndex(label=>label===data.id);
                    values [l] = data.population;
                    break;
                case "delete":
                    const x = labels.findIndex(label=>label===data.id);
                    if (x > -1) {
                        labels.splice(x, 1);
                        values.splice(x, 1);
                    }
                    break;
            }
            UpdateChart(myChart,labels,values);
        });

});
JS;
$this->registerJs($script);
$this->registerJsFile("https://cdnjs.cloudflare.com/ajax/libs/socket.io/4.2.0/socket.io.js",); ['position' => yiiwebView::POS_HEAD]
$this->registerJsFile('https://cdnjs.cloudflare.com/ajax/libs/Chart.js/3.5.1/chart.min.js', ['position' => yiiwebView::POS_HEAD] );
?><div class="site-index">
    <div class="body-content">
        <div id="container" style="width: 75%;">
            <canvas id="myChart"></canvas>
        </div>
    </div>
</div>
While in “SiteController.php” we add “actionMychart”. In this function, check whether the initial data is available or not. Otherwise, a query will be made to the database as the initial data.
    public function actionMychart()
    {
        $response = Yii::$app->myCurl->CurlToNodejs('http://localhost:3000/status');
        if ($response === 'false') {
            $data = commonmodelsCity::find()
                ->asArray()
                ->all();
            $response 1 = Yii::$app->myCurl->CurlToNodejs('http://localhost:3000/initdata', json_encode($data));
        }
        return $this->render('myChart');
}- Up to this step, we can already display dashboard graphics. However, it has not been able to display data changes. This time we will use “Gii” to make CRUD. For more details, you can see the Generating Code with Gii.
- Create a “City” model with a “Gii Generator Model”. From this step will be formed a file “/models/City.php”.
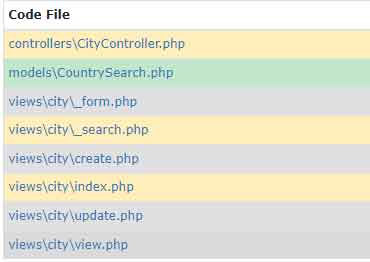
- Then make it with “CRUD Generator Gii” from the model. From this stage, the following files will be formed.
- The next step is to add a script to “CityController.php” that will notify the Node.js of the data changes by using the “myCurl” function that we created earlier.
- Change “actionCreate” to this
    public function actionCreate()
    {
        $model = new City();
        if ($this->request->isPost) {
            if ($model->load($this->request->post()) && $model->save()) {
                $post=Yii::$app->request->post('City');
                $data = ["id" => $post['id'] , "population" = > $post ['population'] "actions"=> "create"];
                Yii::$app->myCurl->CurlToNodejs('http://localhost:3000/newData',json_encode($data));
                return $this->redirect; ['view', 'id' => $model->id]
            }
        } else {
            $model->loadDefaultValues();
        }
        return $this->render('create', [
            'model' = > $model,
        ]);
}- Then change “actionUpdate” to this
    public function actionUpdate($id)
    {
        $model = $this->FindModel($id);
        if ($this->request->isPost && $model->load($this->request->post()) && $model->save()) {
            $post=Yii::$app->request->post('City');
            $data= , ["id" => $post['id'] "population" = > $post ['population'] "actions"=>"update"];
            Yii::$app->myCurl->CurlToNodejs('http://localhost:3000/newData',json_encode($data));
            return $this->redirect; ['view', 'id' => $model->id]
        }
        return $this->render('update', [
            'model' = > $model,
        ]);
}- And then change “actionDelete” to like this
    public function actionDelete($id)
    {
        $this->findModel($id)->delete();
        $data = ["id" => $id, "population" =>"","actions"=>"delete"] ;
        Yii::$app->myCurl->CurlToNodejs('http://localhost:3000/newData',json_encode($data));
        return $this->redirect; ['index']
    }
D. Running an app
- Run the Node server.js with
node server.js
- If all the processes are right, you’ll see it this way.