Have you ever been frustrated because the colons in an Excel document are not right-aligned? Your table of contents, reports, or important tables may appear cluttered, despite their intended professional and neat appearance. Don’t worry, you’re not alone! Excel users, both beginners and advanced ones, often experience this misaligned colon problem.
Did you know? There’s a quick and easy way to create right-flat colons in Excel, without having to manually set the spacing individually! In this guide, Bardimin will unravel a little-known secret technique.
Documents with a neat format are not only pleasing to the eye but also increase your credibility in the world of work or academia. Imagine being able to create a table of contents with a perfect colon in just 10 seconds, even faster than in Microsoft Word!
Method 1: Using Two Columns – The Most Practical and Fast Solution
One of the simplest and most effective ways in Excel to create a right-aligned colon is to use two separate columns for labels and colon symbols. This method is perfect for beginners and professionals who want a neat look without the need for advanced formulas or settings.
Steps:
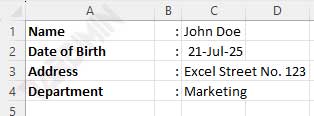
- In column A, type labels like “Name,” “Address,” “Date of Birth,” and so on.
- In column B, fill each row with the symbol “:”.
- Set the alignment on column B to right alignment to perfectly align the position of the colon on the right side of the cell.
- Finally, enter the appropriate value or information in column C.
Advantages of this method:
- Easy to Set
Up No special formulas or settings, just set the columns and alignments manually. - Compatible with Print Preview
This format is perfect if you plan to print a document or save it as a PDF. - Cleaner Data Structure
With the separation between labels, colons, and values, data becomes easier to manage and reformat.
The look above gives the impression of being professional and structured. Additionally, this method is highly flexible and can be used in a wide range of document types, from input forms to company white papers.
Method 2: Excel Custom Format – Elegant Solution Without Additional Columns
If you’re looking for a minimalist and efficient solution in Excel to create right-aligned colons, the Custom Format method can be a very elegant option. This technique allows you to combine label text and colons in a single cell, without the need to create additional columns.
Steps:
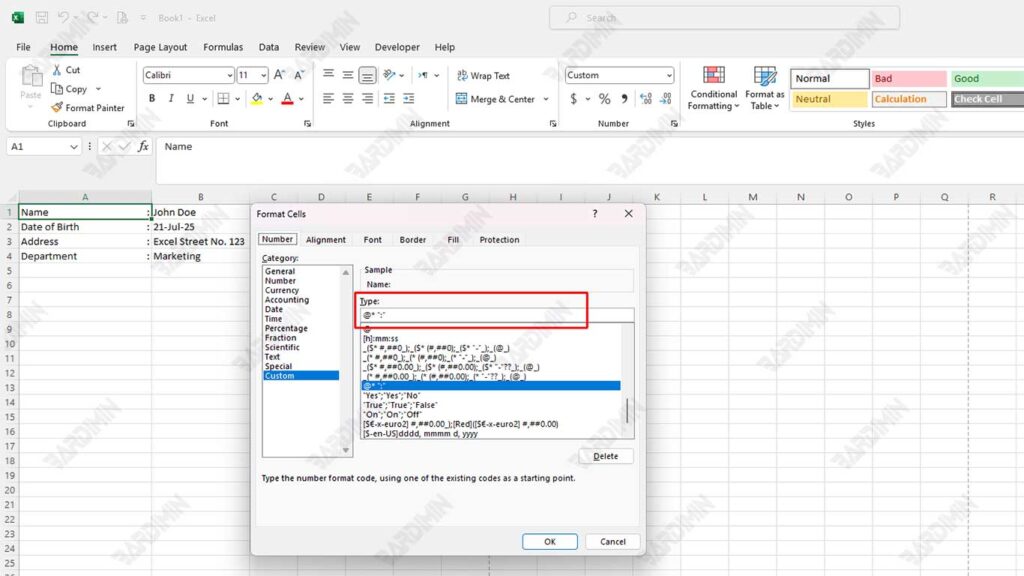
1. Select a cell that contains labels such as “Name”, “Address”, or “Date of Birth”.
2. Right-click on the selected cell, then select Format Cells.
3. Go to the Number tab, then click on the Custom option.
4. Enter the following format code in the Type field:
@* “:”Explanation:
@ represents the content of the text inside the cell.
* (asterisk) followed by a space is used to fill in the remaining blank space with the next character (space).
“:” is the character you want to place on the far right automatically.
Excess:
- One Cell, Two Functions
You don’t need any additional columns to separate labels and colons. Cells become more compact. - Ideal for Dynamic and Modern Views
Ideal for internal documents, report templates, or data entry that prioritizes speed.
Conclusion
While it looks practical, this method is less flexible if the length of the label varies. For example, the “Name” label will be spaced differently from the “Place of Birth” label. Therefore, if you’re using this custom format, make sure the length of the text between lines is relatively uniform, or use a monospace font like Courier New to keep the look consistent.
In addition, this technique is visual, meaning that colons are only visible, but not part of the text content that can be processed with regular formulas (such as FIND or SPLIT).
This method is suitable for those of you who want a professional and space-saving look, especially in internal reports or short data.
