
Did you know that 94% of malware infiltrates through unrecognized apps in Windows 11? Without the right security settings, your PC can be an easy target for ransomware, spyware, or other malicious programs. Windows 11 has a hidden feature that allows you to easily blacklist or whitelist programs, even without additional software.
You can make sure only trusted apps are running on your computer, while suspicious programs are automatically blocked. Not only does it improve security, but it also saves RAM and CPU by preventing junk apps from running in the background.
In this guide, we’ll learn how to control which programs are allowed to run in Windows 11, either using Windows Defender or the Group Policy Editor.
Blacklist vs Whitelist in Windows 11: The Secret Weapon for Full Control of Your Programs
Think of your computer as an exclusive club. A blacklist is a list of “prohibited persons” who are prohibited from entering, while a Whitelist is a VIP invitation system; only those whose names are listed are allowed to enter.
What is Blacklist?
A blacklist is a list of programs that are completely blocked by the system. Once an app makes this list, Windows 11 will:
- Refusing to execute the program
- Prevent installation if it is not installed
- Stop a process that’s already running
Examples of smart use:
- Block keyloggers that infiltrate through pirated software
- Stop adware from browsers that have too many ads
- Restrict games or entertainment apps on your office PC
What is a whitelist?
A whitelist is a proactive security system that only allows trusted programs to run. The concept is simple but powerful:
- Only registered programs can be run
- All other apps are automatically blocked, even if they are not yet known as malware
Brilliant implementation examples:
- In enterprises, only allow Microsoft Office, Zoom, and official tools
- For children, create a whitelist of educational apps only
- On critical servers, lock down all programs except critical ones
How to Blacklist Programs in Windows 11
Want to prevent certain programs from running on Windows 11? One of the most practical solutions is to blacklist apps that are deemed harmful, annoying, or unwanted from running. Windows 11 provides built-in features that can be used for this, especially through Windows Security (Windows Defender).
Here’s a complete guide to blacklisting programs in Windows 11 using Windows Security, without the need for additional software!
Method 1: Using Windows Security (Defender)
This built-in security feature in Windows 11 not only protects against viruses, but it also provides advanced settings to block apps based on their reputation or malicious characteristics. Follow these steps:
Step 1: Open Windows Security
- Click the Start button, then type Windows Security and press Enter.
- Once opened, select the App & browser control menu on the left side.
Step 2: Enable Reputation-Based Protection
- In the App & browser control menu, click the Reputation-based protection settings section.
- Enable all reputation protection options, specifically:
- Check apps and files
- SmartScreen for Microsoft Edge
- Potentially unwanted app blocking → Enable the Block apps and Block downloads options
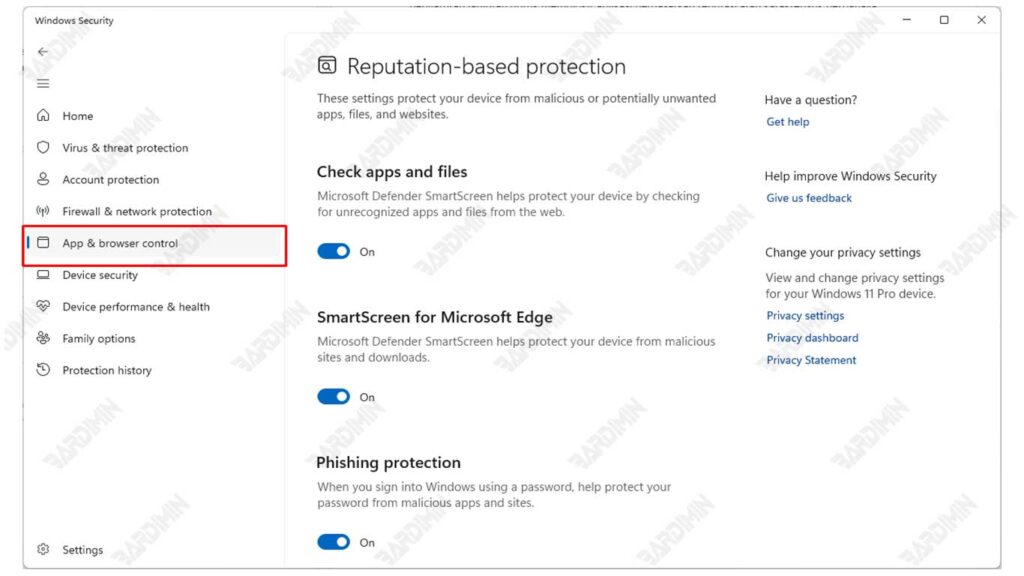
With this feature enabled, Windows will automatically block apps that are known to be potentially harmful or come from untrusted sources.
Step 3: Add Apps Manually via Exploit Protection
- Scroll to the bottom of the window and click Exploit Protection settings.
- Select the Program settings tab, and then click the + Add program to customize button.
- Click Choose exact file path and enter the full path of the .exe app file you want to block.
- Once added, you can set the parameters so that the app is restricted or prevented from running properly.
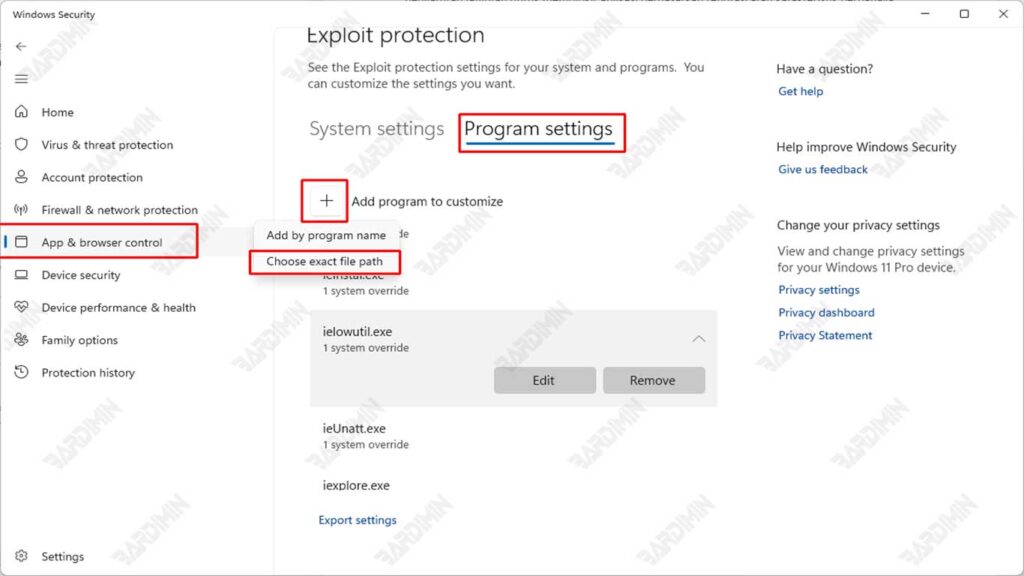
This method does not directly “remove” or “remove” the application from the system, but it significantly limits its execution and functionality.
