Epson L-series printers (L360, L130, L220, L310, L365) often display a “Service Required” error when the waste ink counter reaches its limit. This article provides a technical guide on resetting the waste ink counter using an adjustment program, including step-by-step instructions, safety tips, and maintenance advice to keep your printer running smoothly.
Understanding the Waste Ink Counter and Why Reset It
Epson inkjet printers like the L360, L130, L220, L310, and L365 feature an automatic print head cleaning system. This process generates waste ink, which is collected in a waste ink pad (absorber) inside the printer. The printer tracks the amount of waste ink using a waste ink counter stored in its firmware. Once this counter hits a predefined threshold, the printer halts and shows an error message like “Service Required” or “Parts End Life” to prevent overflow.
Resetting the waste ink counter without physically inspecting or replacing the waste ink pad can lead to ink leakage and permanent damage. Always check the pad’s condition before performing a reset.
It’s crucial to understand that resetting the counter only clears the software value; it does not remove accumulated ink. Therefore, technicians and home users should periodically open the printer and clean or replace the waste ink pad as part of routine maintenance.
Epson Printer Models Compatible with the Adjustment Program
The adjustment program (also known as a resetter) discussed here is designed for Epson L-series printers with integrated ink tanks. Based on field experience, the software works reliably with the following models:
- Epson L360 – A popular choice for small offices.
- Epson L130 – An entry-level color printer.
- Epson L220 – A model with a built-in scanner.
- Epson L310 – A faster variant of the L210.
- Epson L365 – Equipped with Wi-Fi connectivity.
Before downloading, double-check your printer’s exact model number. Using the wrong adjustment program may fail to reset the counter or even corrupt the printer’s firmware.
How to Safely Download the Epson Adjustment Program
Official Epson support sites do not provide adjustment programs, as they are intended for authorized service centers. However, these tools are widely available on technician forums and third-party websites. Exercise caution when downloading—always use trusted sources and scan files with up-to-date antivirus software. Below is a tested download link (password protected for security):
Note: Some adjustment programs may require an internet connection for verification, but most work offline. Always run the executable as an administrator to avoid permission issues.
Step-by-Step Waste Ink Counter Reset for Epson L-Series
Before you begin, ensure your printer is powered on and connected to your PC via a USB cable. Close any applications that might be using the printer. Follow these technical steps carefully:
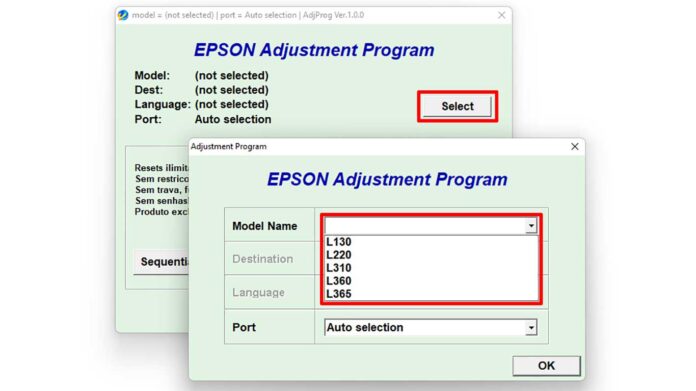
- Extract and run Adjprog.exe – Right-click the file and select “Run as administrator” to prevent access errors.
- Select your printer model – Click the Select button, then choose your model from the list (e.g., L360, L130, L220, L310, or L365). If your model isn’t listed, try clicking “Check” to refresh or select the closest alternative.
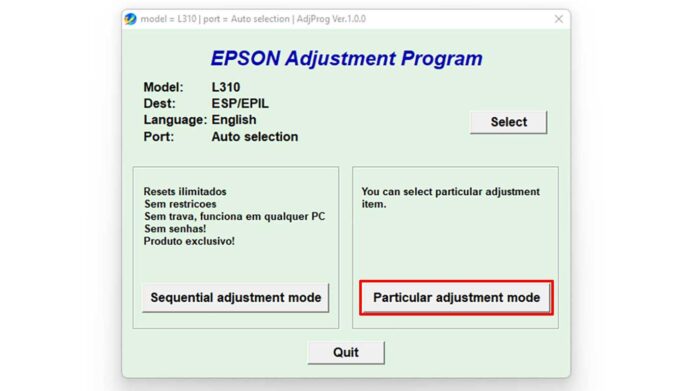
- Enter adjustment mode – Click Particular adjustment mode to access specialized settings.
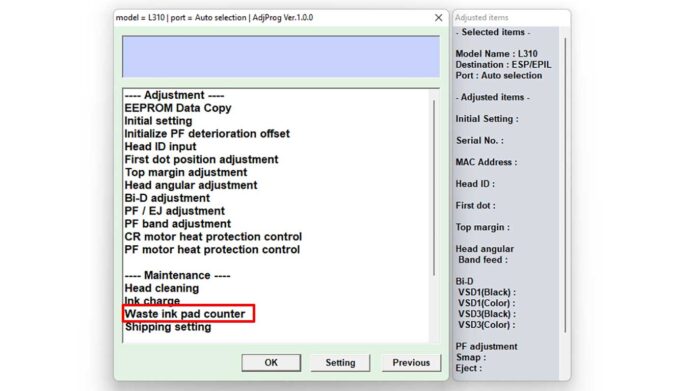
- Select Waste ink pad counter – In the new window, check the box for Waste ink pad counter and click OK.
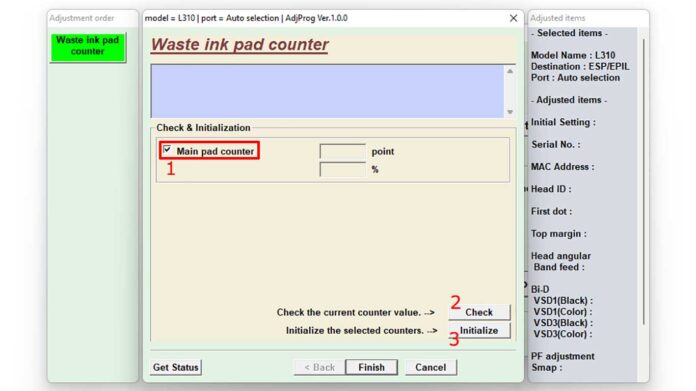
- Read and initialize the counter – Tick Main pad counter, then click Check. Wait for the program to display the current counter value. After that, press Initialize to reset it to zero. A prompt will ask you to turn off the printer—follow the instructions, then click Finish.
- Restart your printer – Close the application, turn off the printer, wait about 10 seconds, and power it back on. The error message should no longer appear.
Common Troubleshooting Tips After Reset
- Printer still shows “Service Required” – This may happen if: (a) the waste ink pad is physically saturated and needs replacement, or (b) the adjustment program version is incompatible with your printer’s firmware. Try a different version or check forums for your specific model.
- USB communication error – Verify that the USB cable is functional and the printer drivers are properly installed. Try another USB port or restart your computer.
- Initialize button grayed out – Some programs require you to click “Check” first and wait for the data to load fully. If it remains inactive, relaunch the software with administrator privileges.
Waste Ink Pad Maintenance to Prevent Recurring Issues
Resetting the counter is only a temporary fix if the waste ink pad is already full. For long-term reliability, follow these maintenance steps recommended by professional technicians:
- Carefully open the printer casing (mind the flexible cables) and locate the waste ink pad, typically found at the bottom near the print head parking area.
- Remove the pad, rinse it under running water until the water runs clear, and let it dry completely. Alternatively, replace it with a new pad readily available online.
- If the pad is torn or disintegrating, replace it immediately. Do not allow ink to pool inside the printer, as it can damage electronic components.
After cleaning or replacing the pad, perform another reset using the adjustment program. To slow down future waste ink accumulation, reduce the frequency of automatic print head cleanings by printing regularly and using high-quality ink.
Conclusion and Technical Recommendations
Mastering the use of the adjustment program for Epson L360, L130, L220, L310, and L365 printers is a valuable skill for technicians and home users alike. It can save on service costs and extend the life of your printer. However, always pair software resets with physical maintenance of the waste ink pad. By combining both, your Epson printer will continue to produce thousands of pages without the dreaded “Service Required” interruption.
For further information on Epson printer care, visit the official Epson Indonesia support page or join discussions in technician forums. Happy printing, and may your printer serve you reliably!