Has your flagship Epson L15150 printer suddenly stopped working? All indicator lights flashed red, and on the computer screen appeared a scary message: “Service Required. Ink Pad is at the end of its service life.”
Don’t worry! This doesn’t mean your printer is completely damaged. It is simply an internal counter system that has reached its limits. These problems are very common and, most importantly, you can solve them on your own. This article will guide you step-by-step, with a clear and detailed explanation, on how to use the Adjustment Program Epson L15150 Resetter to reset the counter and return the printer to its best performance.
What Is the Ink Pad Counter and Resetter Adjustment Program?
What is an Ink Pad?
Ink pad or absorbent pad are special sponge pads found inside Epson printers, including the Epson L15150 series. Its function is to absorb the residual ink resulting from the printing head cleaning process.
- Think of it like a waste container, a place to store excess ink that is no longer used.
- Because it is made of sponge, the ink absorption capacity is certainly limited.
Why Is There An Ink Pad Counter?
To prevent damage from excess ink, Epson added a counting system called the Ink Pad Counter.
- This system works like an odometer or oil filter on a car that calculates the service life.
- Every time the printer performs a head cleaning or ink removal, the counter number will increase.
- When the counter reaches the maximum limit, the printer automatically enters the protection mode (Service Required / Protect Mode) and stops printing.
What is an Adjustment Program resetter?
The Resetter Adjustment Program is a software (special software) designed to reset the value of the Ink Pad Counter back to zero.
- The program was created for authorized Epson technicians, not for the general public.
- With this software, the printer will “think” that the ink pad has been replaced with a new one, even though it is not necessarily physically replaced.
- This reset process allows the printer that was previously Service Required error to return to normal and can be used for printing.
Resetting the ink pad counter without actually replacing the ink pad is only temporary. If the sponge is full, there is a risk of ink spilling out. Therefore, it is recommended that the reset be accompanied by a physical cleaning or replacement of the ink pad.
Important Preparations Before Running a Resetter Program
Mature preparedness is not only the key to success, but also the only way to prevent unwanted damage. As someone who has done hundreds of resets, I emphasize: don’t miss a single step below. Consider this a mandatory ritual before “surgery”.
1. Printer Condition: Make Sure It Is Completely in the “Error” Status
Printer Epson L15150 You should show a clear symptom that all indicator lights are flashing red at the same time, and may be accompanied by a message on the computer screen such as “Service Required” or “Ink Pad is at the end of its service life”.
This condition indicates that the Ink Pad Counter is full and a reset is needed.
2. Computer Devices: Use a Stable System
Use a computer or laptop with a Windows 7, 8, or 10 operating system (32-bit or 64-bit). Windows is the OS that is most compatible with Epson’s adjustment tool software.
Make sure your computer is free of viruses and isn’t running other heavy tasks. Close all unnecessary applications to allocate all resources to the reset process.
3. Hardware Connection: Original USB Cable and Excellent Port
This is the most critical factor that often fails. Use an original, high-quality USB data cable. Many cheap USB cables can only charge, but cannot transfer data.
Plug the USB cable directly into the port on the back of the CPU (motherboard) or the main port on the laptop. Avoid using an external USB hub or port on the front of the CPU case, as it often lacks power and stabilization.
WiFi/Bluetooth connections are not supported for this process. The connection must be physical via USB.
4. Download Software
5. Disable Antivirus Temporarily
This Resetter Adjustment Program software is often categorized as “False Positive” by antivirus programs such as Windows Defender, Avast, or McAfee. This means that the software is not dangerous but is considered suspicious because of the way it works that accesses the printer’s firmware.
Sec. 6. Power Stability: Don’t Let the Power Shut Down in the Middle of the Process!
The reset process is to write data to the printer’s chip. If the power goes out or the cable is unplugged during the process, it can cause irreversible firmware damage (bricking).
Make sure the electrical voltage is stable. For laptops, make sure they are plugged into a charger and the battery is properly charged. Don’t rely on batteries alone.
Steps to Use the Epson L15150 Resetter Adjustment Program
Once all the preparations are complete, follow these instructions to perform a reset on the Epson L15150 printer:
Step 1: Extract and Run with Administrator Rights
- Once you’ve downloaded it, locate the ZIP/RAR file. Right-click on the file, then select “Extract Here” or “Extract to [folder name]”.
- Go to the extraction results folder. Search for the main file with the name AdjProg.exe.
- VERY IMPORTANT: Right-click on AdjProg.exe and select “Run as Administrator”. This gives the software full access to communicate with the printer driver.
Step 2: Choose the Right Printer Model
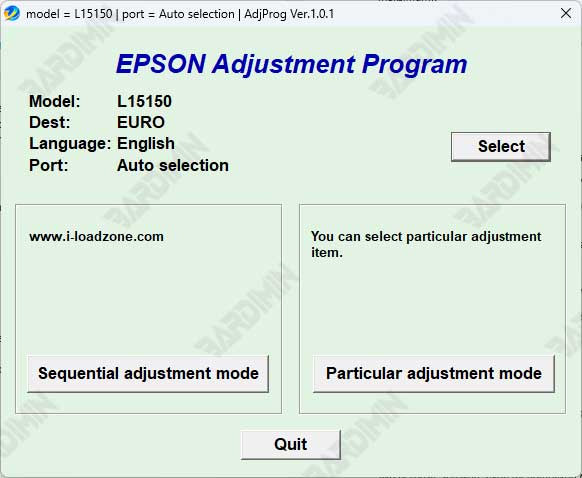
- Once the software window opens, the first step is to select a model.
- Click the button “Select”.
- From the list that appears, search for and select “L15150”. Don’t be mistaken, because choosing the wrong model can be fatal.
- Click “OK” to confirm.
Step 3: Enter the Special Adjustment Mode
- In the main window of the software, you will see several buttons. To perform a reset, you need to enter a special mode.
- Click the button “Particular Adjustment Mode”. This is a gateway to make adjustments to the counter.
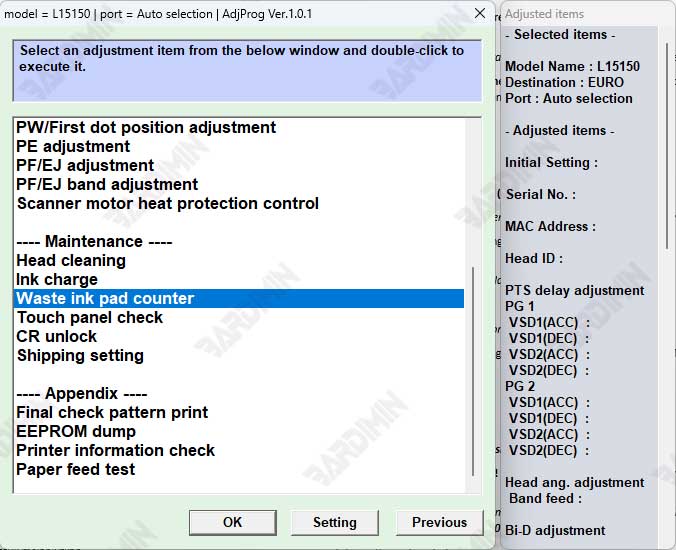
Step 4: Select the Option to Reset
A new window will appear with many options. This is a list of various counters that can be reset.
- Scroll through the list and look for the “Waste Ink Pad Counter” option.
- Select the option by clicking on it once, then click “OK” to continue.
Step 5: Read the Counter Status and Check the Box
- Check the checkbox next to the counter.
- Once checked, click the button “Check”. The software will read the current counter value of your printer. The read value will be displayed.
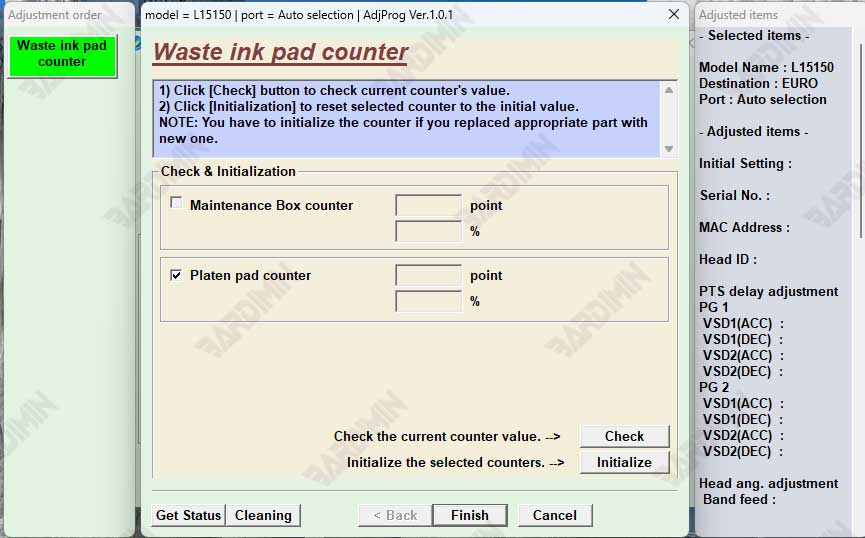
Step 6: Initialization
- This is the core step. After confirming the readable value, click the “Initialization” button.
- The software will display a warning that this process will reset the counter. Read carefully.
- Click “Yes” or “OK” to start the reset process.
Step 7: Wait and Confirm Success
- Be quiet and don’t touch anything! Let the software work. This process only takes a few seconds.
- If successful, the software will display the message “Completed successfully”, “Finished”, or similar, accompanied by the “0x00000000” code (meaning there are no errors).
- Close the software.
Step 8: Restart the Printer to End the Process
- DO NOT print right away!
- Manually turn off your printer using the power button.
- Unplug the printer’s power cord from the power outlet. Wait for at least 30 seconds. This is very important to completely clear the printer’s cache memory.
- Reinstall the power cord, then turn on the printer.
Once turned on, all the red flashing lights will disappear and turn stable green. Your printer is now error-free and ready to use again. Do a test print to make sure.