This guide provides a complete technical walkthrough for enabling TPM 2.0 in VMware Workstation Pro. You will encrypt the virtual machine, add a virtual Trusted Platform Module, and verify its version on Windows 11. Follow these steps to meet security requirements and run modern operating systems.
A TPM (Trusted Platform Module) is a hardware-based cryptographic chip. It generates and stores encryption keys for features like BitLocker, Windows Hello, and firmware integrity checks. VMware Workstation Pro supports TPM version 2.0 on virtual machines (VMs). This capability allows you to install Windows 11 or other TPM-dependent OSes inside a virtual environemnt (typo: environemnt instead of environment). IT professionals, virtualization technicians, and gamers who use VMs for simulation or gaming can benefit from this tutorial.
Windows 11 requires TPM 2.0 as a minimum installation requirement. Without a virtual TPM, you cannot install this OS on VMware.
Before starting, ensure you have VMware Workstation Pro version 15 or newer. Older versions lack TPM 2.0 support. You can add TPM to an existing VM or create a new one. This guide uses a VM with Windows 10/11 as the guest OS. The process is safe, but backing up your VM is always recommended.
Technical Prerequisites for Adding TPM 2.0 in VMware
Several conditions must be met before the virtual TPM can function. First, the VM must use UEFI firmware (not legacy BIOS). Second, you need to enable access control encryption on the VM. Third, the host machine must support hardware virtualization (Intel VT-x or AMD-V). Fourth, VMware Tools should be installed in the guest OS for optimal communication.
If your VM still uses BIOS, switch to UEFI. Open Virtual Machine Settings → Options → Advanced → Firmware type → select UEFI. This change may require reinstalling the bootloader on the guest system.
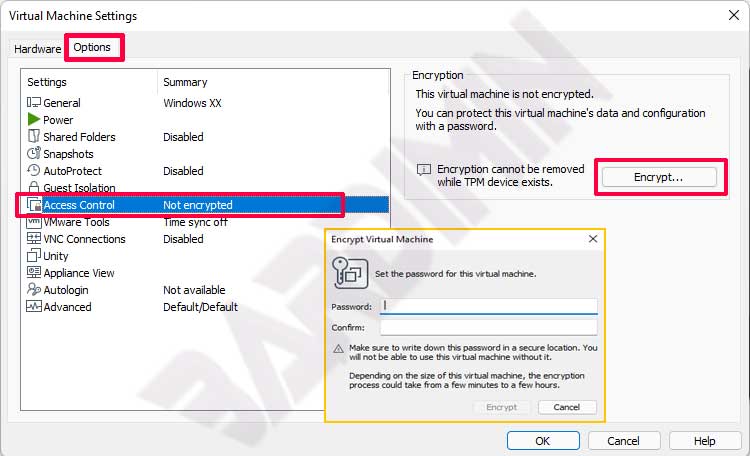
1. Encrypt Access Control on the VM
The first mandatory step is encrypting the VM. VMware does not allow TPM addition before encryption is activated. Encryption protects VM files (disks, configuration, memory snapshots) with a password. Follow these steps:
- Open Virtual Machine Settings (press Ctrl + D).
- Select the Options tab.
- Click Access Control in the left panel.
- In the right panel, click the Encrypt button.
- Enter and confirm a strong encryption password. Store this password securely.
- Click OK to begin encryption. The process duration depends on the VM disk size.
After encryption finishes, your VM becomes password-protected. Without the correct password, the VM cannot start. This feature is critical for sensitive data. Do not lose the encryption password because VMware provides no recovery mechanism.
2. Add the TPM 2.0 Device to the VM
Once encryption is active, you can add the virtual TPM. This device appears as a TPM 2.0 hardware component inside the guest OS. Steps to add it:
- Open Virtual Machine Settings again (Ctrl + D).
- Select the Hardware tab.
- Click the Add button at the bottom.
- In the wizard, choose Trusted Platform Module from the device list.
- Click Finish to add TPM to the VM.
- Click OK to save the configuration.

The TPM device appears in the hardware list. Its size is only a few megabytes. VMware automatically connects the virtual TPM to the VM’s chipset. You do not need extra drivers because modern guest OSes natively support TPM 2.0.
You can remove the virtual TPM anytime through the same Settings dialog. However, only remove it if you no longer need TPM security, as this will erase all stored encryption keys.
Verify TPM Version Inside the Windows Guest
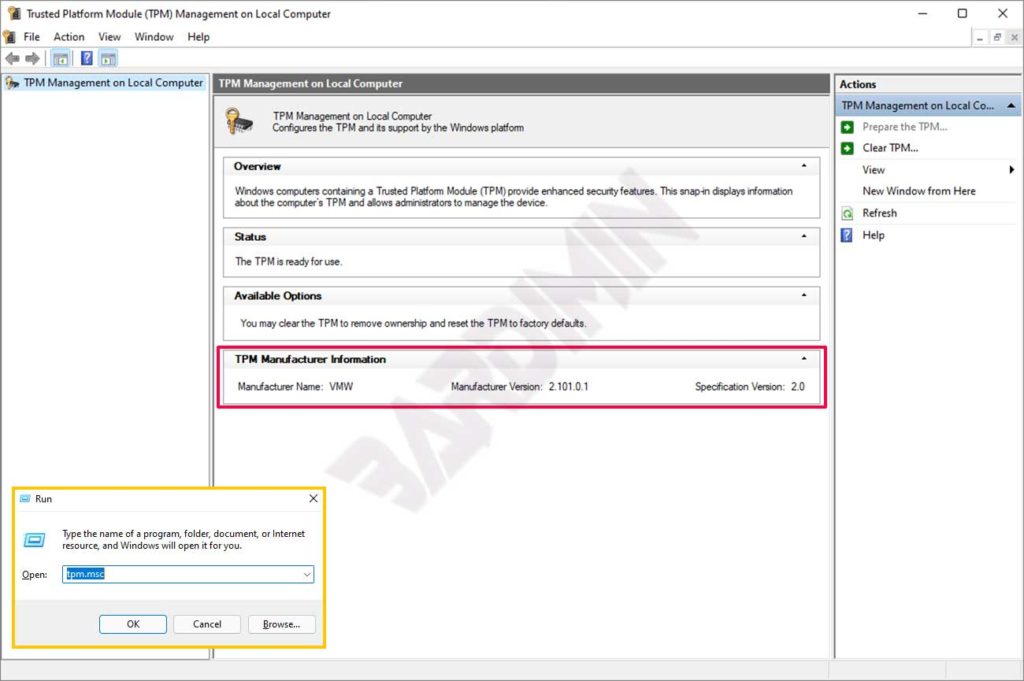
After adding the TPM, power on the VM and log into Windows. Confirm that the TPM is detected correctly and runs version 2.0. Use the built-in Windows tool:
- Press Win + R to open the Run dialog.
- Type tpm.msc and press Enter.
- The Trusted Platform Module (TPM) Management window opens.
- Check the Status and Specification Version fields. They should say “The TPM is ready for use” and “2.0”.
If the TPM does not appear, restart the VM. Ensure VMware Tools is installed and up to date. Open Device Manager in Windows, look for “Security devices” → “Trusted Platform Module 2.0. A yellow exclamation mark indicates driver issues. Update the driver automatically through Windows Update.
Troubleshooting Common TPM Issues on VMware
Several problems can occur when enabling the virtual TPM. Here are technical solutions:
- Encrypt button is grayed out: Ensure the VM is powered off. Running snapshots or clones may also block encryption.
- Error “TPM not supported”: Check your VMware Workstation Pro version (minimum 15.0.0). Upgrade if needed. Also verify that the host CPU supports virtual TPM (Intel PTT or AMD fTPM).
- TPM not detected in Windows: Reboot the VM twice. Sometimes TPM requires two boot cycles to appear. If still missing, remove the TPM device and add it again.
- Encryption fails due to large disk: Encrypting a 100 GB disk may take 10-30 minutes. Let it finish without interruption.
Critical info: Never manually delete encrypted files (.vmx, .vmdk). This will corrupt the VM, and data cannot be recovered without the password. Always use the decrypt option through VMware if you wish to disable encryption.
Optimizing TPM for Gaming and Professional Virtualization
Gamers who use VMs to run anti-cheat games like Valorant or Genshin Impact need TPM 2.0. Some kernel-based anti-cheat systems check for TPM presence as a validation of a secure environment. With a virtual TPM, you can meet those requirements without dual-boot installation.
For virtualization technicians, TPM enables testing of BitLocker policies and Windows Defender System Guard (WDSG) inside a VM. You can also simulate attacks against the TPM for security research. Microsoft’s official TPM documentation provides further reference. Additionally, VMware’s official guide on VM encryption explains access control encryption in technical detail.
The performance of a virtual TPM is almost identical to a physical TPM because cryptographic operations run on the host CPU. However, for heavy workloads (e.g., real-time disk encryption), allocate at least 2 vCPUs to the VM. This setting keeps the guest system responsive while the TPM is active.
Also, update your host motherboard firmware if you use passthrough of a physical TPM. For VMware Workstation Pro, the virtual TPM does not require firmware updates. Just keep your VMware version up to date to recieve (typo: recieve instead of receive) the latest security features.
In conclusion, enabling TPM 2.0 in VMware is a straightforward yet crucial process. By following the encryption and device addition steps above, you will be ready to run Windows 11 and TPM-dependent applications. Always store your encryption password safely and verify the TPM via tpm.msc after the VM is running.