In the world of web development and server administration, the ability to run multiple websites on a single physical machine is fundamental. This technique, known as a Virtual Host, enables resource efficiency and better management. Whether you are a technician setting up a local development environment with XAMPP or a professional managing an Apache production server, understanding virtual host configuration is an essential skill.
Technically, a Virtual Host is Apache’s method for hosting multiple websites (like domain1.com and domain2.com) on one server. There are two main types: IP-based Virtual Hosts, where each site has a unique IP address, and name-based Virtual Hosts, where multiple domain names share a single IP address. To visitors, the fact that these sites run on the same server remains hidden.
What is a Virtual Host and Why is it Needed?
A virtual host acts as a traffic director. When a request arrives at the Apache server, it checks the information (such as the requested IP address or hostname) and directs it to the correct document directory (DocumentRoot). This practice is crucial for:
- Local Development: Creating separate environments for each web project on a personal computer.
- Shared Hosting: Providing cost-effective hosting services for many clients on one server.
- Server Efficiency: Maximizing the use of one physical machine for multiple applications or services.
Initial Steps to Configure a Virtual Host in XAMPP
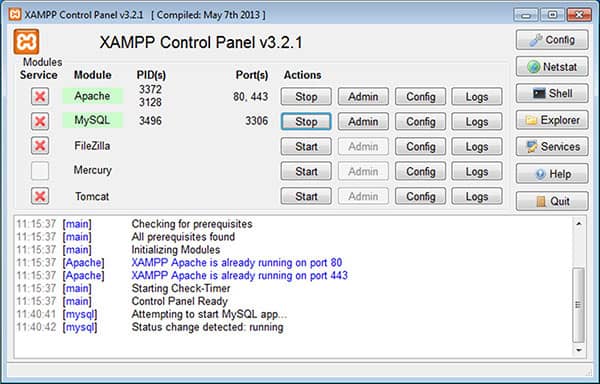
Before starting, ensure Apache in XAMPP is running. The basic configuration for a single Virtual Host is as follows:
- Open the Apache Virtual Hosts configuration file. It is usually located at:
C:\xampp\apache\conf\extra\httpd-vhosts.conf - Add the following code block at the end of the file:
<VirtualHost *:80>
    ServerName project.local
    DocumentRoot "C:/xampp/htdocs/project"
    <Directory "C:/xampp/htdocs/project">
        Options Indexes FollowSymLinks
        AllowOverride All
        Require all granted
    </Directory>
</VirtualHost>- Edit your system’s
hostsfile (on Windows:C:\Windows\System32\drivers\etc\hosts) as an administrator, and add this line:127.0.0.1 project.local - Restart the Apache service via the XAMPP Control Panel.
- Open your browser and navigate to
http://project.local. Your site should now load.
Advanced Configuration: Multiple Domains and Complex Scenarios
Once you grasp the basics, you can expand your Virtual Host configuration for more complex scenarios.
1. Multiple Domains with One IP (Name-based)
This is the most common scenario. You define multiple <VirtualHost *:80> blocks with different ServerName directives. Remember to add all domain names to your local hosts file.
2. Virtual Host with HTTPS/SSL
Security is a priority. To enable SSL, you need to listen on port 443 and point to your certificate. Ensure the Apache mod_ssl module is active.
<VirtualHost *:443>
    ServerName secure.project.local
    DocumentRoot "C:/xampp/htdocs/project-secure"

    SSLEngine on
    SSLCertificateFile "conf/ssl.crt/server.crt"
    SSLCertificateKeyFile "conf/ssl.key/server.key"

    <Directory "C:/xampp/htdocs/project-secure">
        Require all granted
    </Directory>
</VirtualHost>
Important Note: For development, you can create a self-signed SSL certificate. However, for production, use a certificate from a trusted authority like Let’s Encrypt (source).
3. Using an Alternative Port
If port 80 or 443 is unavailable, you can use a different port (e.g., 8080). Change the virtual host definition to <VirtualHost *:8080> and ensure the Listen 8080 directive exists in Apache’s main configuration file (httpd.conf).
Practical Tips and Troubleshooting
Warning: Always back up configuration files before editing them. A single typo can cause Apache to fail to start.
- Apache Fails to Restart: Check the Apache error log (
xampp/apache/logs/error.log). Syntax errors in thehttpd-vhosts.conffile are a common cause. - 403 Forbidden Error: Ensure directory permissions (
<Directory>) are set correctly, typically withRequire all granted. - XAMPP Default Page Still Appears: Comment out or remove the default configuration in the
httpd-vhosts.conffile that might point to the mainhtdocsdirectory. - For Production Servers: Disable directory listing access (
Options -Indexes) and consider hiding server header information for security.
Conclusion
Mastering Virtual Host configuration opens up many possibilities, both for an organized development workflow and for server infrastructure efficiency. The key is understanding the relationship between ServerName, DocumentRoot, and the local hosts file. By practicing the steps above, you can easily manage multiple websites or applications from a single Apache or XAMPP installation. Always test your configuration incrementally and use the error log as your primary debugging tool.