We often use various applications in our daily computing environment for various purposes. However, sometimes the volume of the sound of these apps can be a problem. How can we individually set the volume for each app in Windows 11? This article will discuss resolving this issue and provide a step-by-step guide.
Adjusting the volume of apps in Windows 11 has an important role in improving the user experience, especially when users often move between apps with different volume needs.
Before we get into the technical details, let’s understand why setting the volume of the application is important. When we work or play games, we may want to reduce the volume of apps that make excessive noise, while increasing the volume of other apps that require more attention. By adjusting the volume of the application individually, we can optimize the user experience and avoid distractions.
Through this guide, you will learn various methods to manage the volume of individual apps in Windows 11, either through the built-in features of the operating system or using third-party software. We’ll also discuss tips and tricks for optimizing volume settings as well as how to troubleshoot common issues you may encounter.
Steps to Set Individual Application Volume in Windows 11
Step 1: Opening the Volume Mixer
Accessing the Volume Mixer is the first step to setting the volume of the application individually. There are two main ways to unlock the Volume Mixer in Windows 11:
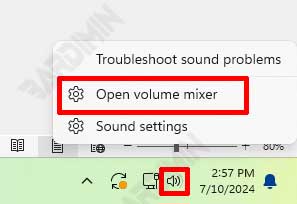
How to Open Volume Mixer via Taskbar:
- Right-click on the speaker icon in the lower-right corner of the taskbar.
- Select the Open Volume Mixer option from the menu that appears.
How to Access the Volume Mixer via Settings:
- Click Start and select Settings.
- Select System and then click Sound.
- Scroll down and click on the Volume mixer option in the Advanced sound options section.
Step 2: Setting the App Volume via the Volume Mixer
Once Volume Mixer opens, you can adjust the volume of individual apps according to your needs.
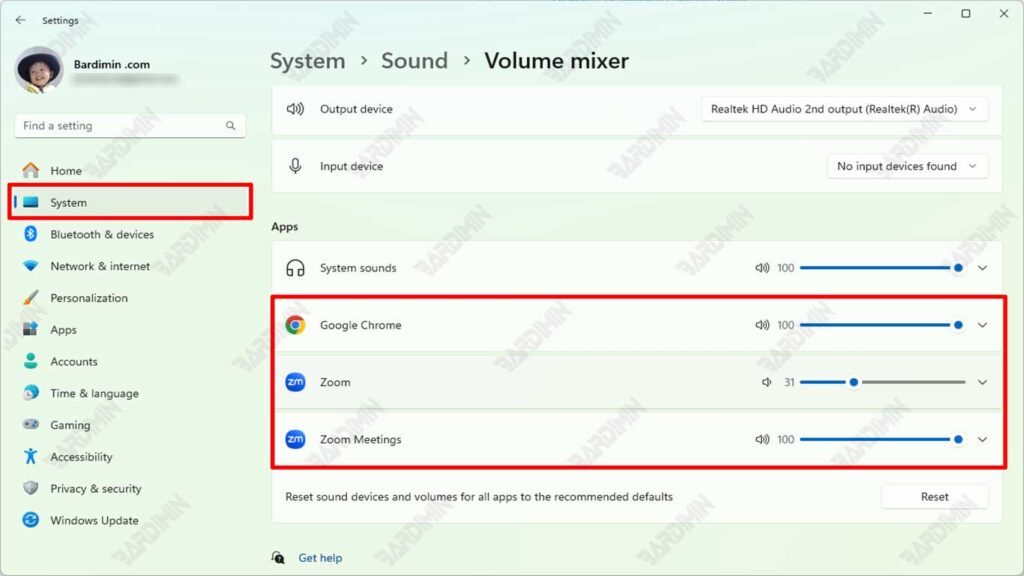
Select the App You Want to Manage:
- In the Volume Mixer window, you’ll see a list of running apps.
- Select the app you want to volume for.
Changing the Volume of the App as Needed:
- Use the slider next to the app’s name to increase or decrease its volume.
- Adjust the volume until it reaches the desired level for each application.
Step 3: Saving the Volume Settings
Once you’ve set the volume of your app, make sure that the settings are saved and still in effect.
Making Sure Settings Are Saved:
- Make sure you don’t force close the app, as the volume settings may not be saved if the app isn’t closed properly.
- Double-check the volume settings after restarting the computer to make sure the settings remain the same.
Troubleshoot if your settings aren’t saved:
- If the volume setting is not saved, try repeating the steps above.
- Check for system and application updates, as the problem may be caused by a software version that is not up to date.
- If the problem persists, consider using third-party software such as EarTrumpet for more reliable volume settings.
Using Third-Party Software for Volume Setting
Recommended Third-Party Software
For more flexible and functional volume settings, you can use third-party software. Here are two recommended apps:
- EarTrumpet: EarTrumpet is an app that lets you adjust the volume of individual apps with a more intuitive and feature-rich interface than Windows’ built-in Volume Mixer.
- Equalizer APO: Equalizer APO is a very powerful and flexible equalizer software for Windows. It allows for more detailed audio settings, including individual app volume settings and other audio effects.
How to Install and Use Third-Party Software
EarTrumpet Installation:
- Open Microsoft Store in Windows 11.
- Search for EarTrumpet in the search bar.
- Click Get to download and install the app.
APO Equalizer Installation:
- Visit the official website of Equalizer APO and download the installer.
- Run the installer and follow the instructions to install the app.
- Once the installation is complete, restart your computer to activate the APO Equalizer.
Usage Guide to Setting the App Volume:
Using the EarTrumpet:
- After installation, open the EarTrumpet of the Start Menu or the taskbar icon.
- You’ll see a list of running apps with their respective volume sliders.
- Use the sliders to adjust the volume of each app as you wish.
- Right-click on the EarTrumpet icon to access additional settings, such as app grouping and audio profiles.
Using the APO Equalizer:
- Open the APO Equalizer Configurator from the Start Menu.
- Select the audio device you want to set up and click OK.
- Open the APO Equalizer Editor from the Start Menu.
- In the Editor, add the desired filters or effects, including volume settings for specific apps.
- Save the settings and close the Editor.
- The APO Equalizer will apply the settings you created automatically.
Tips and Tricks for Optimizing Volume Settings
Setting Volume Priority:
- Identify Key Apps: Determine which apps are most important to you. For example, communication apps like Zoom or Teams may require higher volumes compared to other apps.
- Adjust Volume: Set the main app volume higher to ensure you can hear clearly without distractions.
- Balanced Settings: Make sure other less important apps have a lower volume to avoid excessive noise.
Adjusting Volume Based on Application Category:
- Communication Categories: Apps like Skype, Zoom, and Teams may require higher volumes for clear communication.
- Entertainment Category: Apps like Spotify, YouTube, and Netflix can be customized to your preferences, depending on whether you want to listen to music at a high volume or watch videos at a moderate volume.
- Productivity Categories: Apps like Microsoft Word and Excel may not require volumes, so you can set them to the lowest level or mute them.
Utilizing Additional Features on EarTrumpet:
- App Grouping: Use the grouping feature to group apps by specific categories or needs. For example, you can group all entertainment apps in one group and work apps in another.
- Audio Profiles: Create different audio profiles for different situations. For example, a high-volume “Work” profile for communication apps and a high-volume “Entertainment” profile for music and video apps.
- Volume Notifications: Turn on notifications for specific app volume changes so you always know if there’s an accidental change.
Setting the Audio Profile on the APO Equalizer:
- Create a Custom Profile: Use the APO Equalizer to create a custom audio profile that suits your listening preferences. For example, a profile for gaming with increased bass and a profile for listening to music with treble adjustments.
- Using Filters and Effects: Add filters and effects to improve the audio quality. For example, you can add a bass boost filter for music apps or a treble filter for communication apps.
- Setting App-Specific Settings: The APO Equalizer allows you to set custom audio settings for each app. Use this feature to make sure each app has the optimal audio settings according to your needs.
Troubleshooting Common Problems in Volume Settings
Dealing with Unsaved Volumes:
- Close Apps Properly: Make sure you close apps the right way, not by forcing them to close through the Task Manager.
- Check for System Updates: Make sure Windows 11 and all your apps are in the latest version. Updates can fix bugs that cause volume storage issues.
- Use Third-Party Software: If the problem persists, consider using an app like EarTrumpet or APO Equalizer that has more reliable volume-setting storage capabilities.
- Check Startup Settings: Make sure the apps you want to set the volume for don’t have startup settings that reset the volume settings every time they are run.
Troubleshooting Apps Not Appearing in Volume Mixer:
- Restart the Volume Mixer: Try closing and reopening the Volume Mixer. Sometimes new apps appear after the Volume Mixer is refreshed.
- Check App Status: Make sure the app you want to set the volume for is running and playing audio. Volume Mixer usually only shows apps that are playing sound.
- Reinstall Apps: If a particular app keeps not appearing in the Volume Mixer, try uninstalling and reinstalling the app.
- Use EarTrumpet: Apps like EarTrumpet are often better at detecting and displaying running apps than Windows’ built-in Volume Mixer.
Reset in case of Problems:
- Reset the Volume Mixer: If the Volume Mixer is having problems, you can reset it by turning your computer off and back on.
- Third-Party Software Reset: If you’re using EarTrumpet or APO Equalizer, you can reset the settings through the options available in the app.
- Restore Point: Create a restore point in Windows 11 so that you can restore the system to its previous state in case of major problems.
Conclusion
This guide has explained the detailed steps to set the volume of individual apps in Windows 11. Starting from opening the Volume Mixer through the taskbar or settings, adjusting the volume of applications through the Volume Mixer, to making sure the volume settings are stored properly.
We also discussed the use of third-party software such as EarTrumpet and APO Equalizer for more flexible and functional volume settings. In addition, tips and tricks to optimize volume settings as well as solutions to overcome common problems you may encounter have also been conveyed.
By setting the volume of your apps individually, you can:
- Improve listening experience: Adjust the volume of apps like music, video, and games for a better audio experience.
- Increase productivity: Avoid noise distractions from irrelevant apps when you’re focused on work or study.
- Keeping the environment comfortable: Minimize noise disturbances for those around you by adjusting the volume of the app as needed.
- Optimize audio usage across apps: Make sure each app has a volume setting that matches its function.