The indicator light on your Epson L11050 printer suddenly flashes endlessly, accompanied by a heart-pounding error message: “Service Required: Waste Ink Pad is full.” or perhaps the print results are starting to show broken lines and colors that are out of sync as usual. Is this situation familiar? The first step that often comes to mind is to pick up the phone to call a technician, which is not only time-consuming but also involves a lot of service costs.
There is a “secret tool” used by professional engineers, a powerful software called the Adjustment Program Epson L11050. This software is the key to deep calibration, maintenance, and reset of the critical parameters of your printer.
This article is here not as a substitute for a technician, but as an authoritative guide to empower you with the right knowledge, so you can make an informed decision, whether to do it yourself or understand what a technician will do.
What is the Epson L11050 Adjustment Program?
Adjustment Program is a special utility software from Epson that is used by trained technicians to perform calibration, maintenance, and resets at the printer firmware level. It is a digital “toolbox” that contains various functions to keep the printer in peak condition.
- Main Function: This software allows you to access and modify the internal settings of the printer that are not available through the usual drivers or control panel.
- Analogy: If the printer driver is the car’s dashboard (setting the speed, air conditioning, music), then the Adjustment Program is a machine computer that can perform ECU resets, sensor calibration, and read deep error codes.
The use of this software should be done with EXTREME CAUTION. Some functions, such as Waste Ink Pad Counter Reset, have environmental and technical implications. A reset performed without replacing the physical waste ink pad may cause the ink to overflow and damage the printer or the surrounding environment.
Key Features of the Epson L11050 Adjustment Program
Here are some of the key features that make Adjustment-Program Epson L11050 the best solution to solve various errors on Epson printers:
1. Quick and Safe Counter Waste Ink Pad Reset
The main features that users are looking for the most. With a single click, you can delete the full count of the waste ink pad counter so that the printer can be used again without a Service Required error.
2. Support Particular Adjustment Mode
This program provides a Particular Adjustment Mode menu that allows users to make various technical settings, such as EEPROM reset, ink charge, cleaning, and sensor check. It is very useful for follow-up care purposes.
3. Compatible with Windows 32-bit and 64-bit
There is no need to worry about operating system issues, as the Adjustment-Program Epson L11050 supports various versions of Windows, both 32-bit and 64-bit. This makes the software more flexible to use on various computers.
4. User-Friendly Interface
The program’s interface is simple and easy to understand, even for casual users. The navigation menu is clear, so the process of resetting and maintaining the printer can be done quickly without the need for advanced technical expertise.
5. Safe to Use Without Changing Printer Hardware
The program works only at the software level, so there are no physical changes to the printer’s hardware. Thus, the Adjustment-Program Epson L11050 is safe to use for routine maintenance and troubleshooting.
Download Adjustment Program Epson L11050
For those of you who need resetter software, here is complete information about downloading the Adjustment-Program Epson L11050:
Link Download
System Requirements
Before installing and using the program, make sure your device meets the following requirements:
- Operating system Windows 32-bit or 64-bit.
- The printer driver Epson L11050 is installed correctly.
- The printer is connected to the computer using a USB cable.
How to Use the Epson L11050 Adjustment Program
Step 1: Extract the Downloaded File and Set Up the Software
- Right-click on the downloaded file -> Select “Extract All…”.
- Select the destination directory to extract the files. It’s better to create a custom folder with a clear name, such as Epson_AdjProg_L11050.
- Once extracted, look for an executable file named AdjProg.exe or similar.
Step 2: Run AdjProg.exe with Run as Administrator
This is an important step to give the software the necessary permissions to communicate with the printer’s firmware.
- Right-click on the AdjProg.exe file.
- From the context menu that appears, select Run as administrator.
- If a User Account Control (UAC) dialog appears, click “Yes” to continue.
Step 3: Select Printer Model → Epson L11050
The main window Adjustment Program will open.
- In the “Select Model” section, click the dropdown menu.
- Scroll through the list and search for the exact right option, i.e., L11050 Series or Epson L11050. Select the option.
- Make sure the USB connection is properly plugged in.
Step 4: Go to the Particular Adjustment Mode Menu
Once the model is selected, the buttons will become active.
- Click on the big button that says Particular Adjustment Mode. It is the gateway to all advanced reset and calibration functions.
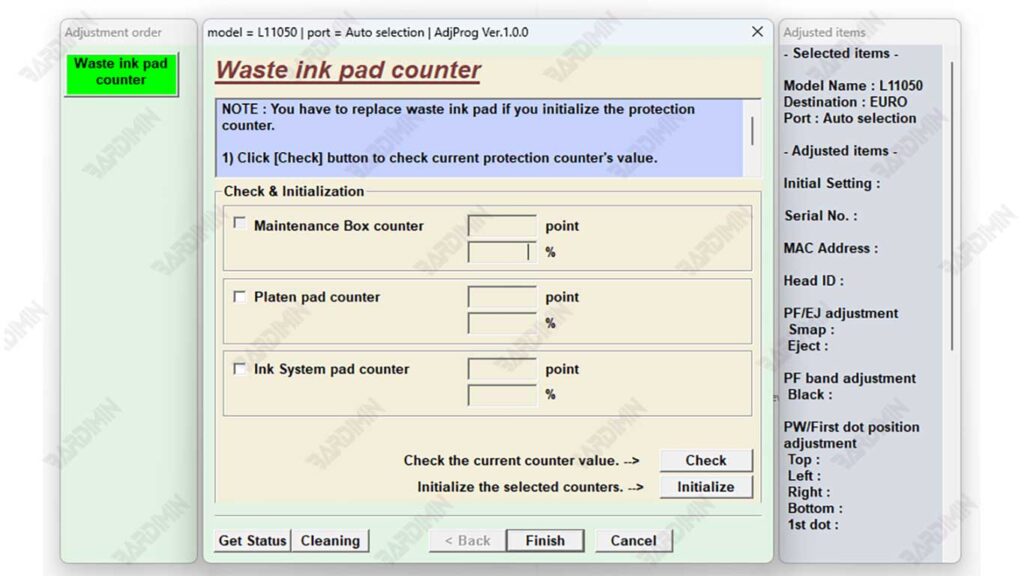
Step 5: Select the Waste Ink Pad Counter and Do a Check
A new window will open, displaying a list of various adjustment functions.
- From the list provided, search for and select (click) the item named Waste Ink Pad Counter.
- Click the Check button. The software will read the counter value of your printer.
- ANALISA HASIL CHECK: The value displayed will indicate what percentage of the counter has been used. If the value is close to or has reached 100%, that’s why the error and reset are needed. If the value is still low, it may not be the source of the problem.
Step 6: Click Initialization to Reset the Printer
If you believe you have replaced the physical waste ink pad and the counter value is full:
- Make sure the printer is ON again and not printing.
- Click the Initialization or Reset button.
- The software will process the reset command. A confirmation dialog will appear that the process has completed successfully.
FINAL STEPS:
CLOSE ALL SOFTWARE AND SHUT DOWN YOUR PRINTER COMPLETELY. Unplug the power printer from the power outlet for at least 30 seconds. This is very important for resetting the printer’s memory completely. After that, turn the printer back on. The error message should have disappeared.