Your Epson XP printer light is flashing brightly, accompanied by the error message “Service Required” or “Waste Ink Pad Full,” which locks all print functions. Don’t worry, you’re not alone in experiencing this. This symptom is a standard “alarm” that signals the waste ink counter in the printer is full, not that your printer is severely damaged.
This is where the Adjustment Program Epson comes into play as the ultimate solution. This particular software is the key to resetting those counters and returning your printer to normal condition in minutes, without costly service fees. By doing the right download Adjustment-ProgramEpson XP-520 XP-620 XP-720 XP-760 XP-820 XP-860 and following the right guidelines, you can become an engineer for your own printer.
This article is not just a link to a download. We provide a secure, complete guide, based on in-depth technical experience, to guide you from the installation process, use, to critical tips to avoid mistakes that could damage the printer. We believe clear knowledge will save you time, money, and worry. Let’s take a look at how to fix this error once and for all.
Key Features of Adjustment-Program Epson XP-520 XP-620 XP-720 XP-760 XP-820 XP-860
Adjustment-Program Epson is not just ordinary software. This program is equipped with a variety of essential features designed to help users perform printer resets, maintenance, and diagnostics independently. Here are some of its key features:
Reset Waste Ink Pad Counter
One of the classic problems with Epson printers is the appearance of the message “Ink Pad is at the end of its service life”. This message indicates that the waste ink pad is considered full by the system. With the Reset Waste Ink Pad Counter feature, the error can be overcome so that the printer returns to normal function without having to replace the hardware directly.
Maintenance Mode
This feature functions to maintain optimal printer performance. Users can perform routine maintenance such as ink charge, head cleaning, and print alignment. With this mode, the print output is more stable, and the printer can be used for a longer period of time.
Testing & Diagnosis Tools
The Adjustment Program also provides a variety of tools to test the condition of the printer. Some examples that are often used include:
- Nozzle Check: Ensure the ink flows smoothly and there are no broken lines on the print.
- Head Cleaning: Clean the print head to avoid clogging.
- Ink Charge: improves ink flow when the printer is used infrequently.
With this tool, users can detect problems early before they cause serious damage.
Support Model Printer
Another advantage of this software is that it has full support for various models of Epson printers, especially the XP series. This Adjustment Program is compatible with Epson XP-520, XP-620, XP-720, XP-760, XP-820, dan XP-860. This means that one program can be used for many models at once without the need to search for separate versions.
Steps to Download and Install the Adjustment Program Epson XP-520, XP-620, XP-720, XP-760, XP-820 XP-860
To avoid mistakes when using this software, follow the Adjustment-Program Epson download and installation guide carefully:
Step 1: Download the File Adjustment Program
Save your downloaded files in a folder that’s easy to find, such as Desktop or Downloads.
Step 2: Extract the downloaded files
- The file is .rar formatted.
- Use an extractor app like WinRAR or 7-Zip to open the file.
- If you are asked for a password when extracting, use: bardimin.
Step 3: Run the Program with Administrator Rights
- Open the extracted results folder.
- Look for the main file named AdjProg.exe.
- Right-click on the file, then select Run as Administrator to make the program run smoothly.
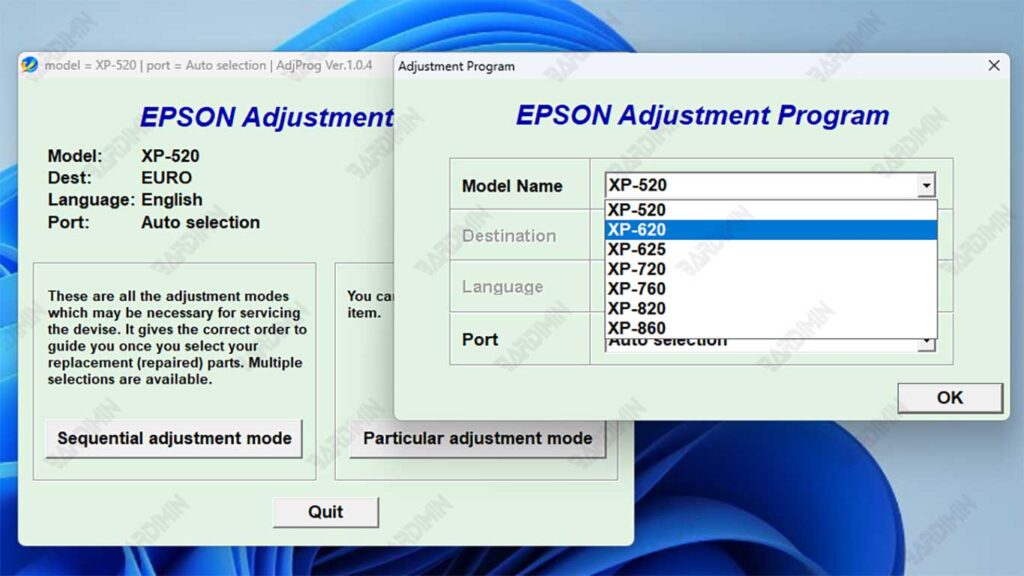
Step 4: Select the Printer Model.
Once the program is open, select the printer model according to your device (XP-520, XP-620, XP-720, XP-760, XP-820, or XP-860).
- Click the Particular Adjustment Mode menu to enter the printer reset and maintenance feature.
Step 5: Ready to Use
After you successfully run the Adjustment-Program Epson XP-520 XP-620 XP-720 XP-760 XP-820 XP-860, the program is now ready to use. At this stage, you can immediately take advantage of the available features as needed.
1. Select Menu Particular Adjustment Mode
- On the main view of the program, click the Particular Adjustment Mode button.
- This menu serves to enter the advanced settings according to the printer model.
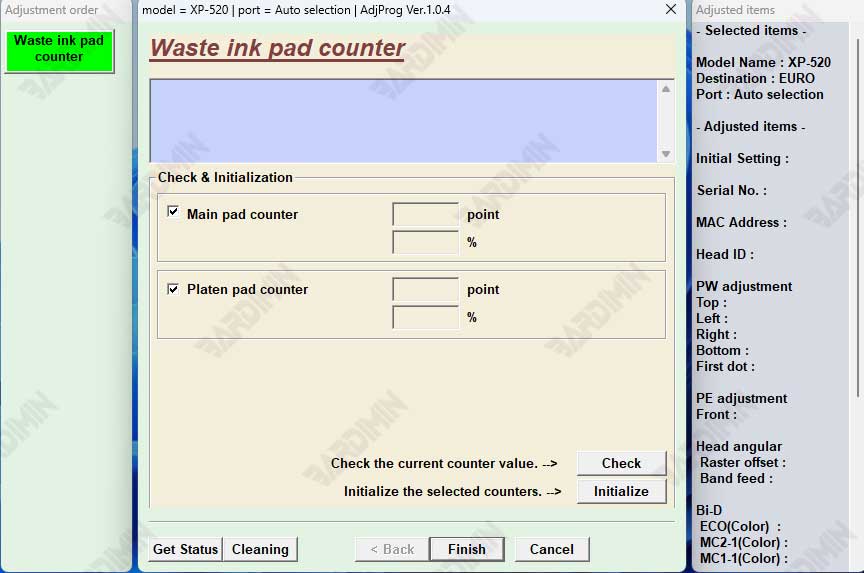
2. Access Waste Ink Pad Counter
- Select the Waste Ink Pad Counter option.
- Check the available boxes, then click Check to check the status of the counter.
- If the status is full, proceed by pressing the Initialization button to have the counter reset to zero.
3. Save Printer Settings and Restart
- Once the reset process is complete, turn off the printer first.
- Turn the printer back on so that the changes are saved correctly.
- The printer is now back to normal and ready to be used for printing as usual.
4. Use Other Care Menu (Optional)
In addition to resets, you can also try other menus such as Nozzle Check, Head Cleaning, or Ink Charge to maintain the quality of the prints.
This feature is especially useful if the printer is used infrequently or the prints start to blur.
Important Note: Before running the program, temporarily disable the antivirus on your computer. This is because some antiviruses often mistakenly detect this software as a threat (false positive).