Have you ever been engrossed in work or watching a movie on Windows 11, and suddenly the volume of your computer jumps or drops drastically, just because you accidentally shift the mouse wheel? This phenomenon is indeed annoying, especially if it happens repeatedly without you understanding the cause.
Then, what exactly causes the mouse wheel to be able to adjust the volume in Windows 11? As it turns out, this can happen due to several factors, ranging from incompatible mouse drivers, the built-in settings of third-party apps (such as Logitech Options or Razer Synapse), to system bugs after the latest Windows update.
In this guide, Bardimin will unpack effective ways to stop the mouse wheel from controlling volume in Windows 11, from basic settings to permanent solutions. Come on, look and find the most appropriate solution for you!
Why Can Mouse Wheel Control Volume in Windows 11?
Have you ever wondered why a simple movement of the scroll wheel mouse suddenly clutters up the system volume in Windows 11? This phenomenon may look like magic, or rather, a small distraction that makes you adorable! There are several technical reasons behind the “magic” of your mouse wheel on this one.
1. Scroll Wheel That Is ‘Smarter’ Than Imagined
Some apps or mouse drivers turn out to have a “creative” habit: they associate scroll wheel movements with volume control functions, as if the little wheel on your mouse were a special volume button. This usually happens because:
- The default configuration of the mouse manufacturer (especially gaming mice).
- Third-party software that tries to add additional features without you knowing.
2. Main Causes: From Drivers to Windows Bugs
A. Incompatible Mouse Drivers
Drivers are the “bridge” between the hardware (mouse) and the operating system (Windows 11). If the driver:
- Too long (not updated since Windows 10).
- Too new (not yet optimized for Windows 11).
… This can lead to “miscommunication”, where the scroll wheel is considered a command to change the volume, rather than just a regular scroll.
B. Built-in Features of Third-Party Software
Some popular mouse brands (such as Logitech, Razer, or SteelSeries) include specialized software for customization. For example:
- In Logitech G Hub, there is a “Scroll Wheel Assignment” option that can be set to the media function.
- Razer Synapse may enable the “HyperScroll” feature that is accidentally bound to the volume.
C. System Bugs After Windows 11 Update
Windows 11 is notorious for its updates that sometimes bring surprises. Some users report that after the update:
- Windows’ default mouse driver suddenly behaves strangely.
- System applications such as Volume Mixer are becoming more sensitive to scroll inputs.
This is usually temporary and can be fixed with a patch from Microsoft or a driver rollback.
3. How to Check the Cause?
Before fixing, first find out the source of the problem:
- Try using a different mouse. If the problem persists, it means that the cause is in the system.
- Open the Task Manager (Ctrl+Shift+Esc), and see if any mouse software (such as LogiOptions.exe or Razer Synapse) is running.
- Check Windows Update History, does the problem start occurring after a specific update?
Quick Solution to Disable Scroll Function for Volume in Windows 11
If you use a mouse from a popular brand such as Logitech, Razer, or SteelSeries, the built-in software is likely the culprit. Here’s how to turn it off:
1. Open the mouse settings app installed on your PC. Example:
- Logitech G Hub
- Razer Synapse
- SteelSeries Engine
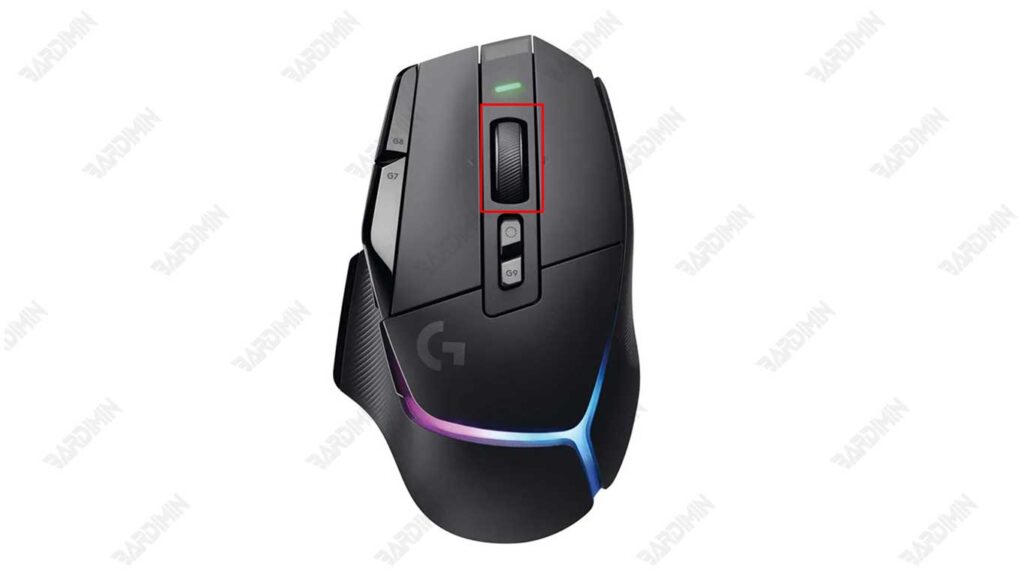
2. Look for the scroll wheel settings option, usually labeled as:
- “Scroll Wheel Assignment” (Logitech)
- “Scroll Wheel Function” (Razer)
- “Customize Wheel” (SteelSeries)
3. Change the settings from “Media Control” or “Volume” back to “Standard Scroll”.
Fix Problematic Mouse Driver Issues in Windows 11
Ever felt like your mouse was “behaving” after a Windows 11 update? It could be that incompatible drivers are the cause! Don’t worry, we’ve got an easy 3-step solution to restore mouse performance to normal, without the need to install additional software.
Step 1: Open Device Manager
Device Manager is the “control center” of all the hardware on your PC. To access it:
- Press Win + X (or right-click on the Start menu).
- Select Device Manager from the list that appears.
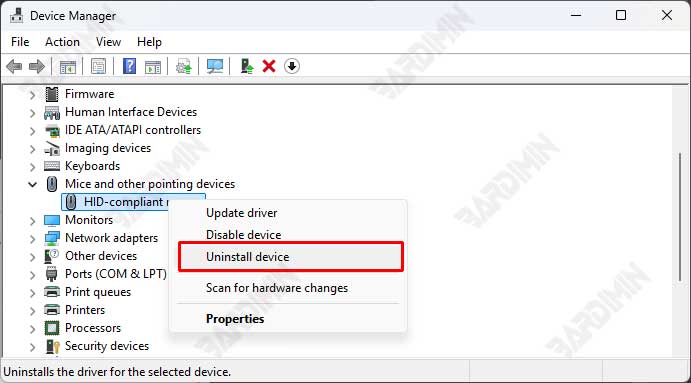
Step 2: Uninstall the Problematic Mouse Driver
- In Device Manager, search for the category “Mice and other pointing devices”.
- Click the small long sign (▶) next to it to see a list of devices.
- Right-click on your mouse driver (for example, “HID-compliant mouse” or your mouse brand, such as “Logitech USB Input Device”).
- Select “Uninstall device”.
Step 3: Restart PC & Let Windows 11 Repair Itself
- After uninstalling, restart your PC.
- On reboot, Windows 11 will automatically detect the mouse and install its default driver.
What to Do If the Problem Persists?
If after restarting, the mouse is still having problems:
- Visit the mouse manufacturer’s website (e.g., Logitech, Razer) and download the latest driver manually.
- Use Windows Update:
- Open Settings > Windows Update > Check for updates.
- Sometimes, Microsoft provides more stable drivers through updates.
With the above steps, you can stop the Mouse Wheel from messing up the volume in Windows 11. Choose a solution according to the difficulty level, from basic settings to Registry tweaks!