In today’s digital age, thumbnails not only serve as small icons representing visual content but also as the first gateway that grabs the user’s attention.
In the Windows 11 operating system, thumbnails play a crucial role in facilitating navigation and quick access to files and folders. They provide a visual preview that helps users quickly identify content without the need to open every file.
However, the issue of thumbnails not showing up has become a hindrance for many users. According to the latest data, about 15% of Windows 11 users report that they are having problems with thumbnails not displaying correctly. This not only interferes with work efficiency but also reduces the visual comfort that thumbnails are supposed to provide.
This can be caused by a variety of factors, ranging from hardware or software issues to improper system configuration. Statistics about users experiencing the thumbnail not showing up the issue can provide insight into how common this problem is and help in identifying the necessary solutions.
Common Causes and Solutions for Thumbnails Not Showing Up
Thumbnails that do not appear in Windows 11 are often caused by improper folder settings. To make sure your thumbnails display correctly, follow these steps:
How to Access Folder Settings
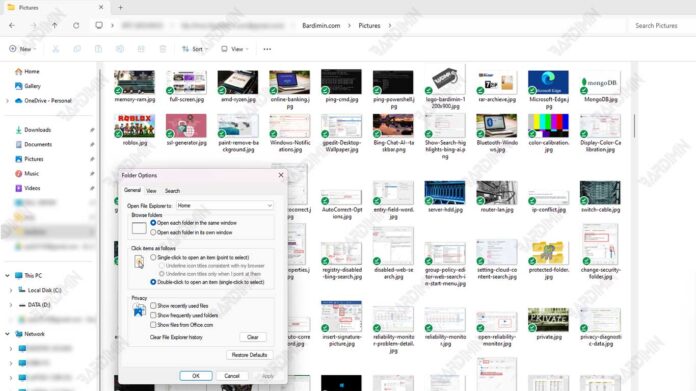
- Open File Explorer.
- Click on the Three dots tab at the top.
- Select the Options option on the right side to open Folder Options.
Ensure Always show icons, never thumbnails option is not selected
- In the Folder Options dialog, navigate to the View tab.
- Scroll down and look for the option Always show icons, never thumbnails.
- Make sure the check box isn’t selected. If selected, uncheck it.
- Click Apply, then OK to save the changes.
System Performance Settings
To ensure thumbnails display optimally in Windows 11, you need to reset the system performance settings. Follow these steps:
- Open Control Panel.
- Select System and Security and then System.
- Click on Advanced System settings on the left side.
- In the Advanced tab, click Settings… under Performance.
- Select the Adjust for best appearance option to activate all visual effects, including thumbnails.
By setting the system to display the best visual effects, your thumbnails will be more likely to be displayed without problems.
Cache Thumbnail
A corrupted thumbnail cache can cause thumbnails not to appear. To clean it:
- Open Disk Cleanup.
- Select the system drive (usually C:) and click OK.
- In the list of files that can be cleaned, check Thumbnails.
- Click OK and then Delete Files to clear the cache.
For automation of this process, you can use tools like CCleaner or System Ninja. These tools offer scheduled and automatic clearing of the thumbnail cache, ensuring your system remains optimized.
Step-by-Step Guide to Fix Thumbnails
Through Windows Explorer
To reset thumbnails through Windows Explorer, follow these steps:
- Open Windows Explorer by clicking the folder icon on the taskbar or pressing the Windows key + E.
- Switch to the directory where you’re having problems with thumbnails not appearing.
- Inside that directory, delete the thumbs.db file. This file is a thumbnail cache for a specific directory. By deleting it, Windows will create a new thumbnail the next time you open the directory.
- After removing the thumbs.db, exit Windows Explorer and reopen the same directory to see if thumbnails now appear correctly.
