How to Solve Thumbnails Not Showing Up in Windows 11

Have you ever encountered a problem with thumbnails not showing in Windows 11? Thumbnails are thumbnails that show a preview of a file or folder on your computer. Thumbnails are very useful to help you recognize and organize your files or folders easily. However, sometimes thumbnails don’t appear in Windows 11, and you only see generic file or folder-type icons. This can be very irritating and reduce your productivity.

There are several reasons thumbnails are not showing up in Windows 11, such as incorrect system settings, corrupted thumbnail cache, graphics drivers not updating, or compatibility issues. Fortunately, there are several ways to work around this problem and make thumbnails reappear in Windows 11. In this article, we will discuss some of the most effective and easy ways to fix thumbnails not showing up in Windows 11. Follow these steps to resolve your issue:

thumbnails

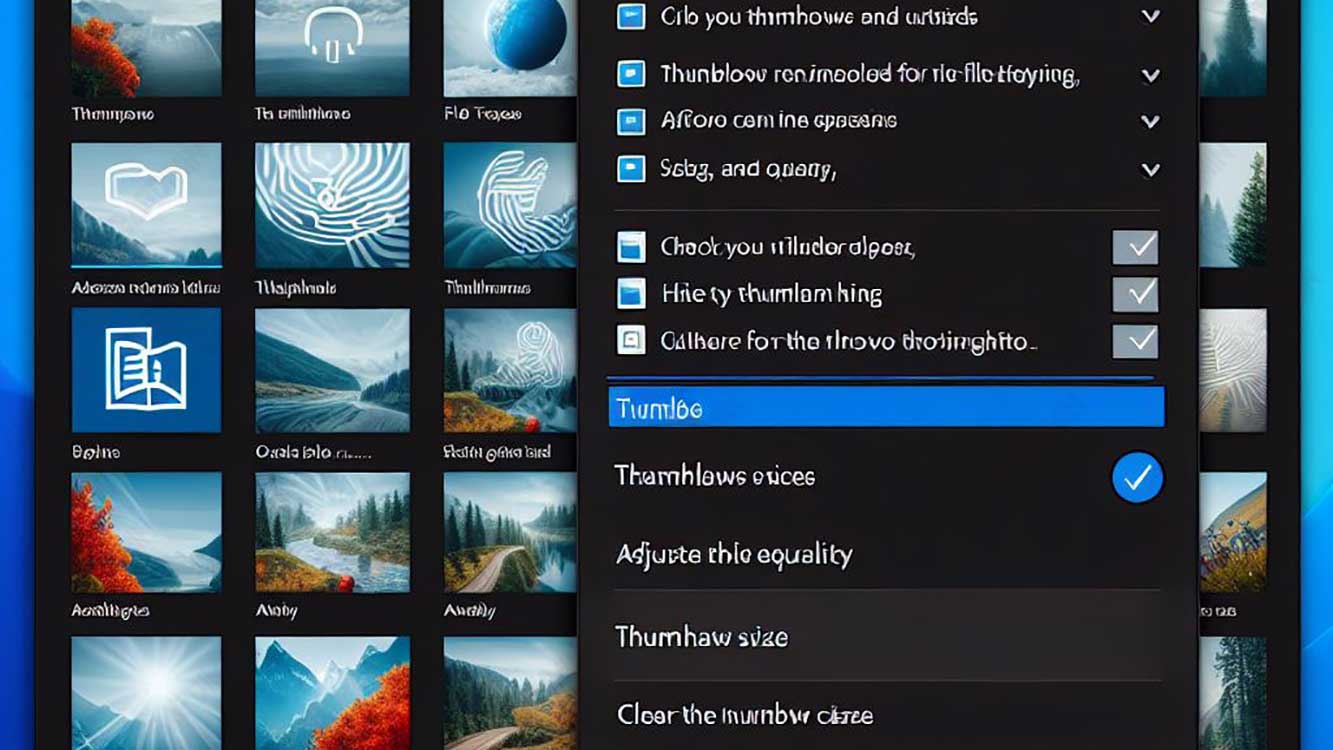
1. Enable Thumbnails in Windows 11

The first step you have to do is check if thumbnails are enabled in Windows 11. If thumbnails are not enabled, then you will not see thumbnails on your computer. To enable thumbnails in Windows 11, follow these steps:

  • Open File Explorer and click on the three-dot button at the top.
  • Click on Options from the menu that appears.
  • In the Folder Options window that appears, click on the View tab.
  • Under the Advanced settings section, uncheck the Always show icons, never thumbnails, and Show icons instead of thumbnails options.
  • Click on the Apply and OK to save changes.

Once you enable thumbnails in Windows 11, see thumbnails appear on your computer. If not, try the next way.

2. Clear Thumbnail Cache in Windows 11

The thumbnails cache is the place where Windows 11 stores pre-made thumbnails to speed up the loading process. However, the thumbnail cache can be corrupted or outdated, and cause thumbnails not to appear in Windows 11. To clear the thumbnail cache in Windows 11, follow these steps:

  • Open File Explorer and click on the three-dot button at the top.
  • Click on Options from the menu that appears.
  • In the Folder Options window that appears, click on the General tab.
  • Under the Privacy section, click on the Clear button next to Clear File Explorer history.
  • Click on the Apply and OK to save changes.
  • Close all open File Explorer windows and reopen them.
  • You can also clear the thumbnail cache by using Disk Cleanup. To do so, click on the Start button and type Disk Cleanup. Select Disk Cleanup from the search results.
  • In the Disk Cleanup window that appears, select the drive you want to clean and click on OK.
  • In the next Disk Cleanup window, check the Thumbnails option under the Files to delete section.
  • Click on OK and Delete Files to confirm.

Once you clear the thumbnail cache in Windows 11, see thumbnails appear on your computer. If not, try the next way.

3. Update Graphics Driver in Windows 11

A graphics driver is software that controls how your graphics card interacts with your operating system. Graphics drivers that are not updated or corrupted can cause thumbnails not to appear in Windows 11. To update the graphics driver in Windows 11, follow these steps:

  • Click on the Start button and type Device Manager. Select Device Manager from the search results.
  • In the Device Manager window that appears, expand the Display adapters category and right-click on your graphics card. Select Update driver from the menu that appears.
  • In the Update driver window that appears, select Search automatically for updated driver software option.
  • Wait until Windows 11 searches for and installs the latest graphics driver for your graphics card. If there is an updated graphics driver available, Windows 11 will download and install it automatically. Otherwise, you will see the message The best drivers for your device are already installed.
  • After you update the graphics driver in Windows 11, you should see thumbnails appear on your computer. If not, try the next way.

4. Run the Files and Folders Troubleshooter on Windows 11

The files and folders troubleshooter is a built-in tool of Windows 11 that can help you fix issues related to files and folders on your computer. The files and folders troubleshooter can help you resolve thumbnails not showing up in Windows 11. To run the files and folders troubleshooter in Windows 11, follow these steps:

  • Click on the Start button and type Troubleshoot settings. Select Troubleshoot settings from the search results.
  • In the Troubleshoot settings window that appears, click on the Additional troubleshooters on the right part.
  • Under the Find and fix other problems section, click on File and Folder Troubleshooter and click on Run the troubleshooter.
  • In the File and Folder Troubleshooter window that appears, follow the given instructions to start the troubleshooting process. The files and folders troubleshooter will scan your system and try to fix detected problems automatically. If there is a problem that requires your intervention, you will be asked to select the appropriate option.
  • After you run the files and folders troubleshooter in Windows 11, you should see thumbnails appear on your computer. If not, try the next way.

5. Resize Thumbnails in Windows 11

Thumbnails are small image sizes that display a preview of a file or folder on your computer. Thumbnail size can affect the performance and appearance of thumbnails in Windows 11. If the thumbnail size is too large or too small, thumbnails may not appear in Windows 11. To resize thumbnails in Windows 11, follow these steps:

  • Open File Explorer and click on the three-dot button at the top.
  • Click on Options from the menu that appears.
  • In the Folder Options window that appears, click on the View tab.
  • Under the Advanced settings section, look for the Adjust thumbnail size option and slide the slider to resize the thumbnails to your liking. You can choose between Small, Medium, Large, or Extra large.
  • Click on the Apply and OK to save changes.

Once you resize thumbnails in Windows 11, see thumbnails appear on your computer. If not, try the next way.

6. Change Performance Mode in Windows 11

Performance mode is a setting that affects how fast and smoothly your computer runs. Performance mode could affect thumbnails not appearing in Windows 11. If the performance mode is too low, thumbnails may not appear in Windows 11 because the system saves resources. To change the performance mode in Windows 11, follow these steps:

  • Click on the Start button and type Power & sleep settings. Select Power & sleep settings from the search results.
  • In the Power & sleep settings window that appears, click on Additional power settings on the right part.
  • In the Power Options window that appears, click on Change plan settings next to the power plan you are currently using.
  • In the Change settings for the plan window that appears, click on Change advanced power settings.
  • In the next Power Options window, expand the Visual Effects category and click on Settings.
  • In the Performance Options window that appears, select the Adjust for best appearance or Custom option. If you select the Custom option, check the Show thumbnails instead of icons option.
  • Click on the Apply and OK to save changes.

After you change the performance mode in Windows 11, see thumbnails appear on your computer. If not, try the next way.

7. Use Video Repair Software

If thumbnails don’t appear in Windows 11 only for certain video files, those video files are likely corrupted or incompatible with your system. This could cause thumbnails not to appear in Windows 11 because the system can’t preview corrupted or incompatible video files. To solve this problem, you can try using video repair software that can help you repair corrupted or incompatible video files.

One of the video repair software you can use is Wondershare Repairit. Wondershare Repairit is a professional video repair software that can help you repair corrupted or incompatible video files easily and quickly. Wondershare Repairit can repair corrupted video files for various reasons, such as transfer errors, save errors, camera errors, virus attacks, etc.

Wondershare Repairit can also fix video files that are not compatible with your system by changing the video file format to a format supported by your system. Wondershare Repairit can repair video files in various formats, such as MP4, MOV, AVI, MKV, FLV, etc.

To use Wondershare Repairit to repair corrupted or incompatible video files, follow these steps:

  • Download and install Wondershare Repairit from the official website: https://repairit.wondershare.com/
  • Run Wondershare Repairit and click on the Add button to add the video files you want to repair.
  • Once you have added the video file, click on the Repair button to start the repair process. Wait for the repair process to complete.
  • Once the repair process is complete, you can preview the repaired video file by clicking on the Preview button. If you are satisfied with the result, click on the Save button to save the repaired video file to your desired location.

Once you have used Wondershare Repairit to fix corrupted or incompatible video files, you should see thumbnails appear on your computer. If not, try the next way.

8. Contact Microsoft Support

If all the above ways did not work to solve thumbnails not showing up in Windows 11, there is likely a more serious problem with your system. In this case, you may need to contact Microsoft support for further assistance.

Microsoft Support is a service that can help you resolve issues related to Microsoft products and services, including Windows 11. Microsoft support can be reached in a variety of ways, such as by phone, email, chat, or forums. To contact Microsoft support, you can visit its official website: https://support.microsoft.com/

On the Microsoft support website, you can search for solutions to your problem by using the search box or selecting the product and service category that corresponds to your problem. You can also ask for help from a Microsoft support agent who will guide you through the troubleshooting steps. You can also join the Microsoft community, where you can share your experience and knowledge with other Microsoft users, or get advice from Microsoft experts.

By contacting Microsoft support, you can get a proper and efficient solution to solve thumbnails not showing up in Windows 11. If no solution is available, Microsoft support can also help you report your issue to the Microsoft development team, who will work to fix the issue in the next Windows 11 update.

Conclusion

Thumbnails are thumbnails that show a preview of a file or folder on your computer. Thumbnails are very useful to help you recognize and organize your files or folders easily. However, sometimes thumbnails don’t appear in Windows 11, and you only see generic file or folder-type icons. This can be very irritating and reduce your productivity.

There are several reasons why thumbnails are not showing up in Windows 11, such as incorrect system settings, corrupted thumbnail cache, graphics drivers not updating, or compatibility issues. Fortunately, there are several ways to work around this problem and make thumbnails reappear in Windows 11.

By following the steps above, you can overcome thumbnails not showing up in Windows 11 and enjoy a more attractive and informative view of your files and folders. Hope this article will be useful for you. Thanks for reading.

Latest Articles