Have you ever encountered a problem when you downloaded a JPG image from the internet, but the image was saved as JFIF? JFIF stands for JPEG File Interchange Format, which is the standard format for storing JPEG images. However, this format is not commonly used and may not be compatible with some applications or devices. So, how to convert JFIF images to JPG in Windows 11?
There are several ways you can do to overcome this problem. The following are some of the easiest and most effective ways:
Method 1: Rename the File
The first way you can try is to rename the image file you downloaded. You can remove the extensions .jfif and replace it with .jpg. For example, if the file name of your image is image.jfif, you can change it to an image.jpg. This method is very simple and fast, but it may not work for all images.
To rename a file, you can follow these steps:
- Open the folder where you saved the image you downloaded.
- Right-click on the image you want to change, and then select Rename.
- Remove the extension.jfif and type.jpg at the end of the file name.
- Press Enter to save your changes.
Method 2: Using the Paint App
The second way you can do this is to use the Paint application that is already available in Windows 11. This application can open JFIF images and save them as JPG easily. This method is more effective than the first method because you can change many images at once.
To use the Paint application, you can follow these steps:
- Open the Paint application by pressing the Windows and R keys at the same time, then type mspaint and press Enter.
- Click the File menu, then select Open.
- Locate the folder where you saved the images you downloaded, and then select the images you want to change.
- Click the File menu again, then select Save as.
- Select JPEG picture as the save format, and then name the file you want.
- Click Save to save the image as JPG.
Method 3: Change Registry Settings
The third way you can try is to change the Registry settings in Windows 11. The registry is a database that stores various information and configurations of operating systems and applications. By changing the Registry settings, you can force Windows 11 to save JPG images as JPG instead of JFIF. This method is the most effective and permanent, but also the riskiest, because if you change the wrong Registry settings, you could damage your operating system.
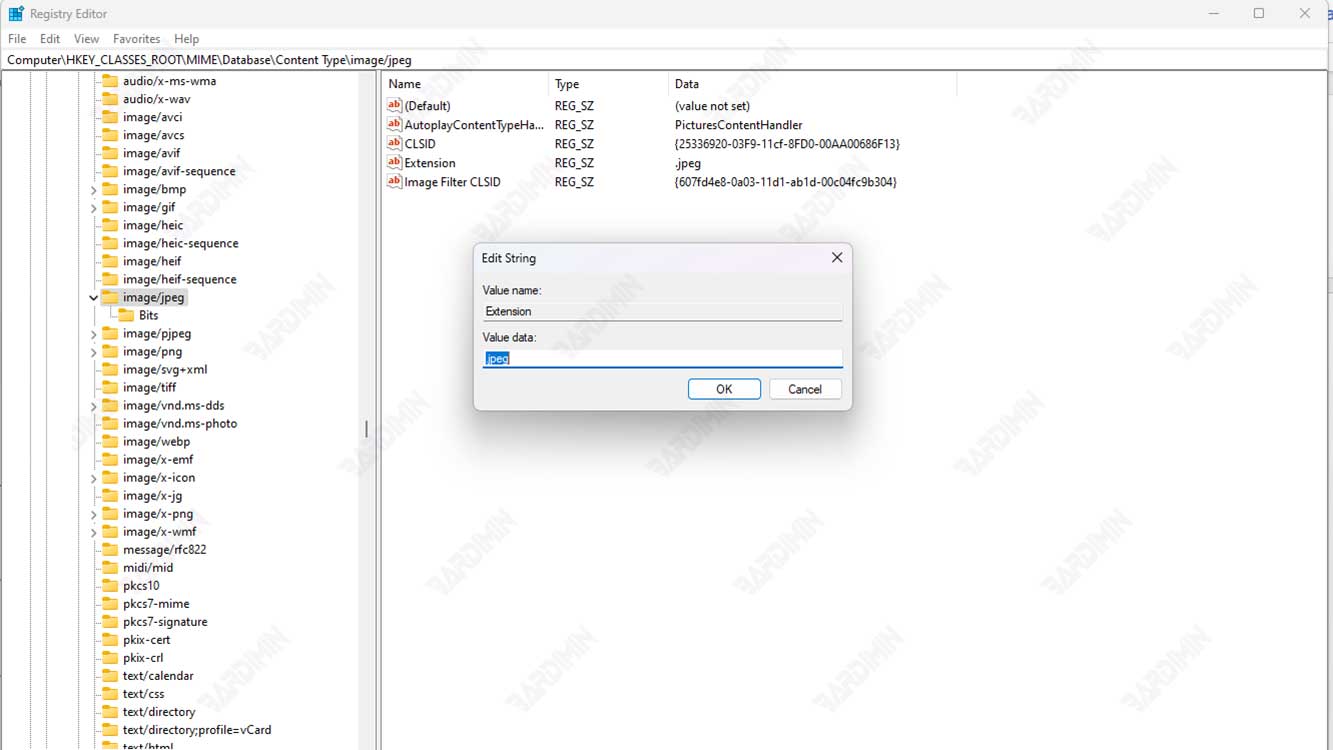
To change Registry settings, you must exercise caution and follow these steps:
- Open Registry Editor by pressing the Windows and R keys at the same time, then typing regedit and pressing Enter.
- Click Yes if a warning appears in User Account Control.
- In the Registry Editor window, navigate to the following folder:
HKEY_CLASSES_ROOT\MIME\Database\Content Type\image/jpeg
- In the right pane, double-click on the value named Extension.
- In the Value data box, delete it .jfif and replace it with .jpg.
- Click OK to save your changes.
- Close Registry Editor and restart your computer.
Once you’ve done one of the methods above, you can download JPG images from the internet without worrying about them being saved as JFIF. You can open JPG images with any app or device you want. Hope this article is useful and good luck.
