Easy Ways to Enable and Disable “Memory Compression” to Improve Windows 11 Performance

bardimin pic

Bardimin

October 19, 2022
task manager memory compression

Easy Ways to Enable and Disable “Memory Compression” to Improve Windows 11 Performance

Home » Blogs » Windows » Tips and Tricks » Easy Ways to Enable and Disable “Memory Compression” to Improve Windows 11 Performance

Memory Compression will improve the performance of RAM usage by compressing data so that RAM can hold more data.

Memory Compression is one of the features of 11 to reduce data before it is written to RAM compressing the data.

This procedure allows the to store more files in physical memory than usual and reduces the amount of memory used per process. So the need for the to use the is getting smaller.

Compressing data in memory is much faster than the alternative of paging data to disk, and more efficient than using paging files. Compressed memory has no drawbacks and when needs more memory, it will automatically compress the data in memory.

When you enable Memory Compression, the data compression process will use CPU resources.  To reduce lag, it's a good idea to use a high-end or up-to-date CPU.

How to See if Memory Compression is Enabled or Disabled

Check Memory Compression through Task Manager

  1. Open the “Task Manager. You can open it by using the shortcut (CTRL + + ESC).
task manager memory compression
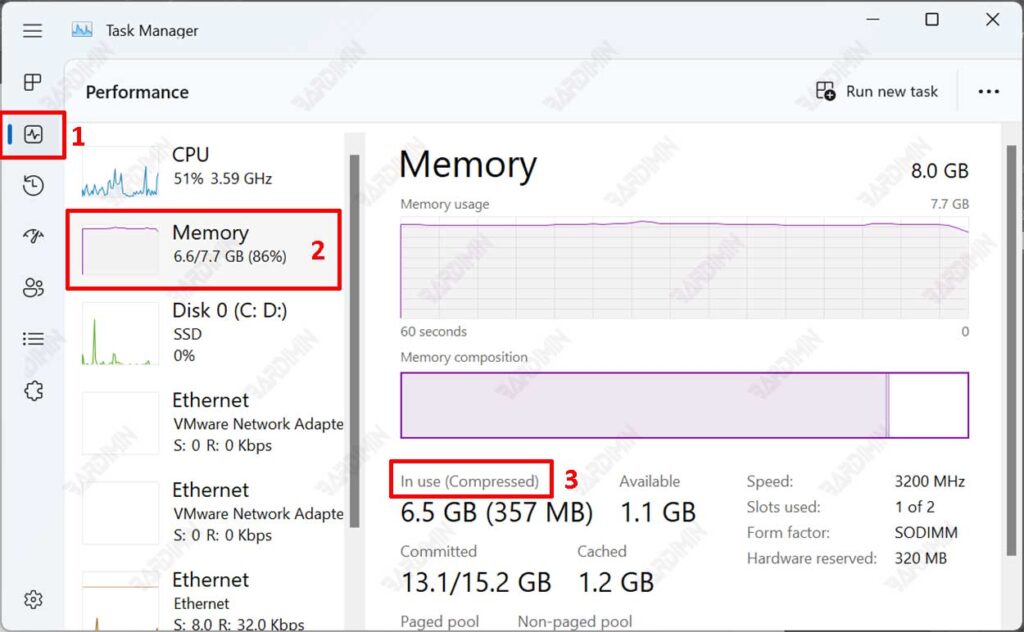
  1. Then navigate to “Performance >> Memory“.
  2. Next on the right pane, look at the memory usage status on “In use“. If it is “Compressed“, it means that Memory Compression is “Active“.

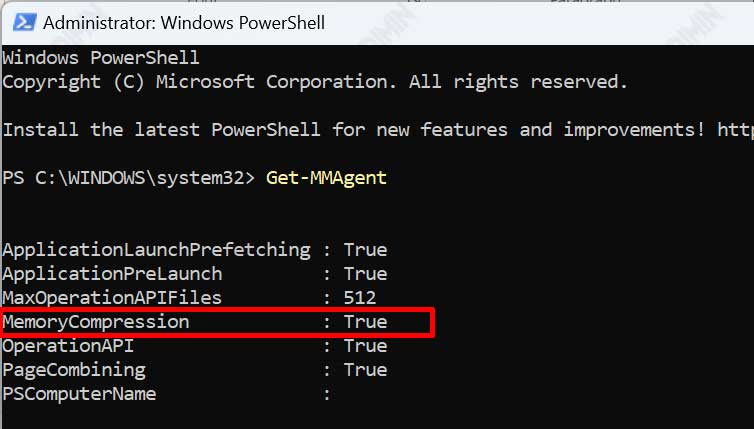
Check Memory Compression via PowerShell

  1. Open “” and run it as Administrator.
  2. Then type the following command
Get-MMAgent
powershell memory compression

How to Disable Memory Compression in Windows 11

  1. Open “PowerShell” and run it as Administrator.
  2. Then type the following command
Disable-MMAgent -mc
  1. Restart your .

How to Enable Memory Compression in Windows 11

  1. Open “PowerShell” and run it as Administrator.
  2. Then type the following command
Enable-MMAgent -mc
  1. Restart your computer.
link nyemin

Latest Articles

How to Fix PowerShell Not Working on Windows 11

How to Fix PowerShell Not Working on Windows 11

PowerShell is a very useful tool for running various commands and scripts in Windows. However, sometimes PowerShell can run into problems and won't open or run properly. This is certainly very annoying, especially if you often use PowerShell to manage your system....

How to Fix Windows Search Not Working on Windows 11

How to Fix Windows Search Not Working on Windows 11

Windows Search is a feature that lets you quickly and easily search for files, folders, apps, settings, and web content in Windows 11. However, sometimes this feature encounters issues and cannot function properly. This is certainly very disruptive to your...

How to Sync Files between Different Computers Easily and Quickly

How to Sync Files between Different Computers Easily and Quickly

Have you ever had trouble syncing files between different computers? Do you want to have the same file on all your computers without having to copy and paste it manually? Do you want to know how to synchronize files between different computers easily and quickly? If...

How to Display Caps Lock Indicator on Windows 11 Screen

How to Display Caps Lock Indicator on Windows 11 Screen

Do you often type in uppercase letters accidentally because you don't realize that the Caps Lock key is active? Do you have trouble seeing the Caps Lock indicator on your keyboard because it's too small or not there at all? Do you want to get visual or audible...