Does your internet connection suddenly feel slow or unstable in Windows 11? Before blaming your internet provider or deciding to change your router, check the speed of the network adapter on your device! The problem may not be from an external network, but from a WiFi or Ethernet adapter that is not working optimally.
You may ask: How can I accurately check network adapter speed in Windows 11? Don’t worry—you don’t need to be an IT expert to do it! This guide’ll cover practical steps, from instant Task Manager to technical methods using Command Prompt and PowerShell.
By reading this article, you can diagnose connection problems on your own and take appropriate action, without the need for technical assistance. Let’s start optimizing your Windows 11 network now!
Why Do You Need to Check Network Adapter Speed in Windows 11?
Checking the speed of your network adapter is a critical step in overcoming internet connection issues. When the network feels slow, this check helps determine if the problem is with your hardware (such as a problematic WiFi/Ethernet adapter, outdated drivers, or signal interference) or with your internet service provider (ISP). By knowing the source of the problem, you can take targeted corrective action.
In addition to troubleshooting, checking the speed of the adapter is also important to optimize network performance according to specific needs. For gamers, the optimal speed of the adapter means a smooth gaming experience without lag. Streamers can enjoy broadcasts without buffering, while remote workers can make video calls stably. By making sure the adapter works optimally, you can make the most of all available bandwidth according to your device’s specifications.
Regular checks on the speed of your network adapter also help you ensure that these components are performing at their maximum capacity. Many users are unaware that their adapter may not be operating at full speed due to various factors such as sub-optimal settings or system limitations. With early identification, you can make necessary adjustments or consider upgrading your device if it’s inadequate.
1. How to Check Network Adapter Speed Using Task Manager (Instant Way)
One of the fastest and most practical methods to check the speed of a network adapter in Windows 11 is through Task Manager. This method is very suitable for beginner users because it does not require any additional applications and can be done in a short amount of time.
Steps:
- Press the Ctrl + Shift + Esc button at the same time to open the Task Manager.
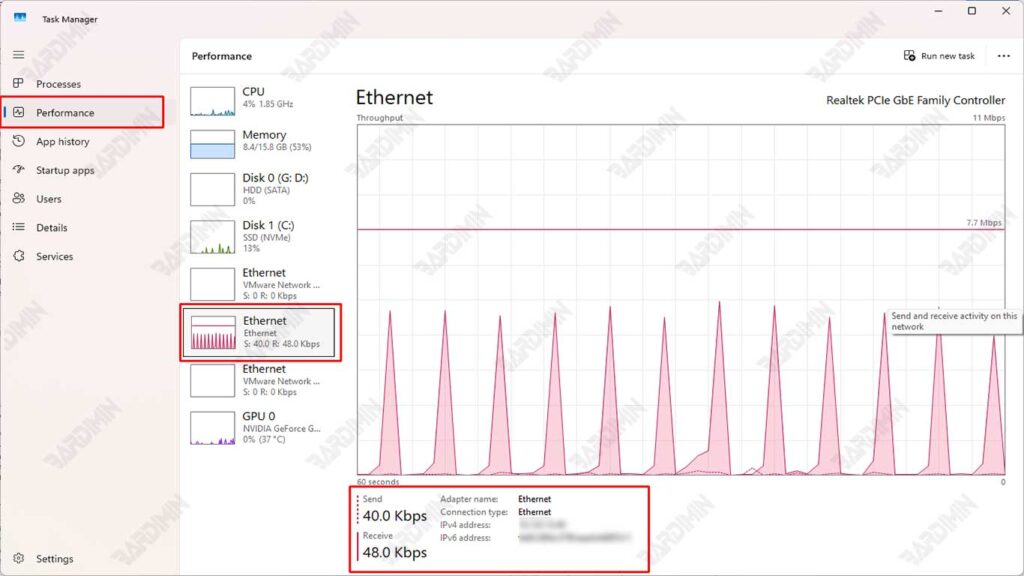
- Click the Performance tab at the top of the window.
- Select your active network connection, for example, Wi-Fi or Ethernet, from the left-side panel.
Once you’ve selected the connection to use, you’ll see a variety of technical information, including the network adapter speed (Link Speed) displayed in units of Mbps (Megabit per second). For example, if you’re using Wi-Fi, the speeds that appear can be 72 Mbps, 150 Mbps, or even higher, depending on the capabilities of your adapter and router.
Important Notes:
The numbers that appear indicate the maximum speed that your network adapter can achieve at that time.
It’s not the speed of internet downloads/uploads, but rather the performance of the hardware that connects your computer to the network.
2. Checking Network Adapter Speed Using Command Prompt (Technical Method)
For users who want to get more detailed information about the performance of their network adapters, Command Prompt (CMD) provides more technical options. Here’s a complete explanation of how to use this method:
1. Open the Command Prompt as an Administrator
- Click Start and type “cmd”
- Right-click on Command Prompt and select “Run as administrator”
- If UAC (User Account Control) appears, click “Yes.”
2. Check the Network Interface List
- Type the following command and press Enter:
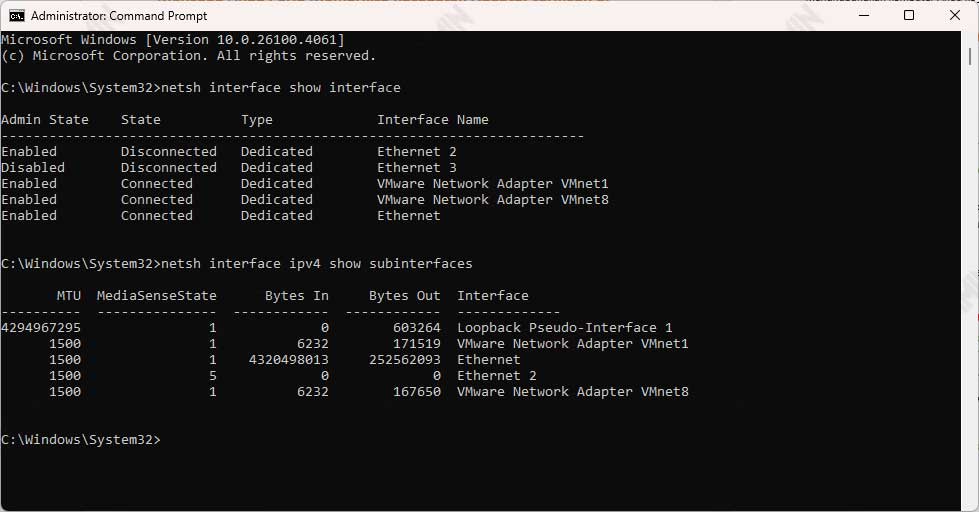
netsh interface show interface

netsh interface ipv4 show subinterfaces- This command will display a list of all the network interfaces that are active on your device
- Make a note of the name of the interface you want to check (for example: “Wi-Fi” or “Ethernet”)
3. Get Detailed Information on Wireless Adapters (Wi-Fi Only)
- If you’re using a Wi-Fi connection, type the following command:
netsh wlan show interfaces- This command will display complete statistics about your wireless connection
4. Receive Rate (Rx) and Transmit Rate (Tx) Analysis
- In the results of the above command, find the section” Receive rate (Rx)” and “Transmit rate (Tx)”
- The numbers shown show the actual speed in Mbps
- Receive rate (Rx): Data download speed
- Transmit rate (Tx): Data upload speed
3. Check Network Adapter Speed Using Windows PowerShell
Windows PowerShell offers a more advanced and flexible way to check the speed of your network adapter. Here’s a full explanation of this method:
PowerShell Usage Steps:
- Click the Start button or press the Windows button
- Type “PowerShell” in the search field
- Right-click on “Windows PowerShell” and select “Run as administrator”
- If the UAC prompt appears (User Account Control), click “Yes”
2. Running the Main Command
- Type or copy the following command:
Get-NetAdapter | Select Name, LinkSpeed- Press Enter to execute the command
3. Understanding the Output Produced
- This command will display a list of all installed network adapters
- The “Name” column indicates the name of the adapter (e.g., “Ethernet”, “Wi-Fi”)
- The “LinkSpeed” column shows the current connection speed
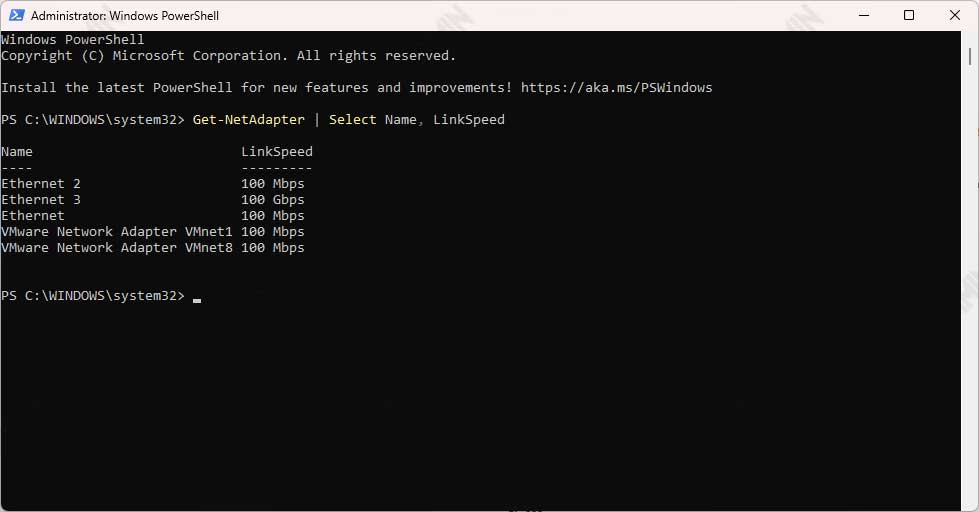
LinkSpeed indicates the maximum speed of the connection between the network adapter and the network device (such as a router or switch). This value can appear in various units, such as:
- 1 Gbps (1000 Mbps) for gigabit Ethernet connections
- 100 Mbps for standard Ethernet
- 433 Mbps or 866 Mbps for Wi-Fi 5 (802.11ac)
- 1200 Mbps for Wi-Fi 6 (802.11ax)
This information is very important because it reflects the maximum limit of the data rate that the adapter can handle under current conditions. If you are using an Ethernet connection and the LinkSpeed that appears to be 1 Gbps, then the adapter and cable used support a gigabit connection.