Windows 11 securely stores WiFi network credentials for seamless reconnection. This definitive technical guide details four core methods—from GUI and Command Prompt to PowerShell and profile management—for retrieving, managing, and securing saved WiFi passwords. Designed for IT technicians, professionals, and power users, it also covers YMYL security considerations and network management best practices.
In today’s interconnected digital landscape, network connectivity is the backbone of productivity. Windows 11, as a modern operating system, implements a sophisticated credential storage mechanism for a frictionless user experience. This system doesn’t just remember network names (SSIDs); it encrypts and securely stores security keys within protected system vaults. Understanding how to access this data is an essential skill for network troubleshooting, device migration, and security auditing. Windows 11 WiFi passwords can be retrieved through multiple system interfaces, each offering different levels of access and complexity.
Architecture of WiFi Credential Storage in Windows 11
Before executing any procedures, it’s crucial to understand the underlying architecture. Windows 11 stores WiFi network profiles in two primary locations: the Credential Manager and the WLAN AutoConfig service database. Each profile contains a complete network configuration, including security type (WPA2/WPA3), encryption method (AES/TKIP), and the key material encrypted with a system key. The password retrieval process involves an on-the-fly decryption that requires elevated security permissions, often necessitating administrator rights.
Method 1: Graphical User Interface (GUI) for Active Networks
This is the most intuitive method, recommended for general users. Its application, however, is limited to the WiFi network currently active and connected to your PC’s wireless adapter. Below is the expanded technical procedure:
- Open Windows Settings: Press the
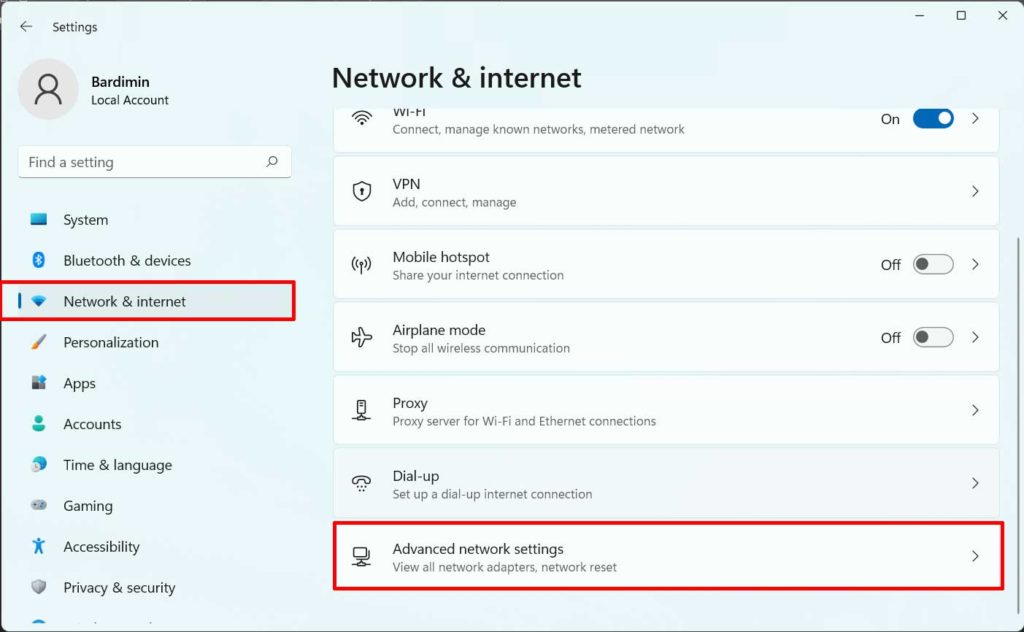
Win + Ikey combination. This shortcut accesses the modern (UWP) settings layer of Windows 11. - Navigate to Network Section: In the Settings window, select “Network & internet” from the left pane, then click “Wi-Fi” on the right. Next, click the name of the active network displayed at the top.
- Access Wireless Properties: On the network details page, scroll down and click the “Hardware properties” link. In the new window that appears, click the “Wireless Properties” button. This window is a legacy (Win32) component that holds the physical network security details.
- Reveal the Security Key: Switch to the “Security” tab. In the “Network security key” section, the password field is shown as dots. Check the box labeled “Show characters”. The system may prompt for administrator credential confirmation or Windows Hello biometric verification as an additional authentication step.
Technically, the “Show characters” action triggers an API call to the Data Protection API (DPAPI) to decrypt the stored key. This process occurs securely in memory without persisting the decrypted plain-text result.
Method 2: Command Prompt (CMD) Using Netsh Commands
For maximum flexibility and access to all historically saved WiFi profiles, Command Prompt with the netsh wlan command context is a powerful tool. The netsh (Network Shell) utility interacts directly with the WLAN AutoConfig service.
- Run CMD as Administrator: Right-click the Start button and select “Terminal (Admin)” or “Command Prompt (Admin)”. Elevated (administrator) privileges are absolutely required for key decryption.
- Enumerate All Saved Profiles: Execute the following command to list all profiles:The command output will display all User Profiles, which are the SSID names of every network ever connected to, including public networks.
netsh wlan show profiles - Retrieve Details and Password for a Specific Profile: Use the following syntax, replacing
PROFILE_NAMEwith the exact SSID (case-sensitive):Thekey=clearparameter is the critical instruction to display the security key in readable (clear text) form after decryption.netsh wlan show profile name="PROFILE_NAME" key=clear - Parse Output for Key Content: In the lengthy output, look for the section titled “Security settings”. The value on the line labeled “Key Content” is the WiFi password you seek. Note: For enterprise networks (WPA2-Enterprise), this field is often empty as they use a different 802.1X authentication method.

For automation purposes, you can chain the command with findstr to extract the password directly: netsh wlan show profile name="PROFILE_NAME" key=clear | findstr "Key Content". This technique is invaluable in batch scripts for administering multiple workstations simultaneously.
Method 3: Windows PowerShell and the WiFiProfile Module
Windows PowerShell offers a more powerful, object-oriented approach compared to CMD. Windows 11 has native capabilities for handling WiFi profiles through PowerShell.
- Open Windows PowerShell as Administrator.
- Use Object-Based Commands: To display all profiles and their passwords in one execution, you can run the following one-liner script:This script parses the
netshoutput step-by-step, extracts profile names, retrieves each key, and finally produces a neat table.netsh wlan show profiles | Select-String "\:(.+)$" | %{$name=$_.Matches.Groups[1].Value.Trim(); $_} | %{(netsh wlan show profile name="$name" key=clear)} | Select-String "Key Content\W+\:(.+)$" | %{$pass=$_.Matches.Groups[1].Value.Trim(); $_} | %{[PSCustomObject]@{ PROFILE_NAME=$name; PASSWORD=$pass }} | Format-Table -AutoSize - Native PowerShell Method (Alternative): On some installations, try the following cmdlet for a more direct approach:
Get-WifiProfile | ForEach-Object { (netsh wlan show profile name=$_.Name key=clear) | Select-String "Key Content" }
The primary advantage of PowerShell is its ability to export results into structured file formats, such as CSV, for documentation. Append | Export-Csv -Path C:\wifi_passwords.csv -NoTypeInformation to the end of the pipeline to generate a report.
Method 4: Via Credential Manager (Advanced)
Credential Manager is Windows‘ centralized repository for all credentials. To access WiFi credentials here:
- Open Control Panel > User Accounts > Credential Manager.
- Click the “Windows Credentials” tab.
- Scroll to the “Generic Credentials” section. Look for an entry starting with the format
Microsoft:Wifi:Ssid=NETWORK_NAME. - Click the entry, then click the “Show” button next to the password field. Administrative verification will again be required.
This method is less commonly used due to its more abstract storage structure, but it is invaluable for a holistic understanding of how Windows manages all credential types centrally.
WiFi Profile Management and Security
Knowing how to view a password is only one aspect. An IT professional must also be able to actively manage WiFi profiles. Here are critical operations performable via CMD or PowerShell:
- Delete Unnecessary Profiles:
netsh wlan delete profile name="PROFILE_NAME". This action enhances security by reducing the attack surface and cleaning up obsolete configurations. - Export a Profile for Backup or Migration:
netsh wlan export profile name="PROFILE_NAME" folder=C:\Backup\ key=clear. This command generates an XML file containing the complete network configuration. WARNING: If thekey=clearparameter is used, the password will be stored in plain-text within the XML file. Protect this file diligently! - Import a Profile to a New Machine:
netsh wlan add profile filename="C:\Backup\PROFILE_NAME.xml". This is highly efficient for standardized deployment across multiple devices.
For corporate environments using an Active Directory domain, Group Policy can be leveraged to push pre-configured WiFi profiles to all domain-joined computers, eliminating the need to manually store and manage passwords on each machine.
YMYL Security Aspects and Precautionary Measures
Accessing stored credentials touches upon digital security aspects categorized as YMYL (Your Money or Your Life). Therefore, the following considerations are crucial:
- Principle of Least Privilege: Do not grant everyday administrator accounts to end-users. Access to view saved passwords should be restricted to authorized personnel only.
- Regular Audits: Use scheduled PowerShell scripts to periodically check and document existing WiFi profiles, ensuring no rogue access points have been previously connected.
- Prioritize WPA3 Encryption: Advocate for networks using the more secure WPA3 protocol, which is more resistant to offline brute-force attacks. WPA3 profiles in Windows 11 are stored with additional cryptographic protection.
- Vigilance Against Phishing and Malware: Be cautious of third-party scripts or tools that claim to “recover” or “display” all WiFi passwords. Such tools could be malware designed to steal all credentials stored on the system. Always use the built-in system tools described above.
For more information on Microsoft’s network security practices, you can refer to their official documentation at Microsoft Security Documentation.
Troubleshooting Common Issues
- Password Doesn’t Appear (Empty Field): If the “Key Content” field is empty, the network likely uses WPA2-Enterprise (EAP). Credentials for such networks are stored separately, often as digital certificates. Use
certmgr.mscto view certificates installed for the current user. - Netsh Command Denied Access: Ensure Terminal, Command Prompt, or PowerShell is running as Administrator. Without elevated privileges, the process cannot decrypt the stored security keys.
- Profile Not Found: The profile may be stored under another Windows user account. Log in with that user account, or use the System Account context which requires advanced techniques like
psexec -sfrom the Sysinternals Suite. - WiFi Adapter is Disabled: Some commands, particularly those listing profiles, require the wireless adapter to be in an active state. Enable the WiFi adapter first via Settings or Device Manager.
Conclusion and Professional Recommendations
Accessing saved Windows 11 WiFi passwords is a legitimate administrative procedure with wide practical application in IT support, disaster recovery, and complex home network configuration. The GUI method suits quick resolution by end-users, while CMD and PowerShell are the primary domain of technicians and system administrators requiring scalability and automation capabilities.
The key recommendation is to adopt a layered security framework: combine strong WiFi passwords (preferably passphrases), conduct regular profile audits, and always utilize the highest security features supported by your router and client devices. Consistently document major network configuration changes in a secure logging system. By mastering the techniques in this guide, you not only secure digital assets but also significantly enhance operational efficiency in managing network infrastructure, whether for low-latency gaming, remote work, or small-scale data centers.