BitLocker is a native drive encryption feature in Windows 11 that protects data at rest by binding encryption keys to the hardware through the Trusted Platform Module. This mechanism prevents unauthorized access via external operating systems or physical disk tampering. Activating BitLocker generates a recovery key that serves as the sole emergency access credential. While BitLocker secures data offline, it does not replace network-based defenses such as firewalls and antivirus. IT professionals, technicians, and gamers must understand the activation, suspension, and key management procedures to maintain both security and system availability.
Microsoft continuously refined BitLocker since its introduction in Windows Vista. On Windows 11, the feature supports TPM version 2.0 and uses XTS-AES 128-bit or 256-bit encryption algorithms by default. The integration with Secure Boot, Windows Defender Credential Guard, and cloud-based recovery key storage in Microsoft Entra ID makes BitLocker a core component of enterprise security frameworks. Technicians should note that the TPM is more than a cryptographic co-processor; it performs measured boot validation before releasing encryption keys, ensuring the integrity of every boot component from UEFI firmware to kernel drivers. For gamers and high-performance users, the impact on disk throughput remains negligible because modern processors accelerate AES operations through dedicated instruction sets. Independent benchmarks indicate that NVMe SSDs with BitLocker enabled experience less than a 5 percent overhead in real world workloads, including sequential reads and random I/O typical in gaming scenarios.
How BitLocker Works with the TPM on Windows 11
BitLocker encrypts entire volumes at the sector level. Every write operation transforms plaintext data into ciphertext before it reaches the storage media, and every read operation decrypts data transparently using keys derived from the TPM. The default encryption mode on Windows 11 is XTS-AES 128-bit, which provides strong diffusion and resistance against ciphertext manipulation. For environments requiring higher assurance, administrators can enforce XTS-AES 256-bit via Group Policy. The TPM stores the Volume Master Key (VMK) inside its shielded non-volatile memory. When the computer powers on, the TPM measures hashes of the UEFI firmware, bootloader, and critical OS components before unsealing the VMK. This measured boot chain ensures that tampered bootloaders or rootkits cannot trick the system into releasing the encryption key.
The TPM functions as a hardware root of trust that performs cryptographic operations inside a secure enclave, making it immune to direct access from the main operating system and resistant to cold boot attacks.
Prerequisites for Enabling BitLocker on Windows 11
Before activating BitLocker, several hardware and software requirements must be verified. First, the device must run Windows 11 Pro, Enterprise, Education, or IoT Enterprise editions. The Home edition lacks full BitLocker support, although Device Encryption provides a limited subset of functionality on compatible hardware. Second, the motherboard must have a TPM 2.0 chip that is enabled in the UEFI firmware. Third, the user account must possess administrative privileges. To confirm TPM status, press Windows + R, type tpm.msc, and check the status window. The message “The TPM is ready for use” indicates compliance. If the TPM is not detected, reboot into UEFI/BIOS setup and enable the fTPM (for AMD platforms) or PTT (for Intel platforms) option. Some gaming motherboards ship with TPM disabled by default, requiring manual activation before encryption can proceed.
How to Enable BitLocker on Windows 11
The activation process is guided by a graphical wizard that handles TPM initialization, recovery key generation, and encryption scope. Follow each step carefully to avoid misconfiguration or loss of access to the drive.
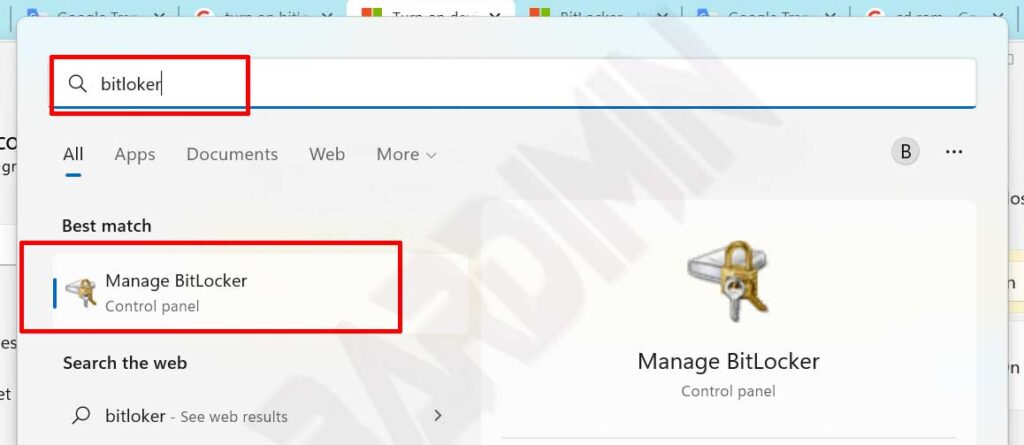
- Open the Start menu, search for “BitLocker”, and click “Manage BitLocker” from the Control Panel results. Alternatively, navigate to Control Panel > System and Security > BitLocker Drive Encryption.
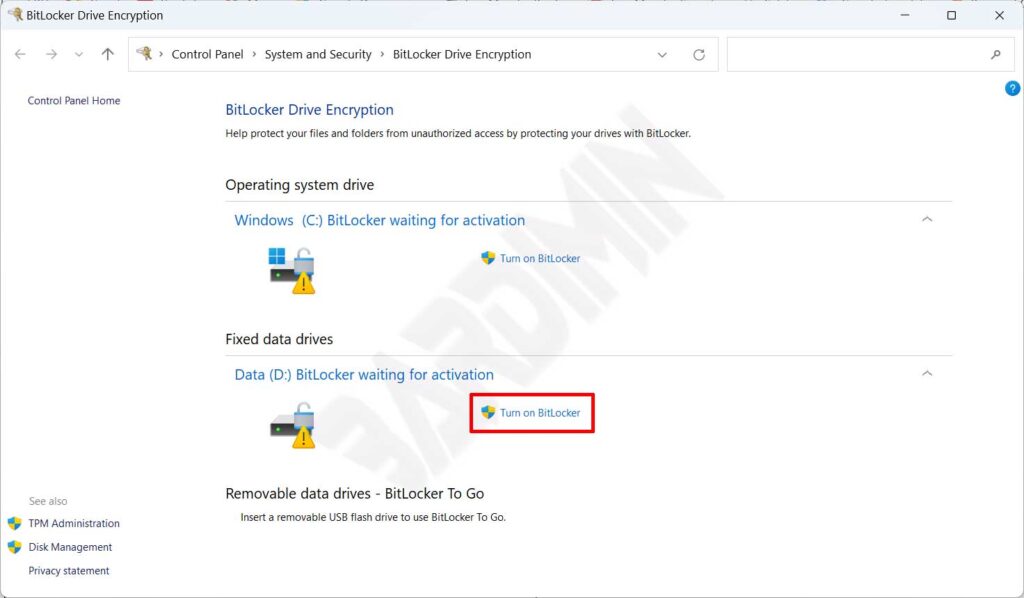
- Identify the system drive (typically labeled C:) and click the “Turn on BitLocker” link next to it. The wizard performs a hardware compatibility check, verifying TPM and partition layout.
- Choose a method to save the recovery key. Options include saving to a Microsoft account, writing to a USB flash drive, saving to a file on a separate disk, or printing a hard copy. Always select at least two methods for redundancy. Never store the key on the same drive being encrypted.
- Select the encryption scope. “Encrypt entire drive” protects all sectors, including residual data from previously deleted files. “Encrypt used disk space only” is faster and recommended for new or empty drives.
- Choose the encryption mode. On Windows 11, select “New encryption mode” (XTS-AES) for optimal security and performance. Use “Compatible mode” only if the drive will be moved to a computer running an older Windows version (pre-1607).
- Check the “Run BitLocker system check” box and click Continue. This ensures the recovery key works before encryption begins. Restart the PC when prompted.
- After reboot, BitLocker encrypts the drive in the background. The duration depends on drive capacity and speed. Normal computer usage during this process is safe.
Critical Note: The recovery key is the only way to regain access to an encrypted drive if TPM validation fails. Store it in a physically separate location such as a fireproof safe or a zero-knowledge encrypted cloud service. Losing the recovery key results in permanent data loss; Microsoft provides no backdoor or bypass mechanism.
How to Disable BitLocker on Windows 11
Turning off BitLocker begins a full decryption process that restores data to an unencrypted state. This step may be necessary before hardware upgrades, transferring a drive to a non-TPM system, or resolving low-level disk access conflicts. Ensure uninterrupted power during decryption to prevent partial data corruption.
- Open Manage BitLocker from the Control Panel or via the Start search.
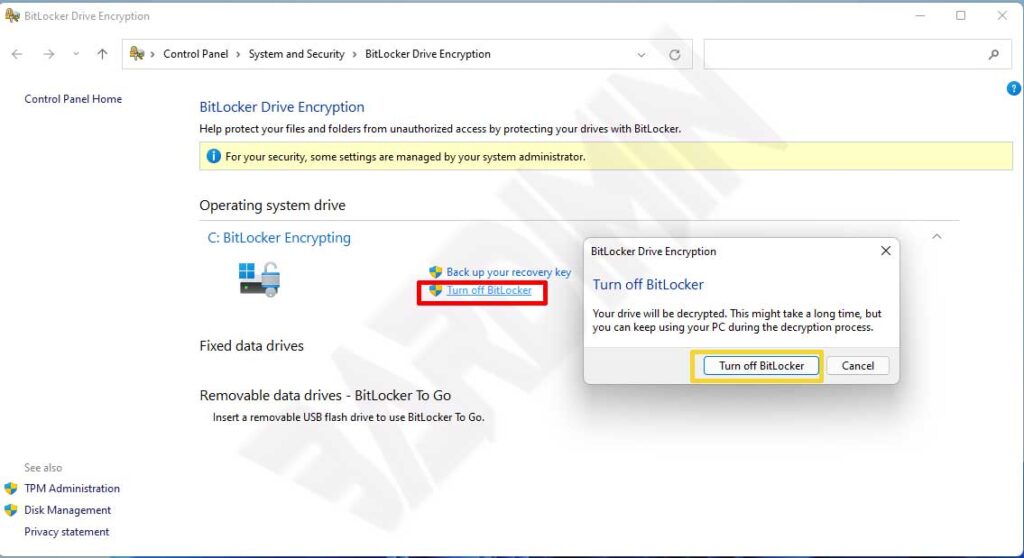
- Locate the encrypted drive and click “Turn off BitLocker”.
- Confirm the action in the dialog box. The system tray displays a progress notification.
- Allow the decryption to complete without forcing a shutdown. Suspending the process midway can corrupt sectors that were partially decrypted.
For temporary scenarios, “Suspend Protection” offers a safer alternative. This option temporarily disables TPM verification without decrypting data, allowing BIOS updates, hardware changes, or dual-boot installations. After completing maintenance, click “Resume Protection” to re-enable full encryption without re-encrypting the entire drive. Suspension does not alter encrypted bits on disk, so it remains secure against physical theft during the suspension period, provided the attacker cannot guess the recovery key.
Managing Recovery Keys and Emergency Access
The 48-digit recovery key is the disaster recovery credential for BitLocker protected drives. Microsoft provides multiple storage channels: the personal Microsoft account recovery key portal (account.microsoft.com/devices/recoverykey), Azure Active Directory for enterprise workloads, and offline formats such as printed documents or text files on external media. In organizational environments, Group Policy can enforce automatic backup of recovery keys to Active Directory, ensuring helpdesks can retrieve them after proper identity verification.
Scenarios that trigger a recovery key prompt include BIOS flash updates, boot order modifications, motherboard component replacements, or repeated failed PIN attempts that lock the TPM. When a user receives a recovery prompt, they must enter the 48-digit key using the function keys. BitLocker’s anti-hammering logic blocks brute-force attempts by incrementally delaying retry intervals after successive incorrect entries. For IT professionals, Always verify the caller’s identity before disclosing recovery information; social engineering remains a viable attack vector even against encrypted systems. Users with personal devices often mishandle recovery keys by storing them in phone photo galleries without encryption, creating a serious vulnerability if the phone is compromised.
Best Practice for Gamers and Power Users: Before overclocking, flashing vBIOS, or modifying UEFI settings, suspend BitLocker to avoid unexpected recovery prompts. Store the recovery key inside an encrypted password manager with zero-knowledge architecture, such as Bitwarden or 1Password, instead of physical paper that can be lost or photographed.
Limitations of BitLocker and Complementary Security Measures
BitLocker exclusively protects data at rest. Once Windows boots successfully and the encryption key is loaded into memory, any running process can access decrypted files. This means malware, ransomware, and remote access trojans can read, modify, or exfiltrate data even when the drive is encrypted. Relying solely on BitLocker without endpoint protection is a flawed security posture. The operating system itself decrypts data upon authorized logon, rendering the encryption transparent to user-mode applications, including malicious ones.
Combine BitLocker with a properly configured host firewall (such as Windows Defender Firewall) and real time antivirus scanning to protect against internet-borne threats. Enable Controlled Folder Access in Windows Security to prevent unauthorized applications from modifying documents after they have been decrypted. For enterprise environments, implement application control policies via AppLocker or Windows Defender Application Control to restrict which binaries can execute. Additionally, consider enabling Windows Defender Credential Guard to isolate secrets from kernel-mode malware. A robust security strategy addresses both offline and online threat vectors, and BitLocker forms only one layer of that defense.
If an attacker gains physical access while a system is in sleep mode, BitLocker’s protection may be weakened. Sleep mode retains decryption keys in memory, whereas hibernation discards them by design. Disable sleep and enforce hibernation on devices that store sensitive data. Furthermore, modern DMA attacks via Thunderbolt ports can extract memory contents if kernel DMA protection is not enabled. Ensure that Input Output Memory Management Unit (IOMMU) and Kernel DMA Protection are activated on compatible hardware to mitigate such threats.
Performance Considerations for Gaming and Workstations
Modern CPUs include hardware-accelerated AES instructions that make the performance cost of BitLocker almost imperceptible. Synthetic benchmarks show a marginal increase in latency for 4K random reads, but in practice, game loading times and application launch speeds remain unchanged. The slight overhead from XTS mode is overshadowed by the security benefits, especially on portable devices that are more susceptible to theft or loss. Gamers who dual-boot Linux distributions may encounter compatibility issues when accessing BitLocker-encrypted NTFS volumes. Tools like Dislocker exist but require the recovery key or password, and performance in cross-platform setups may be suboptimal. For such configurations, storing game libraries on a dedicated non-encrypted drive can separate convenience from security.
Conclusion
BitLocker Windows 11 delivers robust volume-level encyrption that protects data from unauthorized physical access through TPM-bound key management. Proper configuration of recovery key storage and understanding the suspension feature are essential for avoiding irreversible data loss. While the performance impact is negligible for both professional workloads and gaming, BitLocker must be integrated with firewall, antivirus, and secure boot configurations to build a resilient defense. IT teams should enforce centralized recovery key escrow and educate users on phishing-resistant verification procedures. Technicians and enthusiasts who routinely modify firmware or hardware should adopt a disciplined suspend/resume workflow to prevent unexpected lockouts. Ultimately, BitLocker serves as a foundational security pillar that, when combined with complementary controls, significantly raises the bar against physical data breaches.