How to Check If Disk Is Using GPT or MBR in Windows
Method 1: Use Disk Management
- Press the key combination Win + X on your keyboard.
- Select Disk Management from the menu that appears. Alternatively, you can press Win + R, type diskmgmt.msc, and press Enter.
- In the Disk Management window, you will see a list of all disks connected to your computer, along with their partitions.
- Identify the disk you want to check. These disks are usually labeled like Disk 0, Disk 1, and so on.
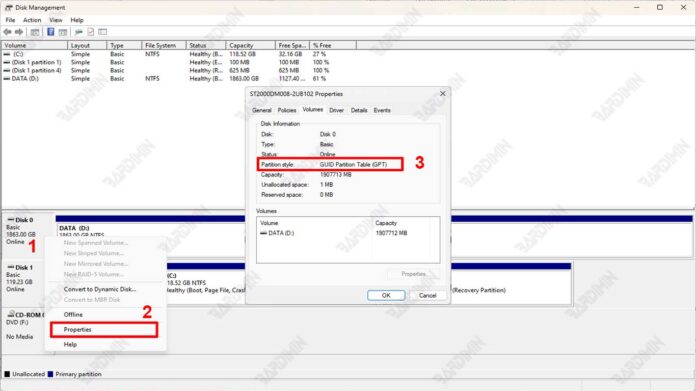
- Right-click on the disk label you want to check (for example, Disk 0).
- Select Properties from the context menu that appears.
- In the Properties window, go to the Volumes tab.
- Under Partition Style, you will see if the disk is using GUID Partition Table (GPT) or Master Boot Record (MBR).
Method 2: Use the Command Prompt
To check if your disk is using GPT or MBR in Windows, you can use Command Prompt. Here are the steps:
- Press Win + X on your keyboard.
- Select Command Prompt (Admin) or Windows PowerShell (Admin) from the menu that appears. Alternatively, you can press Win + S, type cmd, right-click on Command Prompt, and select Run as administrator.
- Type the following command in the Command Prompt window and press Enter:
diskpart
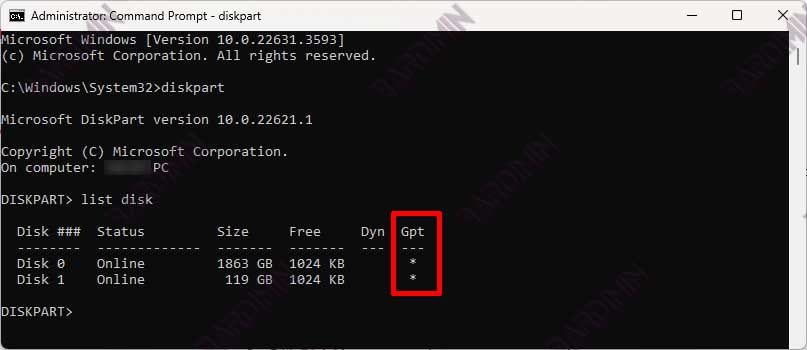
- Once inside the DiskPart utility, type the following command and press Enter:
list disk
- The DiskPart utility will display a list of disks connected to your computer. Note the GPT column in the list. If there is an asterisk (*) in the column, the disk is using GPT. If there is no asterisk, the disk uses MBR.
Method 3: Use PowerShell
You can also use PowerShell to check if your disk is using GPT or MBR. Here are the steps:
- Press Win + X on your keyboard.
- Select Windows PowerShell (Admin) from the menu that appears. Alternatively, you can press Win + S, type PowerShell, right-click on Windows PowerShell, and select Run as administrator.
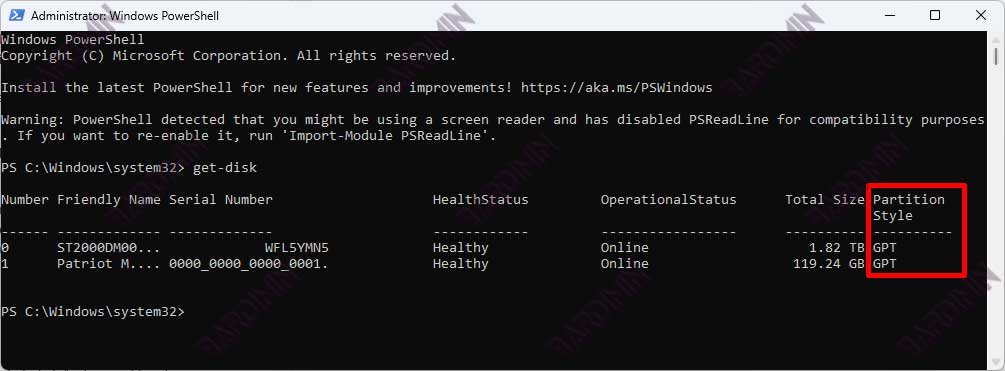
- In the PowerShell window, type the following command and press Enter:
Get-Disk
- PowerShell displays a list of all disks connected to your computer along with detailed information. Pay attention to the PartitionStyle column. This column will indicate whether the disk is using GPT or MBR.
Other Interesting Articles
How to Convert Disk from MBR to GPT or Vice Versa
Preparation Before Conversion
Before you perform the disk conversion from MBR to GPT or vice versa, make sure to:
- Backup Data: Make sure you have backed up all important data from the disk to be converted. Conversion can cause data loss, so make sure to back it up first.
- Pahami Risiko: Understand that the conversion process can delete all partitions and data existing on the disk. Make sure you are prepared for the risk of losing this data before proceeding.
Convert Using Disk Management (Windows 10/11)
- Press Win + X on your keyboard.
- Select Disk Management from the menu that appears.
- Right-click on each partition on the disk you want to convert and select Delete Volume. Make sure to back up the data from that partition first if needed.
- Right-click on the disk you want to convert and select Convert to GPT Disk or Convert to MBR Disk as you need. Follow the instructions that appear to complete the conversion process.
Convert Using Command Prompt
- Press Win + X on your keyboard.
- Select Command Prompt (Admin) from the menu that appears.
- Type diskpart and press Enter.
- Type list disk and press Enter to see a list of disks connected to your computer.
- Type select disk <nomor_disk> to select the disk you want to convert. Be sure to replace <nomor_disk> with the appropriate disk number.
- Use the clean command to delete all partitions from that disk. Make sure to back up the data from that partition first if needed.
- If you want to convert to GPT, type convert gpt. If you want to convert to MBR, type convert mbr. Press Enter to complete the conversion process.
