Creating a virtual CD/DVD in Windows 10 and 11 is a critical solution when physical drives are missing. This technical guide explains using KernSafe TotalMounter to overcome system repair disc errors and set up a fully functional optical drive virtual for ISO burning and system recovery tasks.
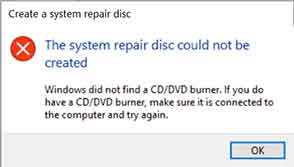
The system repair disc feature in Windows 10 and Windows 11 is a vital tool for boot troubleshooting and system recovery. However, the creation process is often hindered by error messages due to the lack of a physical optical drive. The prompt “The computer doesn’t have a CD/DVD burner” is a common issue on modern devices. An effective solution is to create a virtual CD/DVD in Windows 10 and 11 using emulation software like KernSafe TotalMounter. This makes the system recognize the virtual drive as a valid burning device, allowing the creation of a system repair disc directly to an ISO file.
Virtual CD/DVD Architecture and Integration with Windows
A virtual CD/DVD in Windows 10 and 11 works by creating an emulation layer at the operating system’s kernel level. Utilities like KernSafe TotalMounter install a special filter driver that mimics the behavior of Advanced Technology Attachment (ATA) or Small Computer System Interface (SCSI) hardware for optical drives. This driver then creates a virtual block device accessible through the Windows Storage Stack. This process allows the Windows Disc Image Burner or third-party burning tools to interact with the virtual drive as if it were a physical one.
TotalMounter supports the El Torito specification for bootable CD/DVDs and the Universal Disk Format (UDF) file system for data burning. Therefore, its integration with system features like the system repair disc works seamlessly. Additionally, the tool uses Virtual Write technology that leverages a differencing disk file system. This technology handles all write operations at a virtual layer without modifying the base image file, making it very secure.
Function Comparison in Windows 10 vs. Windows 11
| Aspect | Windows 10 | Windows 11 |
| Kernel Driver Support | Kernel Mode version 7.0+ | Kernel Mode version 8.0+ with stricter signature validation |
| System Repair Integration | Via Control Panel > Backup and Restore | Via Settings > System > Recovery (Burning process is similar) |
| Security (Driver Signature Enforcement) | May require disabling Secure Boot for certain drivers | Requires drivers that are strictly signed by Microsoft |
| TotalMounter Compatibility | Version 4.x.x and above (x86/x64) | Version 5.x.x and above (x64 recommended) |
Technical Analysis: Overcoming System Repair Disc Error
The error message “The computer doesn’t have a CD/DVD burner” appears because the system repair disc utility (recdisc.exe) queries the Windows Hardware Manager for a device with the GUID_DEVINTERFACE_CDROM class and FILE_DEVICE_CD_RW capability. On systems without a physical optical drive, this query fails. A virtual CD/DVD in Windows 10 and 11 created by TotalMounter fixes this by reporting itself as a device with the FILE_DEVICE_CD_RW capability through its driver, thus bypassing this check.
The technical steps invloved include: creating a virtual device object, reporting appropriate capabilities, and connecting it to the system’s storage port driver. Subsequently, this driver processes SCSI Pass-Through Interface (SPTI) or ATA commands for burning operations from user applications.
Implementation Guide: Creating a Virtual Burner with TotalMounter
- Download and Verify Driver: Get the latest TotalMounter installer from the developer’s official site. Ensure you choose the version compatible with your system architecture (x64 for modern Windows 11). Verify the driver’s digital signature before installation.
- Installation with Administrator Rights: Run the installer as administrator. You will be prompted to allow the installation of a kernel driver. In Windows 11, you might need to temporarily disable Memory Integrity (Core Isolation) in Windows Security to install the driver, then re-enable it afterward.
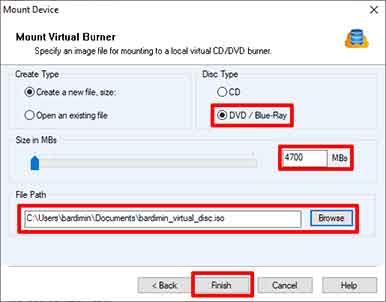
- Virtual Device Configuration: Open the TotalMounter application. Click “Mount” and then select “Virtual CD/DVD RW”. In the configuration window, key parameters to set are:
- Disk Type: Choose “DVD/Blue-Ray” for maximum compatibility.
- Size: Set according to the target media capacity (e.g., 4700 MB for DVD-5).
- File System: Select “ISO9660+UDF” for compatibility with various burning tools.
- Sector Size: Leave at the standard 2048 bytes for DVD media.
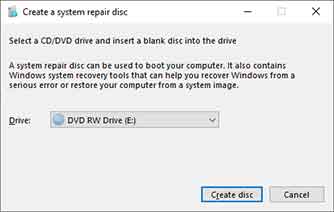
- Burning the System Repair Disc: Once the virtual drive appears in File Explorer (e.g., as drive E:), run the command
recdisc.exevia the Run dialog (Win + R). In the Create a system repair disc window, select the created virtual drive. The Windows utility will now recognize it as a valid burner and start the burning process, resulting in an ISO file at the specified location.
Advanced Optimization and Troubleshooting
For optimal performance, configure the virtual CD/DVD in Windows 10 and 11 to use RAM-based caching. In TotalMounter, enable the “Enable write caching on the device” option via Device Manager in the virtual drive’s properties. This will speed up data transfer when burning large ISO files.
If the virtual drive is not detected by recdisc.exe, check the driver status in Device Manager (devmgmt.msc) under the “DVD/CD-ROM drives” category. Ensure there are no yellow exclamation marks. For troubleshooting, use Windows Event Viewer (eventvwr.msc) and filter logs for the “KernSafe” or “cdrom” source.
Remember, the ISO file from virtual burning is only usefull within a normally running operating system environment. For physical recovery booting, you must transfer the ISO file to a bootable USB media using tools like MakeWinPEMedia or Rufus .
By understanding the working principles and following this technical configuration, you can overcome system repair disc errors and utilize a virtual CD/DVD in Windows 10 and 11 for various technical needs, from creating recovery media to installing ISO-based software. Always ensure you use the latest drivers from official sources to maintain system compatibility and security.