Restricting Access to File Sharing by IP addresses in Windows 11

bardimin pic

Written by Bardimin

On July 5, 2022
Home » Blogs » Network » Restricting Access to File Sharing by IP addresses in Windows 11

Restricting access to file-sharing will improve data security and prevent ransomware attacks.

File sharing is a commonly used method in organizations by utilizing available networks. There are various ways of doing file sharing, ranging from cloud-based ones to the simplest with two PCs.

In organizations with a local network (LAN), you can file sharing by storing files on a server. Then access to the file can be set based on the user and access rights.

In this article, Bardimin will discuss how to do file sharing on a PC. Since we don't want everyone in the organization to access, the file being filtered, we're going to limit the file to only being accessible to A PC with a specific IP address.

Advantages of File Sharing

1. Save Time

PC users in the organization don't need to email files, upload, or download files using the internet. Instead, they can quickly access directly the files they need when they need them. File sharing transfers are much faster than sending over the internet since file sharing uses a local network at a much faster speed. Transfer speeds can reach 1Gb/s – 10 Gb/s, depending on the device used.

2. Save Money

Because it does not use the internet, file sharing will reduce the cost of using the internet.

3. Prevent Data Loss

In file-sharing that uses a server, you can back up data regularly. And in the event of a crash on a PC, the data is not lost because it is still on the server.

4. Restricting Access

You can restrict access to a file whether it can only read, update, delete, create or save.

Disadvantages of File Sharing

1. Requires Local Network (LAN)

To use file sharing properly requires a stable network. File sharing will run well with the local network using a cable. Using Wi-Fi is also possible, but it will have a lower transfer speed and are less stable than using a cable.

2. Higher Risk of Infected Files

There is an increased risk of files being infected by malware, ransomware, and viruses. Because if one of the PCs is infected and accesses the file, there is a possibility of a virus spreading. By keeping and antivirus up to date, this risk can be reduced.

How to Enable File Sharing in Windows 11
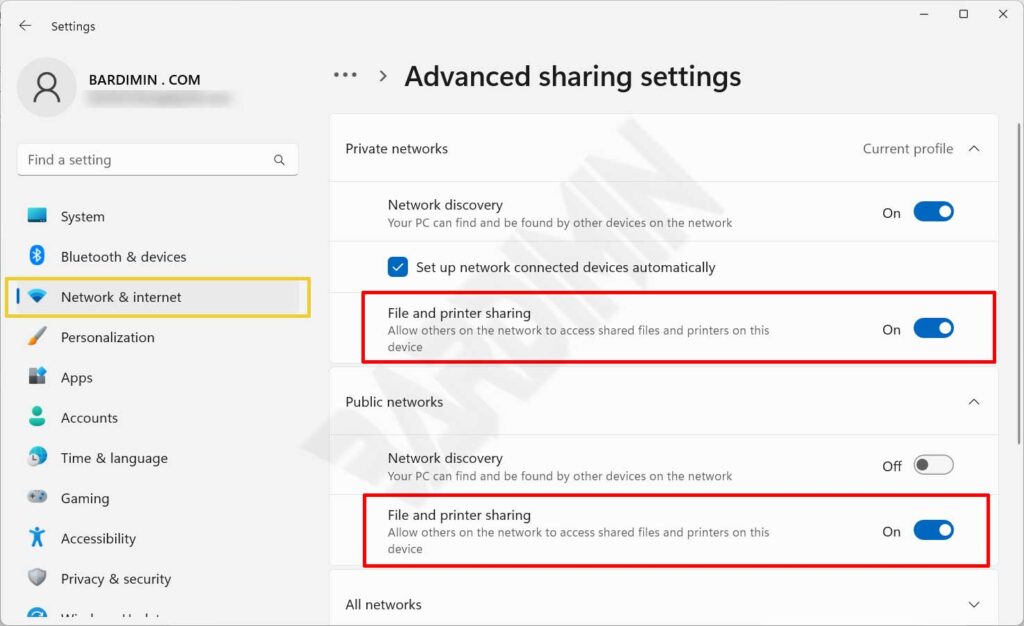
  1. Open the “. You can open by using the keys (WIN + I).
  2. Then select “Network & internet > Advanced network settings > Advanced sharing settings“. Then, on “File and printer sharing“, slide the switch button to the right to activate.  Enable this feature on “Private Network” and “Public Network“.
file sharing turn on
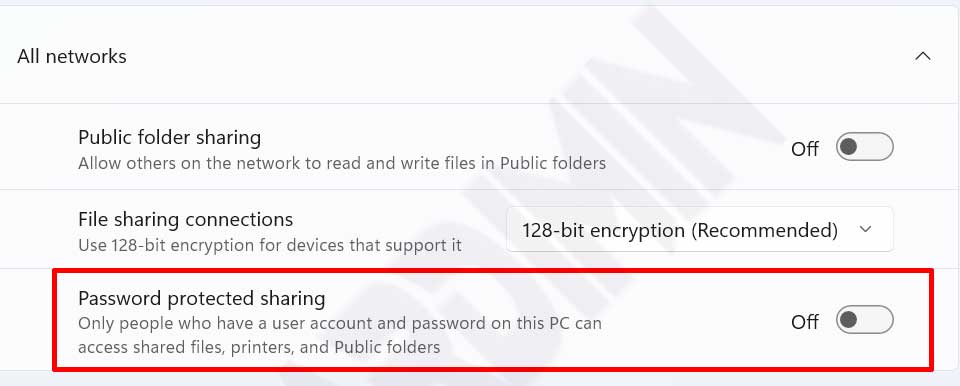
  1. Then on “All Network“, you can turn off sharing (because we will filter by IP address).
file sharing turn off password

How to Share a Folder in Windows 11

After you activate File Sharing, your PC can already be accessed by other PCs. Since there is no that you are sharing yet, when accessed by another PC through File Explorer, it will appear empty.

  1. Open “File Explorer” and select the you want to share.
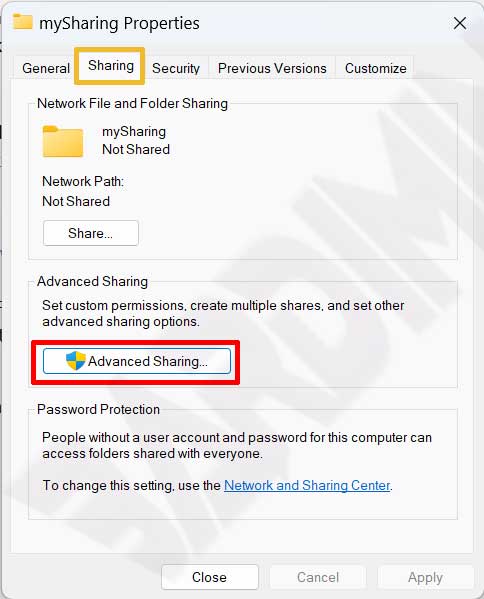
  2. Then right-click on the folder and select “Properties“.
  3. In the Properties window, select the “Sharing” tab and then click on the “Advanced Sharing” button.
folder sharing properties
  1. Next, you check “Share this folder” and you can name the share or leave it as default. Then click the “Permissions” button to set the access.
folder sharing permissions
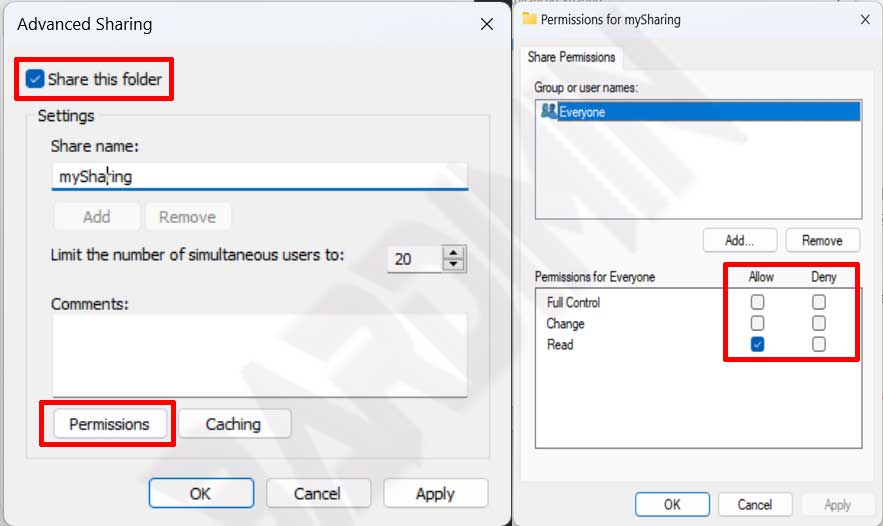
  1. Arrange access to the folder the way you want.

How to Access Windows File Sharing

To access File sharing, you can do it through File Explorer. You can type the IP address in the address bar. You also type the name of the PC, not all LAN network can use the PC name.

For example, you can access it by typing the IP address as follows

\\192.168.1.1
folder sharing ip

RestrictIng File Sharing Access with Windows Firewall

If you have completed all the steps mentioned above, you have successfully shared a folder. The problem is that all PCs connected to the LAN network will access the folder.

In this step, we will restrict access using the and only allow certain IP addresses that can access it.

  1. Go to the “Control Panel” and select “System and Security > Windows Defender > Allowed apps“.
firewall app
  1. Then, in the “Allowed apps” window, click the “Change settings” button. You won't be able to change the settings if you don't click this button first.
  2. Uncheck “File and Printer Sharing” and “File and Printer Sharing over SMBDirect” to block all access.
firewall disable sharing
  1. Then open the “Control Panel” again and select “System and Security > Windows Defender Firewall > Advanced settings”.
  2. In the “Windows Defender Firewall with Advanced Security” window, select “Inbound Rule“. Then right-click and select “New Rule“.
firewall new rule
  1. Next will open the window “New Inbound Rule Wizard“. In the “Rule Type“, select “Custom” and then click the “Next” button.
  2. Then on “Programs“, select “All programs“. Click the “Next” button.
  3. In the “Protocol and Ports” step, select the “TCP” protocol. And at the local port, select “Specific Ports” with the port number “445“. Next click on the “Next” button.
firewall port setting
  1. Then in the “Scope” step, Remote IP section, add the IP of another PC that you allow to access file sharing on your PC.
firewall remote ip
  1. In the “Action” step, select “Allow the connection“. Then click the “Next” button.
  2. And in the “Profile” step, leave everything selected and click the “Next” button.
  3. The last step is to name the Rule you created. Give it a name that makes it easier for you to recognize it, such as “File Sharing – Allow specific IP”.
firewall allow specific ip

You can already restrict file sharing access with only certain IP addresses that can access it.

Latest Articles

17 Tips and Tricks for Customizing Windows via Registry

17 Tips and Tricks for Customizing Windows via Registry

Before you edit or modify the Windows registry, back up from that registry. Fatal errors in changing the registry can cause the operating system to not run normally. In some cases, registry damage can only be repaired by reinstalling the operating system and resulting...

Portable BloatyNosy 0.80 – Debloat and Customize Windows 11

Portable BloatyNosy 0.80 – Debloat and Customize Windows 11

BloatyNosy is a free app that lets you remove the built-in junk apps in Windows that improve your Windows performance. The application is available in portable and installer versions. If you are looking for a free Debloat tool, then you might need to try BloatyNosy...

The sequence of Windows boot processes from zero to ready

The sequence of Windows boot processes from zero to ready

Have you ever wondered how exactly the Windows boot process happens? What processes happen in the background when you press the power button until Windows is ready for you? If yes, then you are in the right place. In this article, Bardimin will explain how all these...

Redirect and Block URLs with HOSTS File on Windows

Redirect and Block URLs with HOSTS File on Windows

Redirect and Block URLs you can easily on Windows. Just by adding the IP of a website, you can redirect or block it. Of course, this is very useful to limit the access of your employees or children from accessing websites that you do not allow. Your Windows PC has...

How Proxy Anonymity Works

How Proxy Anonymity Works

The exchange of information on the Internet is carried out on a client-server model. The client sends a request (what files he needs) and the server sends a reply (what files he needs). For close cooperation (full understanding) between the client and the server, the...