Is your Wi-Fi having problems? You can set Windows to automatically select the Wi-Fi network with the strongest signal.
Laptops offer mobility and portability, which is why Wi-Fi connections are often preferred over wired connections – so users can move around without having to be tied to cables.
There are times when you suspect your wireless connection is underperforming. You may notice that pages load much slower than expected, uploads or downloads take longer, or you often get choppy.

The strength of wireless communication is determined by how close your connected device is to the wireless router. The farther the distance, the worse the signal received by your device. If your device doesn’t get a strong Wi-Fi signal, then your browsing will slow down, fail to load online pages, take longer to download, and so on.
If you live or work in an area with many wireless networks, you may want to always connect to the strongest Wi-Fi network. Connecting to a reliable and strong Wi-Fi connection is essential. Manually switching between networks to select the strongest Wi-Fi network around a location can be tiring.
If you have many network devices at home or work, you can configure your Windows PC to automatically scan and connect to the strongest Wi-Fi network accessible.
To do so, you must adjust the characteristics of your local network card. Otherwise, you can set network priority in Windows by using a third-party Wi-Fi network manager tool.
How to automatically switch to the strongest Wi-Fi in Windows 11
To enable automatic network switching, you must first allow Windows to scan for other wireless networks even if they are already connected to them.
By default, Windows doesn’t scan for other Wi-Fi networks if they’re already connected to them. However, you can always change that behavior by modifying the properties of your network adapter.
You must then change the Roaming Aggressiveness parameter on your Wi-Fi adapter. This helps determine the network strength limit, after which the Wi-Fi adapter starts a scan to look for APs (Access Points) or other potential hotspots.
1] Allow Windows to scan other wireless (Wi-Fi) networks
To enable automatic network redirection, you must first allow Windows to search for alternative wireless networks even if you are already connected to them. All you need to do is as follows.
- Open the “Run” command. You can open it by using the keyboard keys (WIN + R) or by right-clicking on the Start menu and selecting “Run” to launch.
- In the dialog box,type “ncpa.cpl” and press Enter.
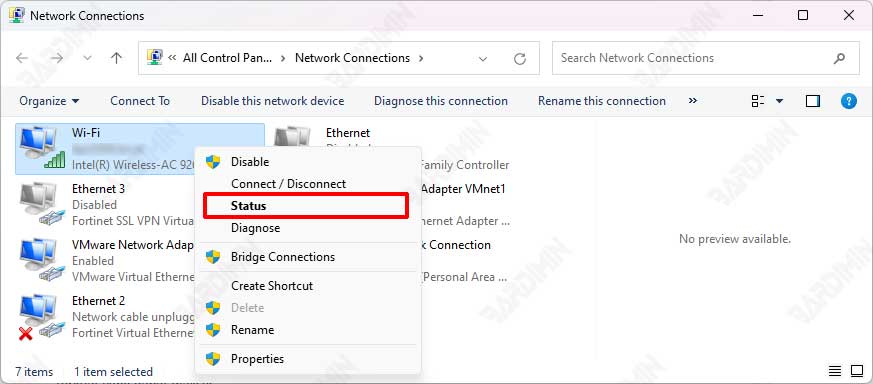
- Next, the “Network Connections” window will open. Select the Wi-Fi Adapter you are using and right-click, then select the “Status” option.
- Click the“Wireless Properties” button in the “Wi-Fi Status” window.
- In the next dialog box, check “Look for other wireless networks while connected to this network”.
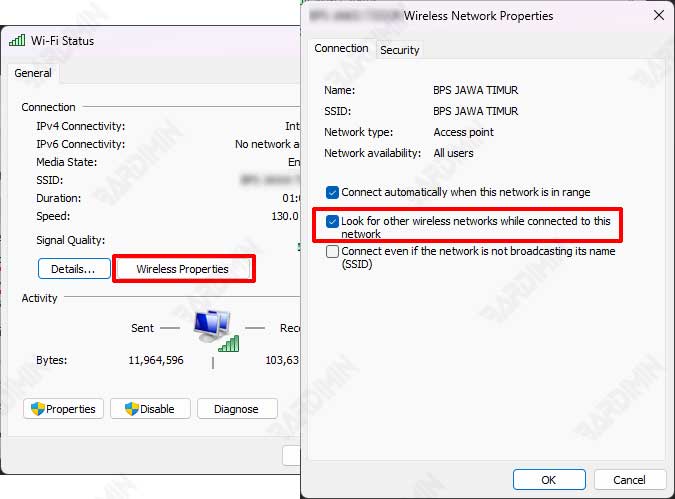
- Then click the OK button to save it and close all windows.
2] Modifying Roaming Aggressiveness on Wi-Fi adapters
Roaming Aggressiveness is a network card feature to change the threshold at which your Wi-Fi adapter starts searching for other Wi-Fi network devices.
When you change the Roaming Aggressiveness parameter of a Wi-Fi adapter to a value that is too low, the Wi-Fi adapter may not scan other networks until the signal strength is too weak.
By default, Roaming Aggressiveness is set to Medium. You can change and set it to the highest level to make Windows connect to the strongest Wi-Fi network available in the area.
- Open the “Run” command. You can open it by using the keyboard keys (WIN + R) or by right-clicking on the Start menu and selecting “Run” to launch.
- In the dialog box,type “ncpa.cpl” and press Enter.
- Next, the “Network Connections” window will open. Select the Wi-Fi Adapter you are using and right-click, then select the “Status” option.
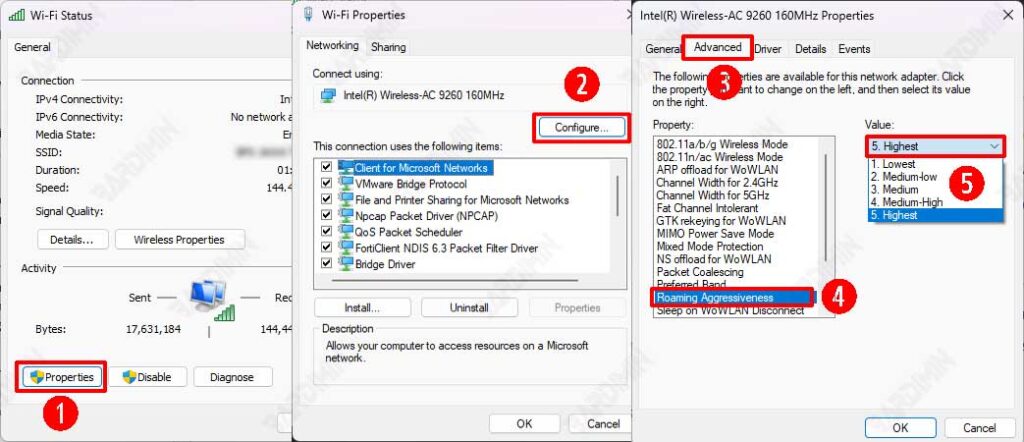
- Click the “Properties” button in the “Wi-Fi Status” window.
- Then, click the “Configure” button.
- In the dialog box that opens,click the “Advanced” tab.
- And in the properties section, select “Roaming Aggressiveness”.
- Next, click the dropdown button on the “Value” field and select the option “5. Highest”.
- Click the OK button to save the changes.
- Close all windows and restart your computer.