In this fast-paced digital age, the need for large and efficient storage capacities is becoming increasingly important. Many computer users, especially those who work with large files such as videos, photos, or business data, need a reliable and easy-to-manage storage solution. One of the solutions offered by Windows 11 is the Storage Spaces feature.
Storage Spaces allows users to combine multiple Hard drives into one large volume. This feature helps increase storage capacity, provides flexibility in data management, and increases data security. With Storage Spaces, you can leverage your existing Hard Drive to create one large storage volume without purchasing a large-capacity Hard Drive which is usually more expensive.
Bardimin will provide a complete guide on how to merge multiple Hard Drive into one volume on Windows 11 using Storage Spaces. You will learn about the benefits of using Storage Spaces, the preparation steps needed, and practical guides to combine Hard Drives easily and effectively. With this information, you can increase the capacity and performance of your data storage efficiently and securely.
What Are Storage Spaces in Windows 11?
Storage Spaces is a powerful feature provided by Windows 11 to manage data storage more efficiently and securely. This feature allows users to combine multiple Hard Drive into one large volume, providing flexibility and increased storage capacity without having to purchase new, large-capacity hardware.
With Storage Spaces, you can create a storage pool, which is a collection of several Hard drives combined into one. In this pool, you can create one or more storage spaces, which act like virtual drives that can be used to store data. Storage Spaces also offers several options to protect your data from hardware failure.
Storage Spaces not only help increase storage capacity but also improve data access speed and overall system performance. This feature is very useful for users who need large storage with easy management and reliable data protection, without having to spend high costs to buy a large-capacity Hard Drive.
Advantages of Combining Hard Drives
1. Larger Storage Capacity
Merging multiple Hard Drive into one large volume allows you to get a larger storage capacity. With Storage Spaces in Windows 11, you can take advantage of the free space of multiple Hard drives to create one large storage volume. This is especially useful for users who work with large files such as videos, high-resolution images, or project data that require a lot of storage space.
2. Ease of Management
By combining multiple Hard Drive into one volume, storage management becomes easier. You no longer need to manage multiple separate drives or move data between drives. All data is stored in one large volume, making it simpler to access and organize. The Storage Spaces feature also makes it easier to increase storage capacity in the future. If you need more space, you can add a new Hard Drive to the storage pool without having to reconfigure the entire system.
3. Improved Performance
Using Storage Spaces can improve overall system performance. With the right configuration, you can get higher read/write speeds compared to using just one Hard Drive. For example, by using the Simple (No Resiliency) or Mirror option, you can increase the speed of data access because data is spread across multiple Hard drives. In addition, by using SSD as part of the storage pool, you can further improve the speed and responsiveness of your system.
Preparation Before Combining Hard Drives
1. Backup Important Data
Before starting the process of merging several Hard Drive into one volume, it is very important to backup all important data in the Hard Drive. This step is to ensure that your data remains safe and is not lost during the merge process. This process may require reformatting or changes to the storage structure that may result in data loss. Use an external storage device or cloud service to keep copies of your important data.
2. Ensure Hard Drive Condition
Before combining Hard Drives using Storage Spaces, make sure all Hard drives are in good condition and functioning optimally. Check the condition of the Hard Drive by using diagnostic tools to make sure there is no physical damage or disk health problems. Good Hard Drive conditions will ensure the merging process goes smoothly and avoid problems in the future. Also, make sure that all Hard Drive to be used are compatible with Windows 11 and have the correct connection to avoid problems when setting up Storage Spaces.
Steps to Merge Hard Drives in Windows 11
1. Open Storage Spaces
The first step in merging multiple Hard drives in Windows 11 is to unlock the Storage Spaces feature. You can access Storage Spaces in the following ways:
- Go to Control Panel and select System and Security.
- Click Storage Spaces.
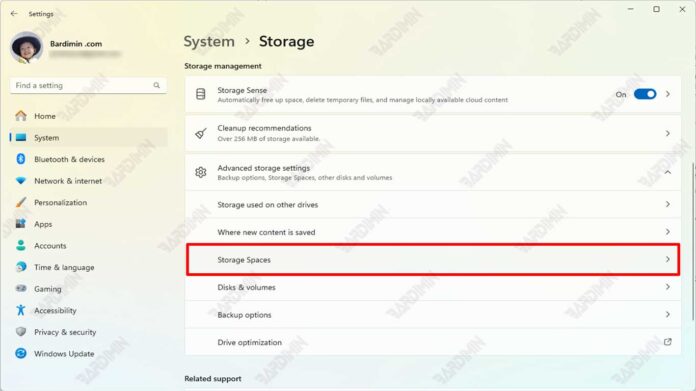
- Or, go to Settings, select System, then select Storage, and click Advanced Storage Settings at the bottom of the page. Click Storage Spaces.
2. Create a Storage Pool
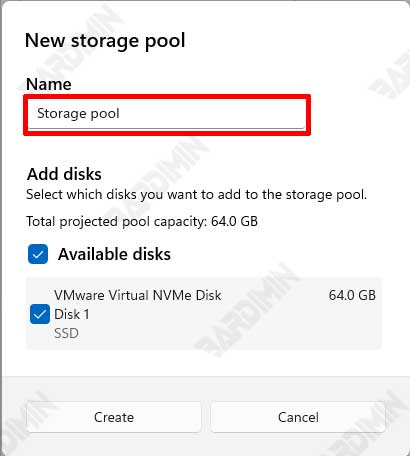
After opening Storage Spaces, the next step is to make a storage pool. A Storage Pool is a collection of several Hard drives combined into one storage unit.
a. Selecting a Hard Drive
Select the Hard Drive you want to merge. Make sure all selected Hard drives are in good condition and compatible to be combined into a storage pool.
b. Adding a Hard Drive
Add the selected Hard Drive into the storage pool. In Storage Spaces, click the Create a new pool and storage space option. Follow the on-screen instructions to add a Hard Drive to a new storage pool.
3. Create a Storage Space
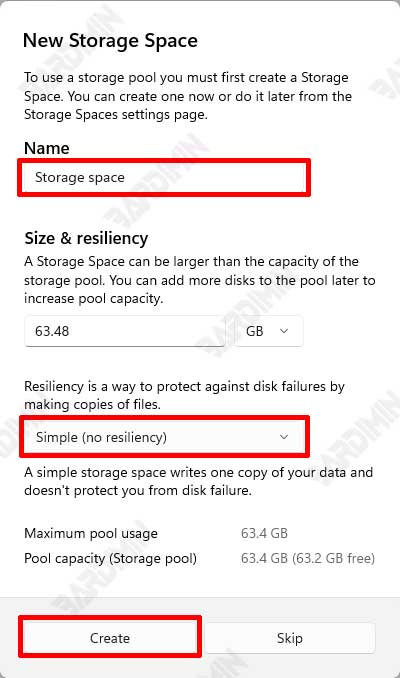
Once the storage pool is created, the next step is to create a storage space within the pool. Storage Space is the virtual storage volume created inside the storage pool.
a. Determine the Type of Storage Space
Choose the type of storage space that suits your needs:
- Simple (No Resiliency): Combines the capacity of all Hard drives into one large volume without data protection. Suitable for temporary or less important data.
- Mirror: Data is copied to two or more Hard drives to ensure data remains safe in case one of the drives is corrupted. There is a choice of two or three copies for different levels of security.
- Parity: Using data dissemination methods with parity information to provide data protection by using less space compared to mirrors. Suitable for storing archive data or data that is rarely accessed but still important.
b. Configure Storage Space
Set the size and name for the new storage space. You can also determine the level of resiliency according to your needs. After configuring, click Create storage space to complete the process.
4. Formatting and Using Storage Space
Once storage space is created, the final step is to format the volume so that it can be used for data storage.
- Open File Explorer and search for the newly created storage space.
- Right-click on storage space and select Format.
- Follow the on-screen instructions to format storage space with the desired file system (for example, NTFS).
- Once the formatting process is complete, storage space is ready to be used to save your data.
By following these steps, you can easily merge multiple Hard Drive into one volume on Windows 11 using Storage Spaces, improving your storage capacity and system performance.
Tips for Optimizing Storage Spaces
1. Using SSD as a Cache
Using SSD as a cache in Storage Spaces can significantly improve your system’s performance. SSD has a higher read/write speed compared to HDD, so it can speed up data access and system response time. Here are the steps to configure SSD as a cache in Storage Spaces:
- Adding SSDs to the Storage Pool: When creating a storage pool, make sure to enter the SSD along with the HDD.
- Enable SSD Cache: Select the option to enable SSD as cache when configuring storage space. It will allocate SSD to store frequently accessed data, improving access speed and overall performance.
The main advantage of using SSD as a cache is the increased speed of data access for applications that require high performance, such as video editing, graphics rendering, and gaming.
2. Storage Spaces Health Monitoring
Health monitoring Storage Spaces is essential to ensure that your storage system is functioning properly and to prevent potential data corruption. Here are some tips for monitoring Storage Spaces health:
- Monitor Storage Pool Status: Regularly check the storage pool and storage spaces status via Storage Spaces on the Control Panel or Settings. Make sure no errors or warnings appear.
- Checking Hard Drive Condition: Use diagnostic tools like CHKDSK or third-party apps to check Hard Drive‘s physical health. This helps detect bad sectors or other problems that can affect performance.
- Ensure Regular Backups: While Storage Spaces offer a variety of data protection options, always perform regular backups to avoid data loss due to hardware failure or other errors.
- Using Monitoring Software: Consider using specialized monitoring software that can provide more detailed Storage space health and performance reports. This software usually offers real-time monitoring features, automatic alerts, and in-depth analysis.
FAQ
1. Are Storage Spaces Secure for My Data?
Storage Spaces is designed to provide strong data protection through multiple resiliency options:
- Simple (No Resiliency)
- Two-Way Mirror
- Three-Way Mirror
- Parity
By choosing the mirror or parity option, your data will be better protected from physical damage to the Hard Drive.
2. Can I Use Hard Drives with Different Capacities?
Yes, you can use Hard Drives with different capacities in Storage Spaces. Storage Spaces are flexible and allow you to mix different sizes and types of Hard drives in one storage pool. However, keep in mind that the total available capacity may be affected by the smallest drive in the storage pool, especially if you are using a mirror or parity configuration. The system optimizes space usage based on the smallest drive size.
3. How to Replace a Corrupted Hard Drive in Storage Spaces?
If any of the Hard drives in Storage Spaces are damaged, you can replace them without losing data (if using a resiliency configuration such as mirror or parity). Here are the steps:
- Identify Corrupted Hard Drive: Open Storage Spaces via the Control Panel or Settings and identify the drive that has failed.
- Replace Corrupted Hard Drive: Turn off your computer, remove the corrupted Hard Drive, and replace it with a new Hard Drive.
- Add New Hard Drive to Storage Pool: Restart your computer, open Storage Spaces, and add a new Hard Drive to the storage pool.
- Rebuild Storage Space: Storage Spaces will start automatically rebuilding to restore data to a new Hard Drive. This process may take some time depending on the amount of data and the size of the Hard Drive.
Conclusion
Combining multiple Hard Drive into one large volume on Windows 11 using Storage Spaces is an effective solution to increase storage capacity, facilitate data management, and improve system performance. Storage Spaces offers a variety of resiliency options that can protect your data from hardware damage, making it a safe and reliable choice for your storage needs.