Struggling to access an important folder only to be locked out by an “Access Denied” message in Windows 11? Don’t panic. This folder permission issue is frustrating but common and can be resolved with a few systematic methods. This article discusses the causes and effective solutions to fix the “Access Denied” error in Windows 11.
The “Access Denied” error message often appears when you try to open, move, or delete files and folders. This is especially common on the system drive (usually C:) and protected folders. The core of the problem lies within the NTFS (New Technology File System) security system used by Windows. NTFS manages permissions and ownership very strictly to protect system integrity and data.
However, incorrect configuration, changed ownership, or even corrupted system files can trigger this error. Fortunately, there are several solutions you can apply, from the simplest to the more technical. Below is a step-by-step guide to fix the folder access denied error in Windows 11.
Understanding the Causes of “Access Denied” in Windows 11
Before diving into solutions, understanding the root cause will help you choose the right fix. The main reasons for a folder access denied error include:
- Incorrect NTFS Permissions: Your user account lacks Read, Write, or Modify rights on the target folder.
- Folder Ownership: The folder is owned by another user account, a system account (like TrustedInstaller), or a deleted account.
- Security Software Interference: Features like User Account Control (UAC) or third-party antivirus software can block access.
- Corrupted System Files: Windows system files responsible for managing permissions may be damaged.
Solution 1: Take Ownership of the Folder
This is the most powerful solution for folder access denied issues in Windows 11. By becoming the owner, you gain full control to change permissions.
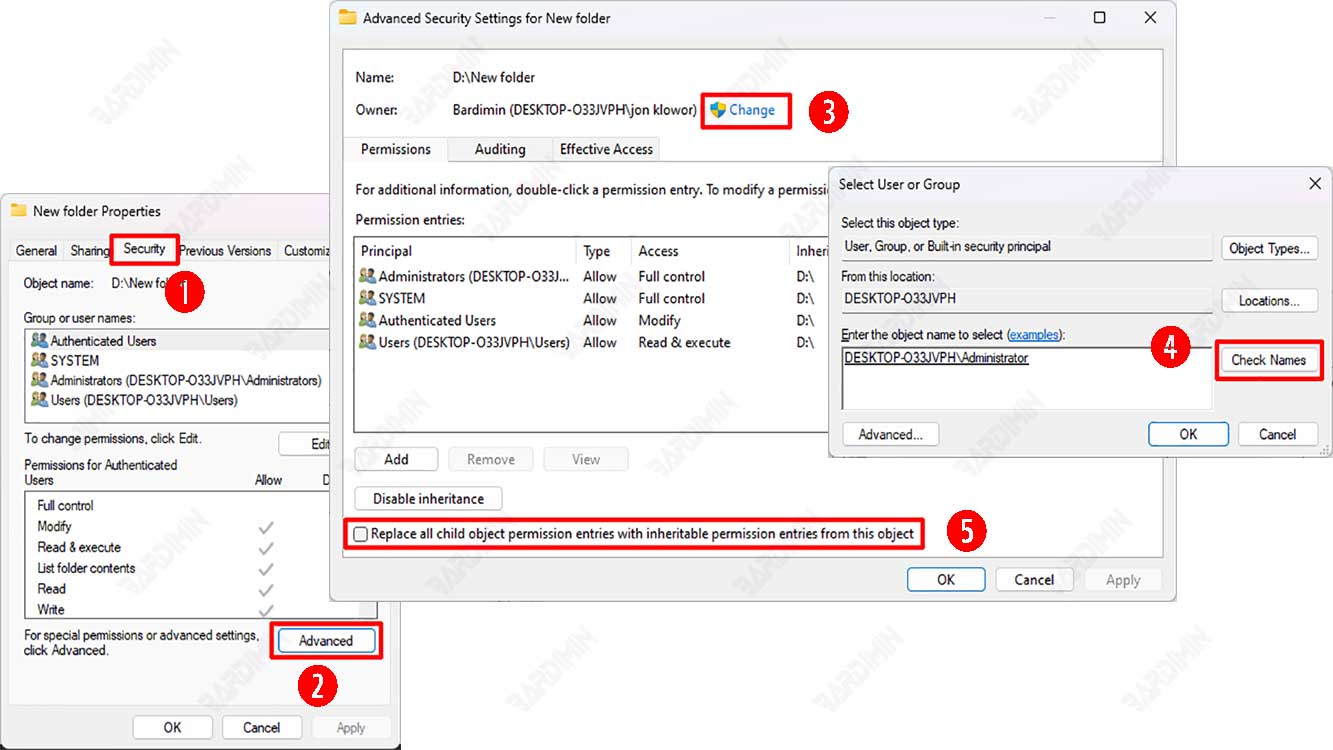
- Right-click the problematic folder and select Properties.
- Go to the Security tab, then click the Advanced button.
- Next to “Owner”, click the Change link.
- Type Administrators in the field, then click Check Names and OK.
- Check the box for “Replace owner on subcontainers and objects”.
- Click Apply and OK, then close all windows.
After these steps, try accessing the folder again. You may need to adjust permissions manually if the problem persists.
Solution 2: Manually Adjust Folder Permissions
If you still encounter the folder access denied error after taking ownership, you need to check the permissions in detail.
- Go back to Properties > Security tab.
- Click Edit to change permissions.
- Select the Administrators group or your username.
- In the bottom panel, check Full control under the Allow column.
- Click Apply and OK.
Important Note: Be cautious when changing permissions for Windows system folders. Misconfiguration can disrupt OS stability. Always ensure you are only modifying personal data folders or program installations.
Solution 3: Temporarily Disable User Account Control (UAC)
UAC can sometimes be overprotective and block access to certain folders. You can temporarily disable it for testing.
- Search for “UAC” in the Start Menu and select Change User Account Control settings.
- Drag the slider to the bottom position (Never notify).
- Click OK and restart your computer.
After testing folder access, immediately return UAC to the recommended level (second position from the top) to maintain system security.
Solution 4: Scan and Repair System Files with SFC & DISM
If the cause is corrupted Windows system files, run the built-in scanning tools.
1. Open Command Prompt or PowerShell as Administrator.
2. Run the command: sfc /scannow
3. Wait for the process to complete (may take time).
4. If SFC finds issues but cannot fix them, run the DISM command:
   DISM /Online /Cleanup-Image /RestoreHealth
5. Restart your computer after both scans finish.
This process can resolve folder access denied issues in Windows 11 caused by core system corruption.
Solution 5: Use the Built-in Administrator Account
The hidden Administrator account in Windows 11 has the highest privileges. Try enabling and using it to access the folder.
- Open PowerShell as Admin, then run:
net user administrator /active:yes - Sign out of your current account and log in using the “Administrator” account.
- Try accessing the problematic folder.
Once done, disable this account again for security using: net user administrator /active:no
Prevention and Best Practices
To prevent folder access denied errors from recurring, adopt these good habits:
- Avoid Using an Administrator Account for Daily Use: Use a standard account for regular activities. This limits accidental changes to system permissions.
- Be Cautious with Registry Cleaner Software: Third-party tools that alter system registry and permissions are often the culprits.
- Back Up Data Regularly: Always keep backups of important data to an external drive or cloud. The File History feature in Windows 11 is reliable.
- Pay Attention to Software Installation Sources: Download programs only from official sources to avoid permission conflicts.
Conclusion
Fixing the folder access denied error in Windows 11 requires a step-by-step approach, from taking ownership and adjusting permissions to checking system integrity. In most cases, solutions 1 (Take Ownership) and 2 (Adjust Permissions) are sufficient. Always prioritize security by not permanently disabling protection features like UAC.
By following this guide, you should be able to resolve folder permission errors and regain smooth access to your important data. For highly specific and complex issues, consider seeking help from technical forums like Microsoft Answers.