Note: This article discusses an advanced security feature (Software Restriction Policies) intended for professionals, IT technicians, and advanced users. Incorrect configuration can restrict system operations. It is recommended to test in a lab environment first.
As a proactive defense line, Software Restriction Policies (SRP) in Windows provide granular control over which applications are allowed to run. This Group Policy feature is a powerful weapon, especially in a strategy to prevent ransomware and other malware from executing unauthorized.
In an increasingly complex digital ecosystem, threats like ransomware come not only from phishing emails but also from infected ads (malvertising), malicious websites, or vulnerability exploits. Software Restriction Policies act as a gatekeeper that enforces execution rules based on path, hash, certificate, or network zone. Thus, you build a security layer beyond traditional antivirus protection.
What Are Software Restriction Policies (SRP) and Their Benefits
Software Restriction Policies are a built-in Windows component (available in Pro, Enterprise, and Education editions) that allows administrators to control the execution behavior of files. This feature is crucial within a Zero Trust framework, where no application is trusted by default.
The benefits of implementing SRP include:
- Malware Execution Prevention: Blocks viruses, ransomware, spyware, or trojans not yet detected by signature-based AV.
- Computer Usage Control: Restricts specific applications or games on shared computers or for children.
- Compliance Enhancement: Ensures only approved (whitelisted) applications can run in corporate environments.
White Listing vs. Black Listing: Which is More Effective?
SRP offers two fundamental approaches:
- White Listing (Allow List): All applications are blocked by default. Only applications explicitly on the list are permitted to run.
- Black Listing (Deny List): All applications are allowed by default. Only specific applications on the list are blocked.
For the purpose of preventing ransomware and zero-day threats, the White Listing approach is far superior and recommended by cybersecurity practitioners. The reason is simple: it is easier to define what is “good” (legal applications) than to constantly chase what is “bad” (new malware variants).
Step-by-Step Guide to Configure SRP to Prevent Ransomware
Below is a basic SRP configuration using the White Listing method. Ensure you are logged in as an administrator.
Step 1: Open Local Group Policy Editor
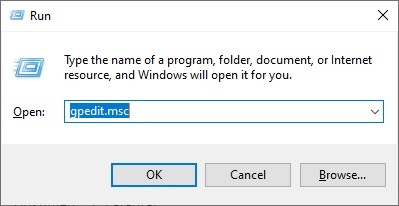
- Press the Windows + R keys to open Run.
- Type
gpedit.mscand press Enter.
Step 2: Navigate to Software Restriction Policies
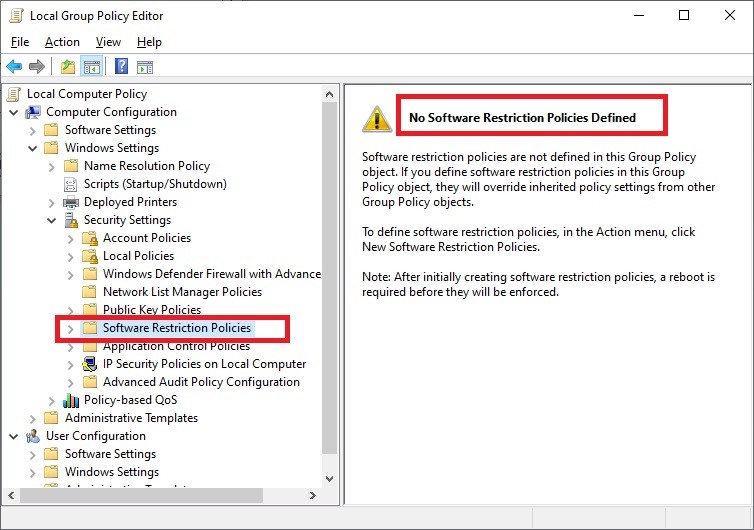
In the Editor window, navigate to: Computer Configuration > Windows Settings > Security Settings > Software Restriction Policies.
Step 3: Create New Policies
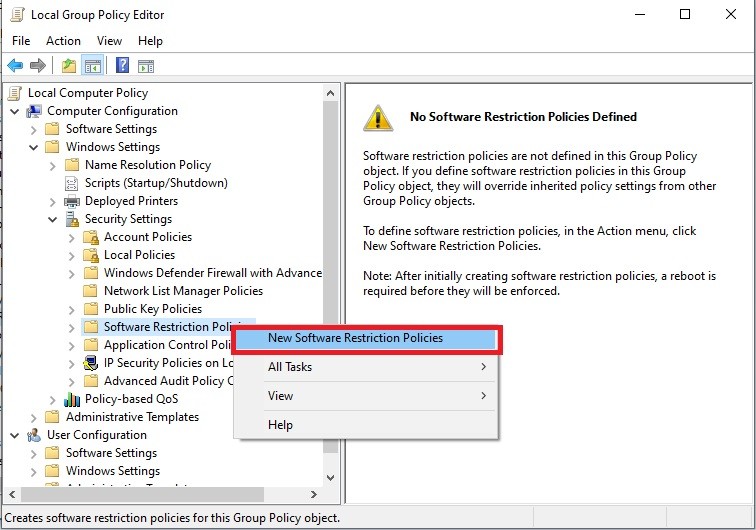
Right-click on Software Restriction Policies, then select New Software Restriction Policies. A default structure will be created.
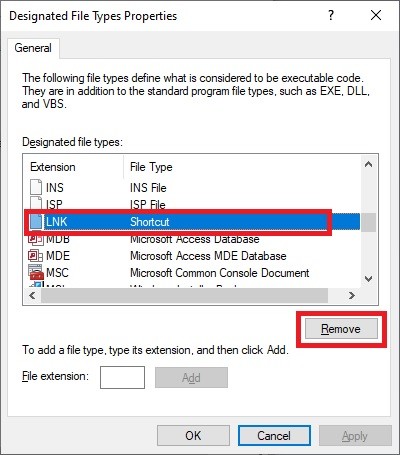
Step 4: Remove LNK Extension from Designated File Types List
This step is crucial to prevent malware from disguising itself as shortcuts. Open Designated File Types. Find the .LNK extension in the list, then click Remove. Click OK.
Step 5: Review and Add Path Rules (Whitelist)
Open the Additional Rules folder. By default, there are two “Unrestricted” path rules:
1. %HKEY_LOCAL_MACHINE\SOFTWARE\Microsoft\Windows NT\CurrentVersion\SystemRoot% (Windows Folder)
2. %ProgramFiles%
For 64-bit systems, you must add a rule for the Program Files (x86) folder:
1. Right-click in an empty area, select New Path Rule.
2. In the Path field, type or browse to: C:\Program Files (x86)
3. Ensure Security Level is set to: Unrestricted.
4. Click OK.
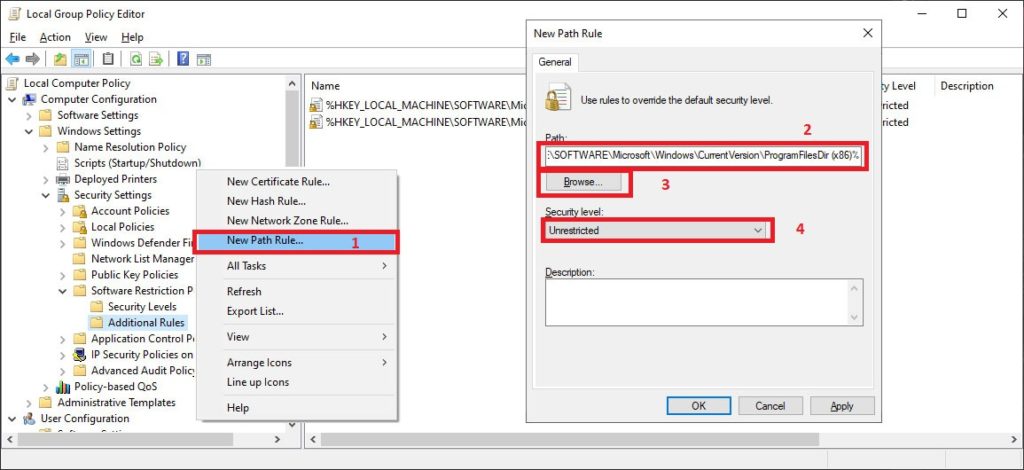
Important Note: Some applications (like Zoom, some games) install in custom locations (e.g., C:\Zoom or C:\Games). You need to create a new Path Rule for each such custom installation folder with the “Unrestricted” level.
Step 6 (Final): Change Default Security Level to “Disallowed”
This is the core of the White Listing strategy. Open the Security Levels folder. Right-click on the Disallowed level, then select Set as Default. Confirm any warning that appears.
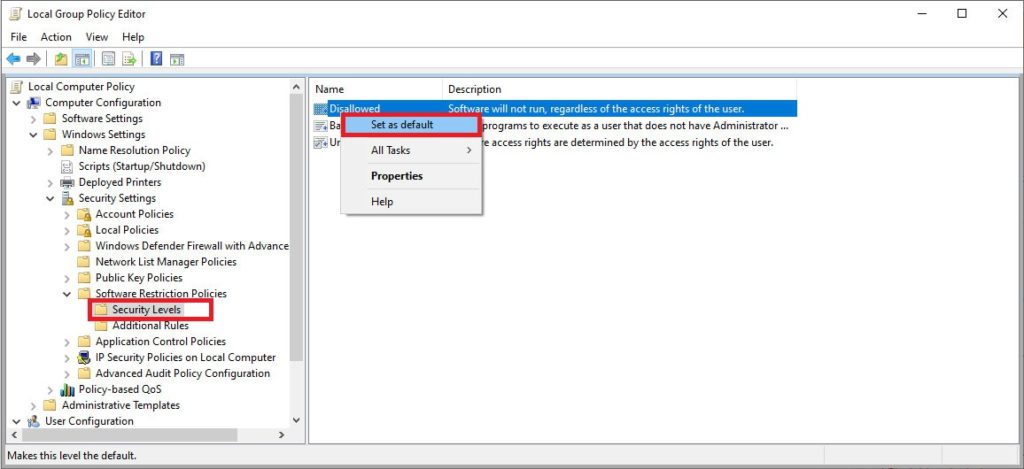
After this step, the policy takes effect. Only applications installed in locations with an “Unrestricted” rule (like Program Files) will run. Applications from other folders (like Downloads, Desktop) or external media will be blocked, effectively helping to prevent ransomware from executing.
Best Practices and Additional Considerations
Implementing Software Restriction Policies requires planning. Here are some tips:
- Test in a Lab First: Apply the policy to a test machine to ensure all critical applications run.
- Use Hash or Certificate Rules for Flexibility: Besides Path Rules, you can create rules based on file hash (suitable for portable apps) or publisher certificate (more secure).
- Monitor Event Viewer: Check logs in
Event Viewer > Applications and Services Logs > Microsoft > Windows > AppLocker(or CodeIntegrity) to see blocked applications. - SRP vs. AppLocker: For Windows 10/11 Enterprise/Education, consider AppLocker which offers more user-friendly and powerful management.
By configuring Software Restriction Policies with a whitelisting principle, you have built a significant proactive defense layer. This layer effectively locks the execution door for unknown programs, including new ransomware variants, thereby protecting your data and system integrity.