Developing Yii2 extensions without relying on lengthy Git-Composer cycles can significantly boost productivity. This article explains a practical method to develop Yii2 extension using Composer’s path repository, allowing code changes to take effect instantly without repetitive commit, push, and update processes. This approach is ideal for active development and intensive debugging phases.
Using Git and Composer is the standard practice for managing Yii2 extensions. However, this workflow becomes suboptimal during intense development phases. Every code modification requires a series of steps: commit to Git, push to remote, and then run composer update in the main project. This process slows down development iteration.
An effective solution is to develop Yii2 extension without Git as a local dependency. This method leverages Composer’s path repository feature. It works by pointing your main project to the extension’s code directory on your local machine. Consequently, any file change in the extension directory is immediately accessible to the main project. This technique eliminates delay and is perfect for rapid prototyping.
Step 1: Create Extension Structure Using Gii
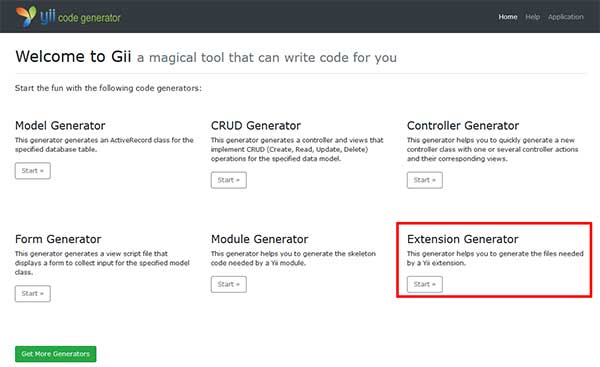
The first step is to create the extension skeleton using Gii, Yii2’s built-in code generator. Access Gii via your browser at http://localhost/your-project/index.php?r=gii. Then, select the “Extension Generator” menu.
Fill in all fields in the displayed form. Pay special attention to the “Vendor Name” (e.g., bardimin) and “Package Name” (e.g., yii2-myextension). The critical configuration is the “Output Path”. Set it to a location inside the vendor folder, for example @vendor/bardimin. This setting helps you develop Yii2 extension in an organized location.
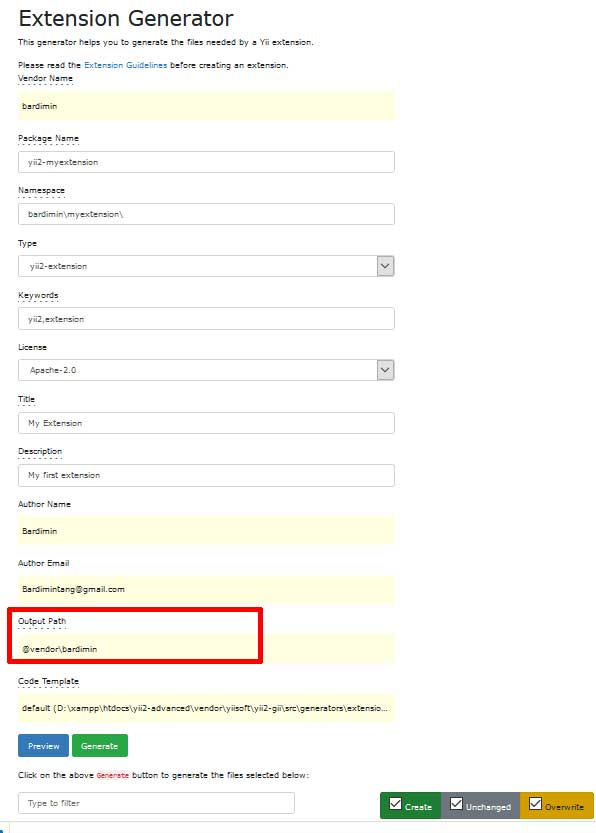
Once the form is complete, click the “Generate” button. Gii will create the basic extension structure files. Verify by opening the output directory. For example, if your package name is yii2-myextension, open the folder vendor/bardimin/yii2-myextension. There you will find main files like composer.json and an autoload class.

Step 2: Configure the Extension’s Composer.json
For Composer to install from a local path, the extension’s composer.json file needs special configuration. Open this file in your extension directory. Then, add the following two lines. This configuration tells Composer that this package is stable enough for local installation even during development.
"minimum-stability": "dev",
"prefer-stable": true
Step 3: Configure Path Repository in Main Project
Now, integrate the local extension into your main Yii2 project. Open the composer.json file located in your project’s root folder. First, declare the extension as a development requirement by adding it in the "require-dev" section.
"require-dev": {
    // Other dependencies...
    "bardimin/yii2-myextension": "@dev"
},
Next, you must define the local repository. Find or create the "repositories" section. Then, add a configuration of type "path" pointing to the extension’s directory using an absolute path.
"repositories": [
    {
        "type": "path",
        "url": "/absolute/path/to/vendor/bardimin/yii2-myextension"
    }
]
Important Note: Use the full absolute path to your extension folder. On a Windows environment, for example: "C:/xampp/htdocs/my-project/vendor/bardimin/yii2-myextension". Always use forward slashes (/) as folder separators, even on Windows. This is the key to successfully develop Yii2 extension without Git using the path repository method.
Step 4: Perform Installation and Test Results
With the configuration complete, run the following Composer command from the terminal in your project root. This command will ‘install’ from the specified local path.
composer update bardimin/yii2-myextension
If successful, the terminal will show an installation message from [path]. The extension is now installed as a symlink. The main advantage of this method is time efficiency. You can directly edit code in the extension folder and changes will be immediately visible in the main application. There is no more repetitive commit or composer update process.
In conclusion, this technique to develop Yii2 extension without Git is highly valuable for accelerating the development cycle. However, for deployment to staging or production environments, you are still advised to use proper Git version management. More in-depth technical information about path repositories can be read in the official Composer documentation.