This comprehensive guide outlines practical steps for building a RESTful API using the Yii2 Advanced Template. You will learn endpoint configuration, controller creation, and API testing methods for data exposure. This tutorial is designed for developers seeking to implement a modern and scalable REST architecture.
An Application Programming Interface (API) is a software interface that facilitates integration and data exchange between applications. A RESTful API is an API implementation that adheres to the principles of REST (Representational State Transfer) architecture. This architecture uses the standard HTTP protocol for communication, making it a performant, scalable, and easy-to-develop solution.
Building a RESTful API in Yii2 can be done efficiently. The framework provides a robust MVC foundation and built-in support for REST development. This article will guide you in creating a separate API endpoint, distinct from typical frontend and backend logic.
We will use a case study of exposing data from a user table. The basic assumption is that you have successfully installed the Yii2 Advanced Template. If not, you can refer to the official Yii Framework documentation for installation guidance.
Steps to Implement a RESTful API in Yii2
The implementation process consists of three main stages: endpoint preparation, application configuration, and testing. Let’s discuss each stage in detail.
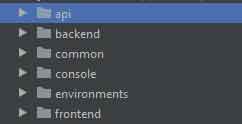
1. Creating the API Directory Structure
The first step is to create a dedicated working environment for the API. In the Yii2 Advanced Template, we will create a new application directory named api.
- Copy the entire contents of the
backenddirectory to the same location, then rename the copy toapi. - Open the
common/config/bootstrap.phpfile. Add an alias for theapidirectory by adding the following line:Yii::setAlias('@api', dirname(dirname(__DIR__)) . '/api'); - Inside the
environmentsdirectory, copy thebackendfolder within bothdevandprod. Rename each copy toapi. - Edit the
environments/index.phpfile. Add configuration paths for theapidirectory in thesetWritableandsetCookieValidationKeysections. - Use the “Find and Replace” feature in your code editor. Replace all occurrences of the string
backendwithapiin all files within the newly createdapifolder.
2. Configuring the Controller and URL Rules
Once the structure is ready, the next step is to configure the controller that will handle API requests.
- Create the API Controller. Create a new file named
UserController.phpinside theapi/controllersdirectory. Fill it with the following code:
This controller inherits from<?php namespace api\controllers; use yii\rest\ActiveController; class UserController extends ActiveController { public $modelClass = 'common\models\User'; }ActiveController, which automatically provides full RESTful endpoints (GET, POST, PUT, DELETE) for the User model. - Configure the URL Manager. Open the
api/config/main.phpfile. Add or modify therequestandurlManagercomponents within thecomponentsarray:
This configuration enables JSON input parsing and defines routing rules for the User controller.'components' => [ 'request' => [ 'parsers' => [ 'application/json' => 'yii\web\JsonParser', ] ], 'urlManager' => [ 'enablePrettyUrl' => true, 'enableStrictParsing' => true, 'showScriptName' => false, 'rules' => [ ['class' => 'yii\rest\UrlRule', 'controller' => 'user'], ], ], ], - Configure the Web Server (Optional). For Apache servers, create an
.htaccessfile inside theapi/webfolder with the following content:
This file directs all requests to Yii2’s mainRewriteEngine On RewriteCond %{REQUEST_FILENAME} !-f RewriteCond %{REQUEST_FILENAME} !-d RewriteRule . index.phpindex.phpfile.
3. Testing the API Endpoints
Once configuration is complete, you can test the created API endpoints. Here are some commonly used testing methods.
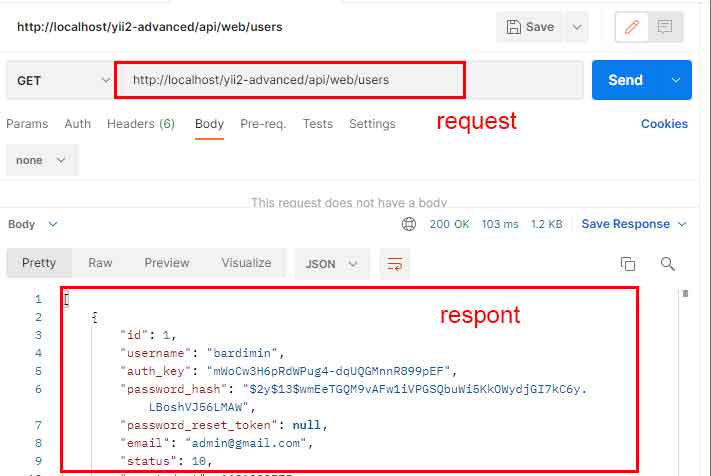
- Using Postman. Download and install Postman. Create a new request using the GET method and the URL:
http://localhost/[your-project-name]/api/web/users. If successful, you will receive a JSON response containing user data. - Using cURL. Run the following command in a terminal or command prompt:
curl -H "Accept: application/json" "http://localhost/[your-project-name]/api/web/users" - Access via Browser. Open the endpoint URL in a browser. However, this method is usually only suitable for simple GET request testing.
By completing all the steps above, you have successfully built a basic RESTful API in Yii2. For further development, consider adding authentication mechanisms (like JWT), authorization, rate limiting, and good API documentation. Always consult the official Yii2 documentation to ensure your implementation follows current best practices.