Windows Performance Recorder is a useful tool for troubleshooting computer problems. It’s easy to install, run, and work with Windows.
Windows Performance Recorder (WPR) and Windows Performance Analyzer are two separate utilities that make up the Windows Performance Toolkit (WPA).
A performance recording tool based on Event Tracing for Windows (ETW) is called Windows Performance Recorder (WPR). It logs system and application events, which can then be used by Windows Performance Analyzer (WPA) to inspect.
Windows Performance Analyzer (WPA) is a program that generates graphs and tables of data using Event Tracking for Windows (ETW) events that have been recorded by Windows Performance Recorder (WPR), Xperf, or assessments that have been run on the Assessment Platform. Any event trace log (ETL) file can be opened by WPA for analysis.
To view specific performance issues and get an overview of resource usage, use WPR in conjunction with WPA. Development and IT workers can proactively identify and address performance issues thanks to WPR and WPA.
Install Windows Performance Recorder
Along with other performance tools such as Windows Performance Analyzer and Xperf, Windows Performance Recorder (WPR) is a component of the Windows Assessment and Deployment Kit (Windows ADK).
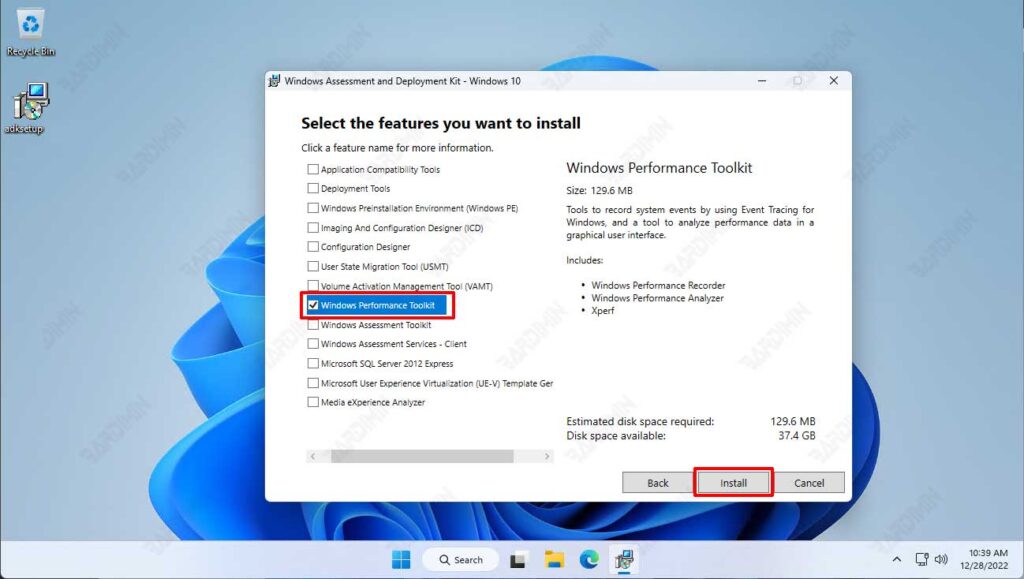
Download WPR on Windows Assessment and Deployment Kit (Windows ADK)

- Run ADKSetup.exe the result of the download.
- Select where the Windows ADK should be installed by clicking Install, and then clicking Next.
- Click Install after selecting the Windows Performance Toolkit (ADK) features you want to install. Other than the Windows Performance Toolkit, nothing else needs to be installed. The entire ADK does not have to be installed (or SDK).
Start Windows Performance Recorder Recording
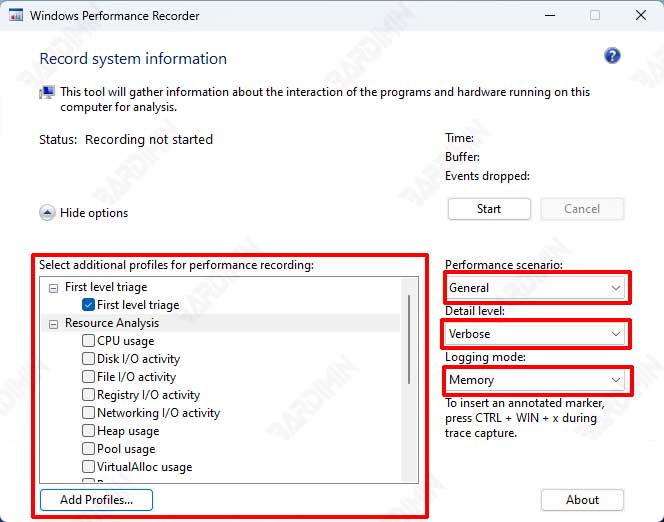
- Open Windows Performance Recorder.
- Select at least one profile from the list in the Select a profile box. The addition of a unique profile is optional. To do so, click “Add Profiles”, select the desired profile, and then click Open.

- Select the desired scenario from the “Performance scenario” drop-down list. Select “General” except recording for on/off scenarios such as sleep, shutdown, reboot, etc.
- Select the detail level of the report, you can choose “Verbose” (default) and “Light”.
- Select File from the Logging mode drop-down menu to save the recording to a file. Except for the on/off transition log, which must be written to a file, memory is the default logging mode.
- To start or stop recording, select Start or Cancel.
Turn off Windows Performance Recorder recordings
- Klik Save on the WPR screen. (No recording data is saved if you click Cancel.)
- Select the location where you want to save the recording file by browsing there.
- Provide a summary of the issue the record wants to address.
- Click OK after clicking Save.
View Windows Performance Recorder Recording Status
The recording status appears on the WPR screen as soon as you start the recording using the WPR user interface (UI).
WPR can only provide the status of a record if WPR starts its recording first. It cannot display the status of records that have been started by Xperf or other programs.
The following details are displayed in the recording state:
- Recording Time: The recording has been played all along.
- Buffer: The size of the buffer used to record is this. It is displayed in MB and as a proportion of the available combined memory.
- Events dropped: how many events have been lost since the recording first started?


