Have you ever encountered the folder access denied issue in Windows 11? This problem can be very annoying, especially if you want to access important files or folders stored on your computer.
The “Access Denied” error is one of the common errors that often occur in Windows 11. This error usually appears when you try to access a file or folder that doesn’t have the required permissions.
This issue is usually caused by incorrect permission settings on the NTFS file system that is used by Windows by default. NTFS stands for New Technology File System, which is an advanced file system that supports security, encryption, compression, and other features.
If you are having the folder access denied issue in Windows 11, don’t worry. There are several ways you can try to fix this. In this article, we will explain some of the best ways to solve this problem easily and quickly. We will also provide some tips to prevent this problem from happening again in the future. Let’s get started!
1] Take Ownership of the Folder
One of the most common ways to resolve the issue of folder access denied is to take ownership of the problematic folder. Folder ownership determines who can access, change, or delete the folder. If you don’t have ownership of the folder, you won’t be able to do anything with it.
To take ownership of a folder, follow these steps:
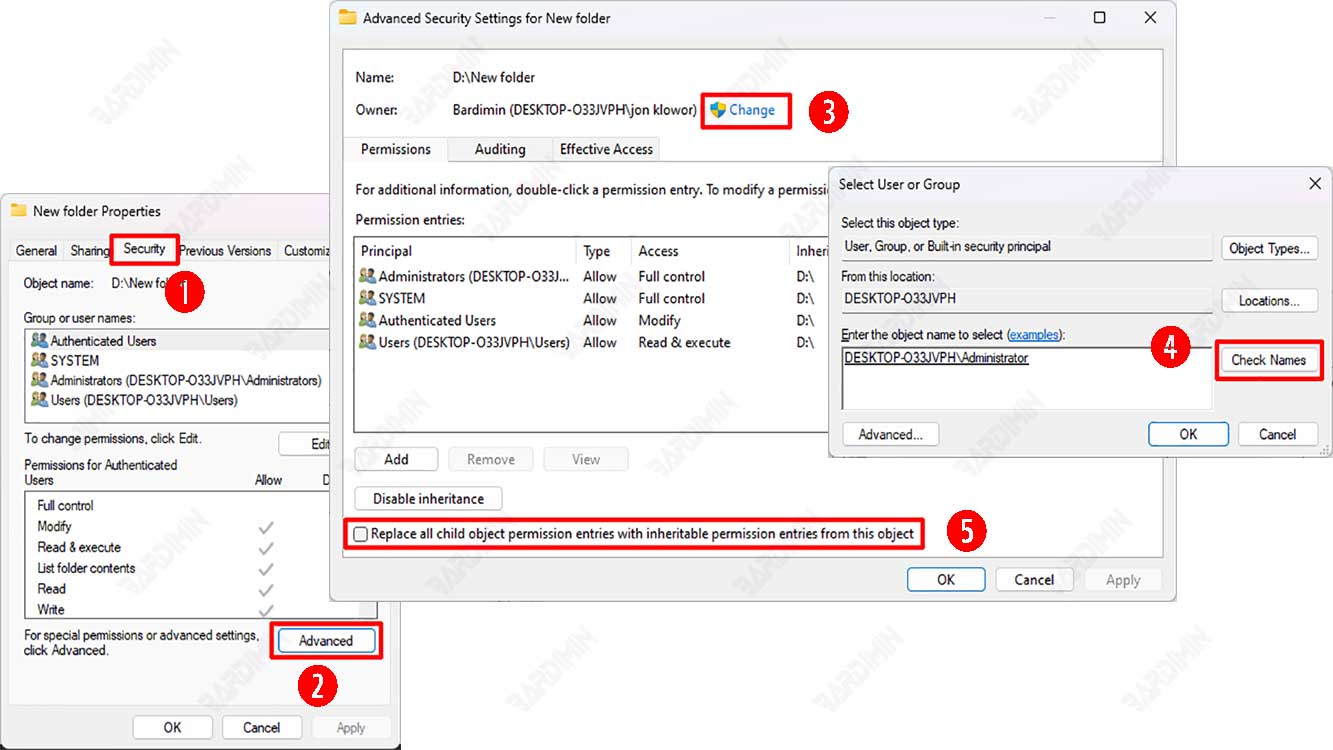
- Right-click on the folder you want to transfer ownership to, and then click “Properties” from the context menu.
- Under the “Security” tab, click the “Advanced” button to see additional options.
- At the top of the window, you’ll see an “Owner” column that shows the current owner of the folder. If the column shows the message “Unable to display current owner”, it means there is a problem with the permissions of the folder.
- To change the owner of the folder, click the “Change” link next to the “Owner” column. Make sure that you have permission as an administrator to do this.
- In the “Select User or Group” dialog box, you must enter the name of the user account or group that will be the new owner of the folder. You can choose a standard group such as “Administrators” if you want all computer admins to have access to the folder, or “Users” if you want everyone to have access to the folder. For personal use, it is better if only one person has ownership of the folder.
- If you want to take ownership of the folder with your account, type your username in the “Enter the object name to select” box. If you use a Microsoft account to sign in to Windows, your username is the first five letters of your email address. Press the “Check Names” button when you’re done to make sure the name you entered is correct. The name will automatically change to [PC Name] [User Name].
- After selecting the new owner, click the “OK” button.
- Back in the main “Advanced Security Settings” window, check the box “Replace owner on sub containers and objects” if you want to apply these changes to all files and folders inside the folder you are changing.
- Click the “Apply” button, then click the “OK” button twice to close the properties window.
After performing the steps above, you should be able to access the previously denied folder without any problems.
2] Change Folder Permissions
If taking over ownership of a folder isn’t enough to resolve the issue of folder access being denied, you might need to change the folder’s permissions. Folder permissions define what specific users or groups can do with the folder, such as read, write, or execute. If a folder’s permissions don’t suit your needs, you might not be able to access or modify the folder.
To change folder permissions, follow these steps:
- Right-click on the folder you want to change permissions for, and then click “Properties” from the context menu.
- Under the “Security” tab, click the “Edit” button to change folder permissions.
- In the “Permissions for [folder name]” window, you’ll see a list of users or groups who have access to the folder. Select the name of the user or group you want to change permissions for, then check or uncheck the box under the “Allow” or “Deny” column to your liking.
- If you want to add a new user or group that has access to the folder, click the “Add” button. In the “Select Users or Groups” dialog box, type the name of the user or group you want to add, then press the “Check Names” button to verify it. After that, click the “OK” button. Then, set the permissions as in the previous step.
- If you want to remove a user or group that doesn’t need access to the folder, select the name of the user or group, then click the “Remove” button.
- When finished setting folder permissions, click the “Apply” button, then click the “OK” button twice to close the properties window.
By changing the folder permissions according to your need, you can solve the folder access denied issue easily.
3] Disable User Account Control
User Account Control (UAC) is a Windows security feature that aims to prevent unauthorized changes to the system by unauthorized programs or users. UAC works by displaying a confirmation dialog whenever there is a request to make important changes to the system, such as installing new software, changing system settings, or changing file permissions. Thus, UAC can help protect your computer from malware or hacker attacks.
However, UAC can also be the source of folder access denied issues in Windows 11. This is because UAC may prevent you from accessing certain files or folders if you do not have sufficient administrative rights. If you are sure that the file or folder that you want to access is safe and harmless, you can try disabling UAC temporarily to resolve this issue.
To disable UAC in Windows 11, follow these steps:
- In the Windows search bar, type “uac” and select the “Change User Account Control settings” option.
- In the “User Account Control Settings” window, slide the slider down until you reach the “Never notify” level. This means that UAC will not display any confirmation dialog when there is a request to make changes to the system.
- Click the OK button, then enter your administrator password if prompted.
- Restart your computer for the changes to take effect.
After disabling UAC, try accessing files or folders that were previously denied. If it works, it means that UAC is the cause of the problem. However, remember that disabling UAC may increase your computer’s security risks. Therefore, we recommend re-enabling UAC after you finish accessing the problematic file or folder.
4] Running SFC Scanner
SFC (System File Checker) scanner is a built-in Windows tool that can scan and repair corrupted or lost system files. System files are important files required by Windows to function properly. If any system files are corrupted or missing, Windows can run into various issues, including the folder access denied issue in Windows 11. Therefore, running an SFC scanner can help you solve this problem.
To run the SFC scanner on Windows 11, follow these steps:
- Open the “Start” menu, type “cmd”, then right-click on “Command Prompt” and select “Run as administrator”. This will open a command window with elevated permissions.
- In the command window, type the following command and press “Enter” :
sfc /scannow
- Wait for the scanning process to complete. This may take a few minutes, depending on the size and condition of your system files.
- If the SFC scanner finds and repairs corrupted or missing system files, you will see the message “Windows Resource Protection found corrupt files and successfully repaired them” at the end of the process. Otherwise, you’ll see the message “Windows Resource Protection did not find any integrity violations”.
- Close the command window and restart your computer.
After running the SFC scanner, try to access the file or folder that was previously denied. If it works, it means that corrupted or missing system files are the cause of the problem.
5] Using System Restore
System Restore is a built-in feature of Windows that can restore your system state to a specific point in time in the past. System Restore can help you resolve folder access denied issues if the issue is caused by unwanted changes to the system, such as installation of problematic programs, deletion of important files, or virus infection. Using System Restore, you can undo those changes and return your system to its normal state.
To use System Restore in Windows 11, follow these steps:
- Open the “Start” menu, type “recovery”, then select the “Recovery options” option.
- In the “Recovery” window, click the “Open System Restore” button.
- In the “System Restore” window, click the “Next” button to continue.
- In the next window, you’ll see a list of available restore points to choose from. Select a restore point that corresponds to the date before you experienced the folder access denied issue. If you’re not sure when this issue started occurring, select the most recent available restore point. If you don’t see the restore points you want, check the “Show more restore points” box to see more options.
- After selecting the restore point, click the “Next” button to continue.
- In the confirmation window, double-check the details of your selected restore point, then click the “Finish” button to start the restore process.
- Your computer will restart automatically and start restoring your system to its previous state. This may take a few minutes, depending on the size and number of files involved.
- After the restore process is complete, your computer will return to the desktop with the message “System Restore completed successfully”. Try accessing a file or folder that was previously denied and see if the problem is resolved.
Using System Restore, you can restore your system to its normal condition without losing your data.
Tips to Prevent Folder Access Denied Issues
After successfully addressing the folder access denied issue in Windows 11, there are a few things you can do to prevent this issue from happening again in the future. Here are some tips you can try:
- Always log on to Windows with an administrator account. An administrator account has the highest permissions to manage files and folders on your computer. By using an administrator account, you can avoid permission or ownership issues that can cause folder access denied issues.
- Always back up your important files and folders. A backup is a copy of files and folders stored in a different location than the original. By creating a backup, you can restore your files and folders in case of folder access denied issues or other corruption. You can use built-in Windows features like “File History” or “Backup and Restore” to automatically back up your files and folders. You can also use external storage media such as flash drives, external hard disks, or cloud services to store your backups.
By following the tips above, you can prevent the folder access denied issue in Windows 11 and keep your files and folders safe and secure.
Other Interesting Articles
Conclusion
The folder access denied issue is one of the common problems that Windows 11 users can experience. This problem can be very annoying, especially if you want to access important files or folders stored on your computer. Don’t worry, though. There are several ways that you can try to fix it easily and quickly.
By following the steps and tips we provide, we hope you can solve the folder access denied issue in Windows 11 successfully and without difficulty. If you have any other questions, suggestions, or feedback about this article, please leave a comment below. Thanks for reading!